Anti DDoS Attack Protection
LiteSpeed Web Server provides several features aimed at reducing and even eliminating the impact of HTTP-level Denial of Service (DoS) and Distributed Denial of Service (DDoS) attacks. You can either use LSWS built-in features or third party ModSecurity rules such as Owasp, Atomicorp, Comodo and CloudLinux Imunify360. The following LSWS built-in configuration settings will help mitigate such attacks.
Layer 7 Attacks: Enable reCAPTCHA
One of the most effective methods to mitigate DoS and DDoS attacks is to enable the reCAPTCHA feature. reCAPTCHA is a free service from Google that helps protect websites from spam and abuse. A "CAPTCHA" is a turing test to tell human and bots apart. It is easy for humans to solve, but hard for bots and other malicious software to figure out. The reCAPTCHA feature is supported as of LSWS 5.4 and later. Please see these instructions to enable reCAPTCHA.
Enable LiteSpeed Cache
Enabling LiteSpeed Cache will increase the server's capacity to handle heavy traffic.
LiteSpeed Cache is designed to improve site load speed and handle increasingly high traffic. LiteSpeed Cache cannot block any DDos attack, however, it can help the server to handle hundreds or thousands of times more requests/second. This definitely helps lessen the impact of DDoS attacks. See these instructions to learn how to enable LSCache. For a cPanel server, you can use LiteSpeed Cache manager to mass enable LSCache in one click.
Layer 4 Attacks: Use Per-Client Throttling
LiteSpeed Web Server includes a built-in Per-Client Throttling feature which allows you to block bad IPs.
Navigate to Configuration > Server > Security configurations > Per Client Throttling to find several configuration settings that you can use to limit the request, bandwidth, and connection rate per remote IP address.
Request Throttling
Separate controls are available for throttling requests for static files and dynamic content.
Bandwidth Throttling
The server allows setting separate bandwidth limits for inbound and outbound traffic.
- Bandwidth numbers will be rounded up in 4KB increments.
- Set to
0to disable throttling. - The Outbound Bandwidth limit allows serving more unique clients and prevents limited network bandwidth from getting used up by a small number of clients with fast network connections.
Connection Throttling
These settings control concurrent connections coming from one client (IP address) and guard against DoS attacks.
- Connection Hard Limit controls how many concurrent connections are allowed from one IP address. If an IP reaches the hard connection limit, the web server will immediately close newly accepted connections from that IP address, and move on to pending connections from different IP addresses. As almost all web browsers support keep-alive/persistent connections (multiple requests pipelined through one connection), the number of connections required in normal browsing is very small. Typically, one connection is enough, but some web browsers try to establish additional connections to speed up downloading. Allowing 4 to 10 connections from one IP is recommended. Less than that will probably affect normal web services.
- Use Connection Soft Limit, Grace Period, and Banned Period to spot and mitigate abusers: An IP address that stays over the soft limit for the length of the grace period will be banned for the length of time set in Banned Period. This is a good way to identify IPs that should be added to the Denied List.
Note
The number of connections can temporarily exceed the soft limit during the grace period, as long as it is under the hard limit. After the grace period, if it is still above the soft limit, then no more connections will be allowed from that IP for duration of the banned period.
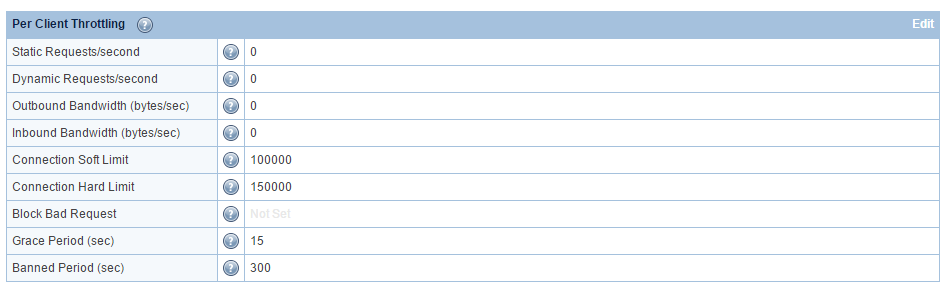
Example
Default Settings:
Updated Settings: 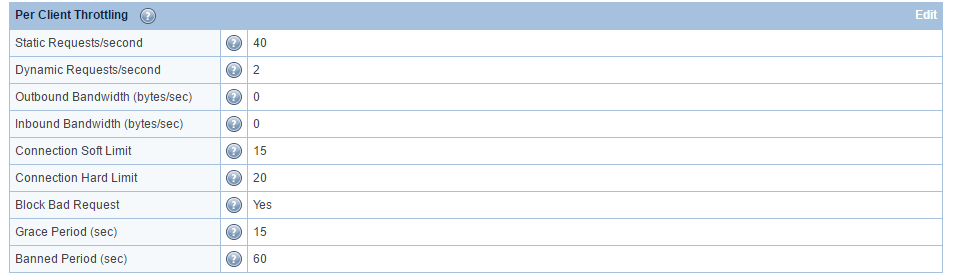
- Static Requests/second =
40 - Dynamic Requests/second =
2 - Outbound Bandwidth (bytes/sec) =
0 - Inbound Bandwidth (bytes/sec) =
0 - Connection Soft Limit =
15 - Connection Hard Limit =
20 - Block Bad Request =
Yes - Grace Period (sec) =
15 - Banned Period (sec) =
60
Explanation: An IP that has established more than 20 connections with the web server, or has established over 15 connections of over 15 seconds (the grace period), is treated as a DoS-attacker. The server will ban the IP for 60 seconds and record a log entry in the error log file. To exclude any IP from the client throttle limits (and bypass DDoS detection), add the IP with a trailing T (aka trusted) in Allowed List (WebAdmin Console > Server > Security > Access Control).
The hard limit can be adjusted based on an attacker's strategy. If the botnet is not very aggressive, you will need to lower the limit to just below their max connection per IP, to make sure it won't affect a regular user. If they only make very few connections per IP, do not use the hard limit to detect them.
The blocked IPs can be found in the real-time-stats report.
If you use CDN services with real visitor IP enabled, the IP which is forwarded from the CDN may get blocked if the soft or hard limit is too low. One way to disable such blocking or per-client throttling is to set the connection limits to very large numbers, such as 100000 and 150000, respectively.
Another option, available in LSWS v6.1 and above, is the DisableForwardedIpBan Apache-style directive. Use this directive in the server-level Apache configuration, and make sure it is enclosed within <IfModule LiteSpeed> tags, like so:
 <IfModule LiteSpeed>
    DisableForwardedIpBan <on|off>
</IfModule>
Note
DisableForwardedIpBan cannot be set at the virtual-host level, only at the server level.
Virtual Host-Level Bandwidth Throttling
LiteSpeed Web Server version 5.0+ introduces virtual host-level bandwidth throttling. This can be thought of as an extension of LSWS's Per Client Throttling settings explained above, which allow you to control the amount of stress a single IP can put on your server. Virtual host-level bandwidth throttling allows you to customize bandwidth throttling, in Apache configs, for particular virtual hosts through MaxConnPerClient <limit_for_connections>,LargeFileLimit [Type] [Minimum Size in kilobytes] [Speed in bytes/s], BandWidth [Origin] [Speed in bytes/s] and MinBandWidth all -1. . Please see VHost-Level Bandwidth Throttling for details.
Increase Max Connection Settings
Increasing the Max Connection Settings will increase capacity and allow you to mitigate attack without limiting yourself.
Default:  Change to:
You should adjust Max Connections and Max SSL Connections to 20K and 10K, respectively, or even higher as long as the server has enough free memory. The purpose of the change is to increase the capacity, not to limit yourself under DoS attack.
The number of connections on port 80 doesn't matter. As long as the service is up, you've won!
Manually Block Known Bad IPs
If you know an attacker's IP, you can block it. Under **Configuration
Server > Security**. Block IPs that abuse your web server by listing them in the Denied List in the Access Control table.
Manually Block Target URLs
If your server is flooded by hundreds of requests from different IPs but to the same URL, you can set up rules to block access to that URL.
For example, in a control panel environment, to block all access to /foo/, in the /foo/.htaccess of the targeted domain virtual host, place the following:
RewriteEngine On
RewriteRule .* - [L,F]
In LSWS native mode, you can either use rewrite rules as indicated above, or native context configuration like so:
- Create a context (Configuration > Virtual Hosts > View/Edit > Context > Add > Type =
Static) to block access to that URL. - Set Accessible to
Noand the context URI to match or include the URL being attacked.
If the server is pounded with requests for /foo/bar.html, then adding a context with Accessible set to No and the URI set to /foo/bar.html will block all of those requests. You can also set the context URI to /foo/ to block requests to all URLs that start with /foo/.
Use ModSecurity Rules
LSWS is campatible with the most common ModSecurity Rules, such as Owasp, Atomicorp, Comodo and CloudLinux Imunify360 etc. You can enable one of them on LSWS.
Never Set Use Client IP in Header to Yes
To restore real visitor IPs, navigate to LiteSpeed WebAdmin Console > Configuration > General Settings and set Use Client IP in Header to Trusted IP Only, and add your CDN such as CloudFlare IPs/subnets to the trusted list. Never set Use Client IP in Header to Yes, since clients can spoof IPs with the X-Forwarded-For header that is sent to CloudFlare.
Troubleshooting
Check concurrent connections
To check the number of concurrent TCP connections, run the following command:
netstat -an | grep 80 | grep ESTA | wc
To check concurrent connections sorted by IP, run the following:
netstat -ntu | grep ESTABLISHED | awk '{print $5}' | cut -d: -f1 | sort | uniq -c | sort -nr
Please keep in mind that netstat -ntu will list TCP in TIME_WAIT state, which will inflate the number. For the correct concurrent TCP connections counting method, you should only count TCPs in ESTABLISHED state. Hence grep ESTA or grep ESTABLISHED will be required.
Analysis of IPs from Attacker
Bad IP's can make quick connections, and you end up with many time_waits which you won't see when just looking at established.
If you don't necessarily count concurrent connections, and just want to analyze which IPs might be attackers, you can include time_waits connections. Run the command without grep ESTABLISHED, which gives you the ability to see what IP's just connected and dropped and may need to be blocked:
netstat -ntu | awk '{print $5}' | cut -d: -f1 | sort | uniq -c | sort -n | awk '$1 >= 5 {print $0}'
An attacker could make a connection, send requests to an expensive URL, wait a little while, and then close the connection. If the server does not abort the process, the backend will be used up soon, as it will keep serving requests that have been abandoned. The above command will be useful during such a situation.
Check the Banned IP and Reason
If an IP has been banned, but you don't know why, you can check it with SSH. Here is an example of a connection that was banned because it reached the hard limit.
!!! note: Your logging level must be set at least to NOTICE in order to see the reason an IP is banned.
Banned IP
grep BLOCKED_IP /tmp/lshttpd/.rtreport*

BLOCKED_IP: 192.0.2.0,
Banned Reason
Whenever the server adds an IP to the block list, it will write a log to error log:
[<IP.addr>] bot detected for vhost [Example], reason: xxxxx, close connection!
For example:
tail -f /etc/apache2/logs/error_log

 [NOTICE] [192.0.2.0 reached per client hard connection limit: 1, close connection!
 [NOTICE] [192.0.2.0] bot detected for vhost [N/A], reason: OverConnHardLimit, close connection!
or
[NOTICE] [192.0.2.0] bot detected for vhost [N/A], reason: OverConnSoftLimit, close connection
or
2018-12-05 12:18:05.440745 [NOTICE] [192.0.2.0] bot detected for vhost [APVH_example.com:443], reason: DetectByWAF, close connection!
You should be able to find out why it is added and take action accordingly.
SSL Negotiation Based Attack
This feature is to protect against SSL handshake attack, which can overload a server with excessive SSL handshakes. If you want to allow more handshakes from a particular IP, you can add that IP to the trusted list.
[SSL] too many new SSL connections: 173, possible SSL negotiation based attack, block!
The above error message shows when an IP makes too many direct connections for the SSL port, unless the IP is in the trusted list.Trusted IPs won't be blocked, nor will this message appear.
A real browser normally won't make too many SSL connections, especially if the client supports HTTP/2 or HTTP/3. Usually, each CPU core (xeon) can do about 500 SSL handshakes when it reaches 100% cpu. If one IP is trying to make too many SSL connections all at once, it will trigger the server to block that IP to protect the server from overloading.
Example
A google Chrome addon that communicates with the website API without their HTTP client closing the connections may trigger SSL Negotiation protection and be blocked.
ModSecurity
If the IP was banned but a record was not found in error_log, it's possible that the IP was dropped by mod_security.
grep "192.0.2.0" /usr/local/apache/logs/modsec_audit.log
Trusted IPs
If the IP address involved is in the LSWS trusted list, it shows:
2018-12-05 12:18:05.440754 [NOTICE] [192.0.2.0] trusted, ignore!
Whenever a mod_security with "drop" action is triggered, LiteSpeed will add the IP to the blacklist. If the IP is in the trusted list, it will be ignored. As with too many blocks, please review the mod_security rule and audit_log, as LSWS will follow the rules there.
If ModSecurity blocks a request and LSWS sees the IP as trusted, the request is still served with 403 response, but that IP won't be blacklisted. If an IP is blacklisted, LSWS will stop serving future requests from that IP.
Trusted IP can be either set at the server level or virtual host level through .htaccess.
Server Level in WebAdmin Console
In the LSWS WebAdmin Console, navigate to Server > Security > Access Control. Add the trusted IP address to Allowed List, and append a trailing T, as in 192.0.2.0T.
Server Level with config file
Trusted IPs (as well as IPs you want to deny) can be set up through the /usr/local/lsws/conf/trusted-ip-list file. If the file exists, LSWS will load it automatically.
Add one IP/subnet on each line.
- To mark it as "trusted" you can append a trailing
T, or append nothing - To mark it as "denied" you must append a trailing
N
Any text that appears after a # will be treated as a comment. You can use the trusted-ip-list file by itself, or together with the WebAdmin Allowed List and Denied List settings.
Example
192.0.2.0    #Trusted
192.0.2.1T   #Trusted
192.0.2.2N   #Denied
A graceful restart is required for changes to this file to take effect.
Virtual Host Level with .htaccess
You may use the following in the Virtual Host document root .htaccess to unblock a blocked IP and make that IP trusted for that vhost.
<IfModule LiteSpeed>
    Trusted 192.0.2.0, 192.0.2.1
</IfModule>
This is not the same as setting a trusted IP at the server-level. It has no effect on bandwidth. The main effect of adding an IP to .htaccess is to take that IP off of the blacklist and to disable WordPress Protect and reCAPTCHA when accessing that specific virtual host.
Drop or Deny
What if ModSecurity does a drop (TCP FIN) rather than deny for a trusted IP? The trusted list only has an effect on the "drop" action, but not on the "deny" action. A trusted IP won't be added to the blacklist, but trust status has no effect on other actions.
Mitigating SYN Floods
Defending against SYN floods and other TCP-level attacks is a matter of hardening your kernel. It is not something LiteSpeed Web Server or any other HTTP server can deal with. (For an explanation of how SYN floods work and why they are not related to your HTTP server, please see this blog article. This document will assume you understand SYN floods and the TCP handshake.) That being said, here are some simple steps for hardening your Linux kernel:
Turn on Syncookies
In /etc/sysctl.conf add
net.ipv4.tcp_syncookies = 1
Syncookies allows your system to serve more TCP connection requests. Instead of logging each TCP connection request and waiting for a response, the system will instead send a cookie with its SYN-ACK response and delete the original SYN message. Any ACK response the system receives from the client will then contain information about this cookie, allowing the server to recreate the original entry. 1 enables this feature, 0 disables it. This setting is off by default.
Set Your Backlog Limit
In /etc/sysctl.conf add
net.ipv4.tcp_max_syn_backlog = 2048
This setting tells the system when to start using syncookies. When you have more than 2,048 (or whatever number you set it to) TCP connection requests in your queue, the system will start using syncookies. Keep this number pretty high to prevent from using syncookies with normal traffic.(Syncookies can be taxing for the CPU.)
Lower the Number of SYN-ACK Retries
In /etc/sysctl.conf add
net.ipv4.tcp_synack_retries = 3
This setting tells your system how many times to retry sending the SYN-ACK reply before giving up. The default is 5. Lowering it to 3 essentially lowers the turnaround time on a TCP connection request to about 45 seconds. (It takes about 15 seconds per attempt.)
Apply These Changes Now
The changes above will not take effect until you reboot. To apply them now, use
echo 1 > /proc/sys/net/ipv4/tcp_syncookies
echo 2048 > /proc/sys/net/ipv4/tcp_max_syn_backlog
echo 3 > /proc/sys/net/ipv4/tcp_synack_retries
Doing only the above echo commands without altering /etc/sysctl.conf will mean that the changes will be lost next time you reboot.
Fix a Full Linux Conntrack Table Issue
A website that was fine under normal traffic may become much slower when traffic spikes. A typical example of this would be a download server, where there is a large number of concurrent connections. Under these conditions, response time may feel much slower. One potential cause for this sluggishness is a full Linux conntrack table.
Verify
#dmesg | tail
nf_conntrack: table full, dropping packet.
nf_conntrack: table full, dropping packet.
nf_conntrack: table full, dropping packet.
If you see the above messages, then the issue of a full conntrack table is confirmed.
#sysctl -a | grep conntrack
...
net.netfilter.nf_conntrack_max = 65536
net.netfilter.nf_conntrack_count = 68999
net.netfilter.nf_conntrack_buckets = 16384
...

#cat /sys/module/nf_conntrack/parameters/hashsize
16384
if nf_conntrack_count is close to nf_conntrack_max or even larger, this problem will occur.
Solve the Issue
#sysctl -w net.netfilter.nf_conntrack_max=655360
net.netfilter.nf_conntrack_max = 655360
#echo 163840 > /sys/module/nf_conntrack/parameters/hashsize
Make it Permanent
Edit /etc/sysctl.conf, and add following line:
net.netfilter.nf_conntrack_max=655360
Edit /etc/rc.local, and add following line:
echo 163840 > /sys/module/nf_conntrack/parameters/hashsize
Unblocking a blocked IP
LiteSpeed Web Server automatically removes most IP blocks (from Per-Client Throttling, WordPress Protect, ModSecurity drop actions, etc.) once the configured Banned Period expires (default: 300 seconds).
Current blocked IPs are visible in real-time stats:
grep "BLOCKED_IP" /tmp/lshttpd/.rtreport*
If an IP remains blocked beyond the ban period (still visible in .rtreport or continuing to trigger 403 errors), it is usually because the IP has kept sending requests after the initial block. This persistent traffic can repeatedly reset or extend the ban duration.
Use one of the following methods to unblock the IP:
- Mark the IP as Trusted from the server level or virtual host level through
.htaccess - Clear persistent blocks in shared memory (advanced)
Warning
Restarting LSWS no longer automatically clears shared memory (for performance reasons). A simple restart will not remove persistent blocks.
To manually clear the client statistics:
rm /dev/shm/lsws/stats_clients.shm
systemctl restart lsws
After clearing the file, the blocked IP entry should be removed.