WordPress Cache Management
WHM Plugin - LiteSpeed Cache For WordPress Management
This page covers the various cache management options available through our WHM plugin's GUI interface. Most of these options are also available through the command line as the root user using our lscmctl CLI script.
The LiteSpeed WHM plugin contains a section for managing LiteSpeed Cache for WordPress. This guide will lead you through the different operations and management actions you can take when using our plugin.
If you do not see the LiteSpeed Cache For WordPress Management section on your LiteSpeed WHM plugin screen, please upgrade LiteSpeed Web Server to v5.1.x at the minimum.
You must have a license with LSCache enabled to use these features. See How To Get LSCache.
Cache Root Setup
Equivalent CLI commands: setcacheroot
Example: ./lscmctl setcacheroot (See all CLI commands)
Click WHM Plugin > LiteSpeed Configuration > Cache Root Setup 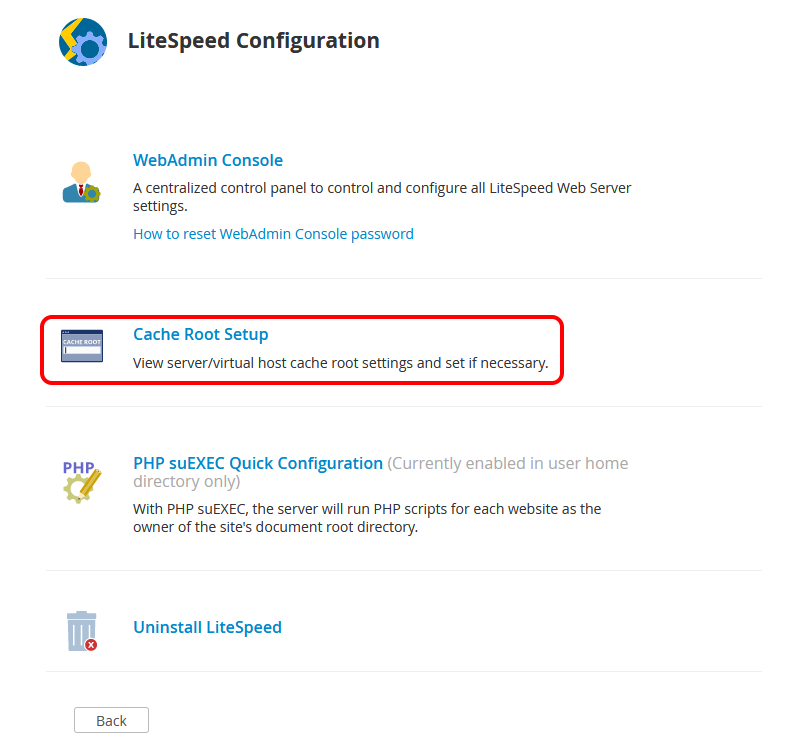
This screen searches for Server level cache root definitions in either the /usr/local/apache/conf/includes/pre_main_global.conf file or in the LiteSpeed Web Server Web Admin under Server > Cache > Cache Storage Settings > Storage Path setting. 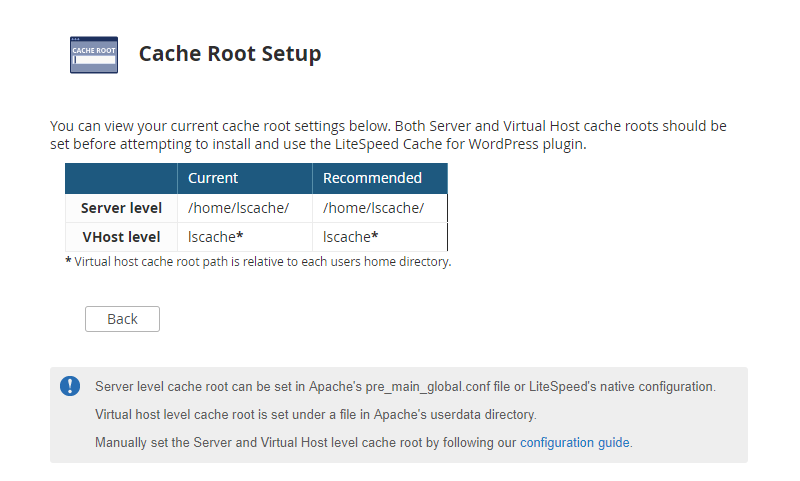
If it is defined in pre_main_global.conf it should look something like this:
<IfModule LiteSpeed>
CacheRoot /home/lscache/
</IfModule>
Where /home/lscache/ is the CacheRoot path. In this case, the Server level cache root will be set to /home/lscache/
This screen searches for VHost level cache root definitions in the /usr/local/apache/conf/userdata/lscache_vhosts.conf file.
If it is defined in lscache_vhosts.conf it should look something like this:
<IfModule LiteSpeed>
CacheRoot lscache
</IfModule>
Where lscache is the CacheRoot path. In this case, the VHost level cache root will be set to /home/<user_folder>/lscache
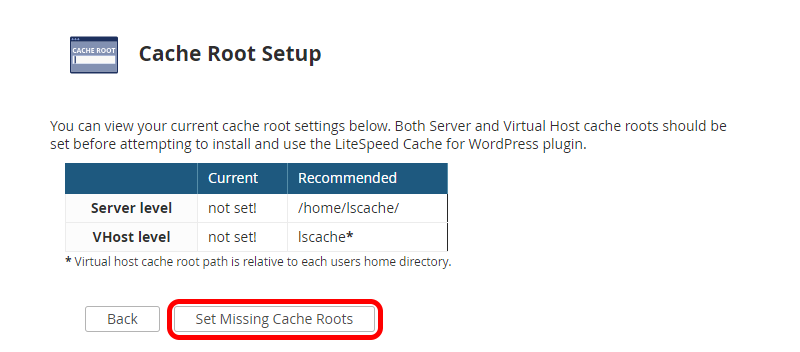
The Set Missing Cache Roots button sets Server level and VHost level Cache Root definitions if they are detected as not set.
Note
The Set Missing Cache Roots button will only appear if at least one of the two cache roots (Sever level or VHost level) is detected as not set.
Getting Started
From the initial plugin screen you should be presented with 5 different options under the LiteSpeed Cache For WordPress Management section.
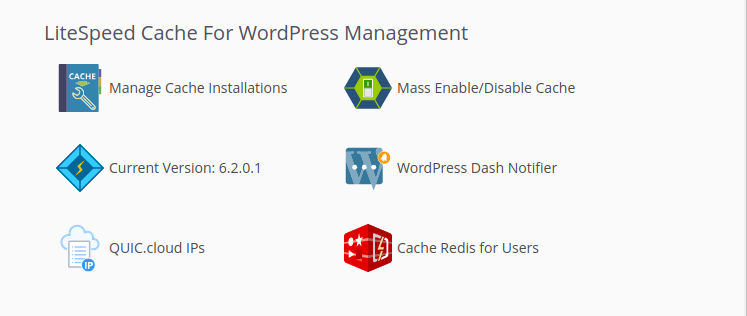
- Manage Cache Installations allows you to manage LiteSpeed Cache for WordPress on your individual WordPress installations.
- Mass Enable Cache & Mass Disable Cache can be used to enable/disable the LiteSpeed Cache Plugin for WordPress on all discovered WordPress installations which are not flagged (more on flags later).
- Version Manager displays the currently active LSCache for WordPress version (more on the Active Version later). It also allows you to adjust this active LSCache for WordPress version and to upgrade and downgrade LSCache for WordPress installations based on their current version.
- WordPress Dash Notifier is used to recommend a plugin or broadcast a message to all discovered WordPress installations using the Dash Notifier plugin for WordPress.
- QUIC.cloud IPs is an informational page listing IPs used by the QUIC.cloud service. These IPs should be whitelisted in your server's firewall if you plan to use QUIC.cloud services.
- Cache Redis for Users installs and activates Redis for each user you wish to configure object cache for. This only operates in environments where you have a sandboxed (caged) system like CloudLinux or LiteSpeed Containers. Each user's cached data is independent, guaranteeing speed and security.
Manage Cache Installations
Equivalent CLI commands: scan, scannew, enable, disable, flag, unflag, status
Example: ./lscmctl scannew (See all CLI commands)
The manage view is where most of the magic happens. Here you can manage the LiteSpeed Cache Plugin for WordPress for your WordPress installations individually or in small groups. (There is nothing wrong with big groups, but that is what Mass Enable Cache and Mass Disable Cache are for)
The first time, a user may see only a Scan button available 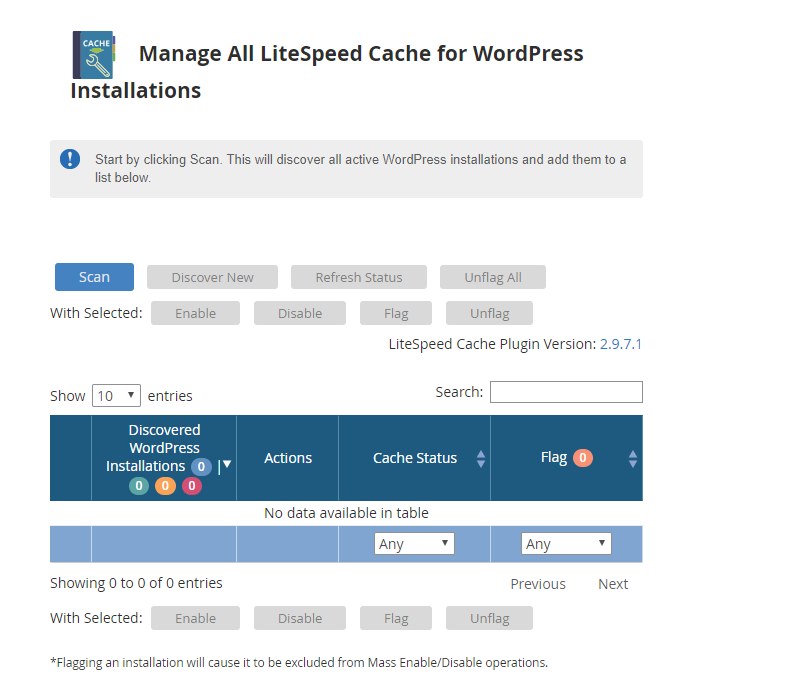
After a scan and cache is enabled, it will look like this
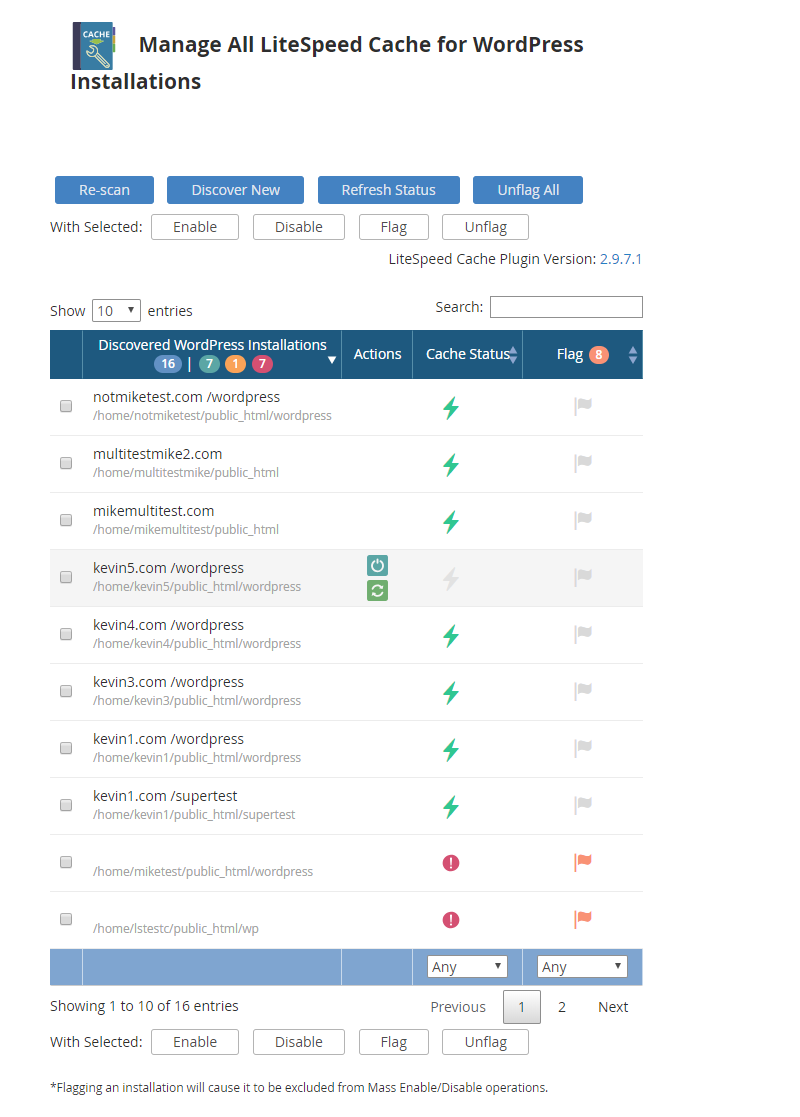
Starting from the actual table we have the following fields:
-
Discovered WordPress Installations - This field will contain the path of each WordPress installation discovered during the last scan operation.
-
Actions - This field contains action buttons that perform a specific action only for the related WordPress installation. These actions include Enable/Disable the LiteSpeed Cache Plugin for WordPress, and Refresh Status which updates the current status of LiteSpeed Cache for WordPress for this installation only.
-
Cache Status - Displays the last known status of LiteSpeed Cache for WordPress for the listed WordPress installation.
-
Flag - Click to set Flag/Unflag. This field can either be blank or display a flag icon. While an installation is flagged, displaying the flag icon, it will be excluded from all future Mass Enable/Disable operations.
Looking at the top row of buttons, we have Scan/Re-scan, Discover New, and Refresh Status.
-
Scan/Re-scan - Discovers all WordPress installations under each cPanel users
public_htmlfolder. These discovered installations will then be saved to a data file and displayed in the manager screen. If this data file is removed or corrupted, simply scan again to repopulate the list. -
Discover New - Discovers all WordPress installations belonging to users not already listed in the Discovered WordPress Installations section. This will NOT discover new WordPress installations for existing users. For these cases, Scan/ Rescan should be used instead.
-
Refresh Status - Each listed WordPress installation will have a Cache Status of either
EnabledorDisabledreflecting the status of the LiteSpeed Cache Plugin for WordPress for that installation. The Refresh Status button will update this value to the most current status for all listed WordPress installations.
Moving on we have the the bottom row of buttons which are used to perform group operations. These buttons work in tandem with the check-boxes found next to each discovered installation to allow you to perform some basic operations for only the selected group.
-
Enable Selected & Disable Selected - These buttons allow you to enable and disable the LiteSpeed Cache Plugin for WordPress for the selected WordPress installations.
-
Flag Selected & Unflag Selected - These buttons allow you to set or unset the flag field for the selected WordPress Installation. Flagged installations will be excluded from Mass Enable Cache and Mass Disable Cache operations.
-
LiteSpeed Cache Plugin Version - This label shows the currently active version of the LSCache Plugin for WordPress. Clicking the version number listed here will take you to the Version Manager screen.
Mass Enable Cache & Mass Disable Cache
Equivalent CLI commands: enable, disable
Example: ./lscmctl enable -m (See all CLI commands)
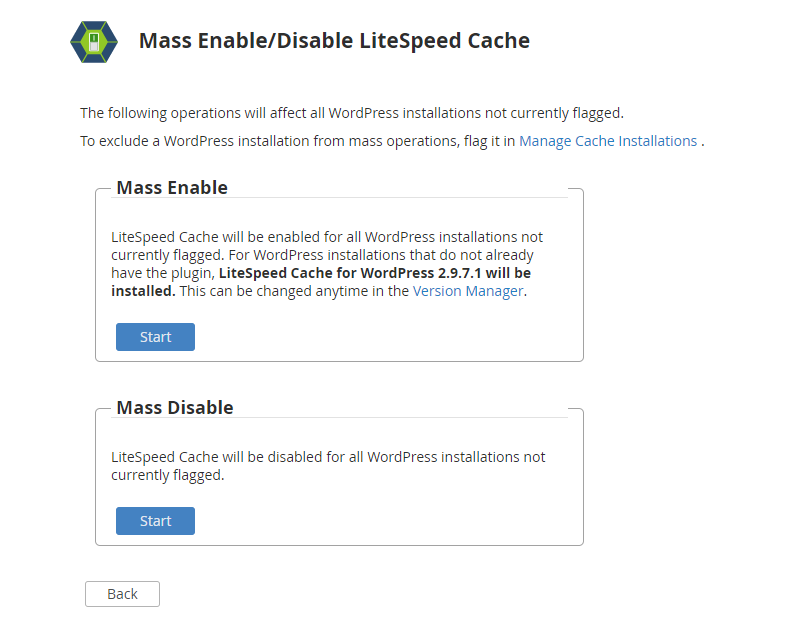
Both of these selections behave in a very similar way by allowing you to enable/disable the LiteSpeed Cache Plugin for WordPress en masse.
When Mass Enabling/Disabling the LiteSpeed Cache Plugin for WordPress, all WordPress installations that are not currently flagged in the Manage screen will have the LiteSpeed Cache Plugin for WordPress installed/removed. If a WordPress installation is detected as manually disabled, the WHM plugin will flag it and skip it. During this operation, you should see the following output screen.
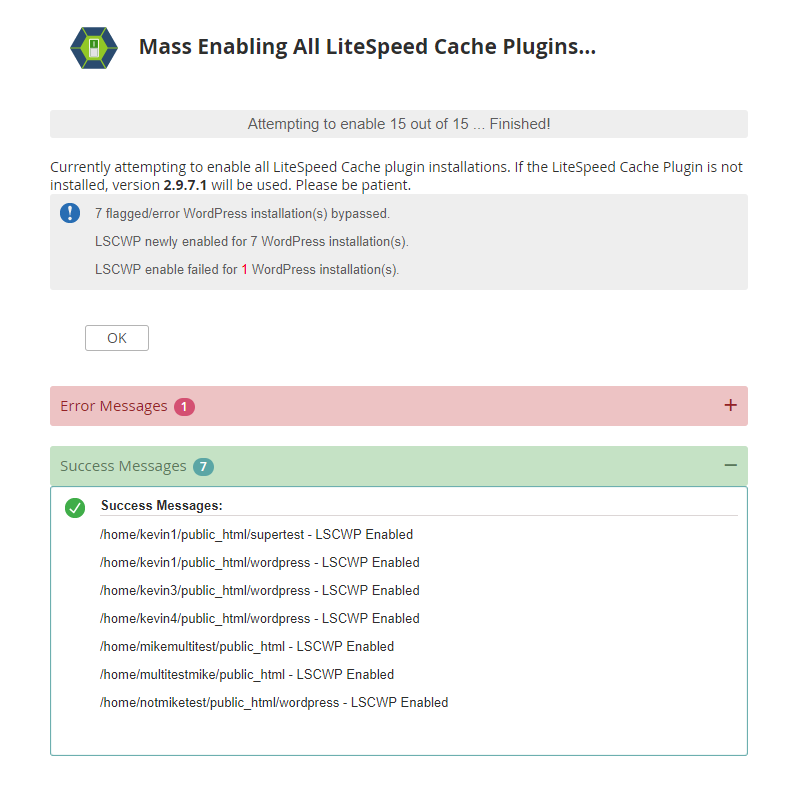
After this operation is complete you will get a short summary message letting you know how many installations had LiteSpeed Cache for WordPress enabled/disabled successfully and how many failed, as well as how many flagged installations were detected and skipped over. You will also be provided with both an error log and a success log shown under these results listing the installations that were enabled and those that failed along with the related error messages.
Note
If you have not performed a scan before clicking on Mass Enable/Disable Cache buttons, or your previous scan data is unable to be read by the plugin, you will be asked to scan again.
Version Manager
Equivalent CLI commands: setversion, upgrade
Example: ./lscmctl setversion --latest (See all CLI commands)
-
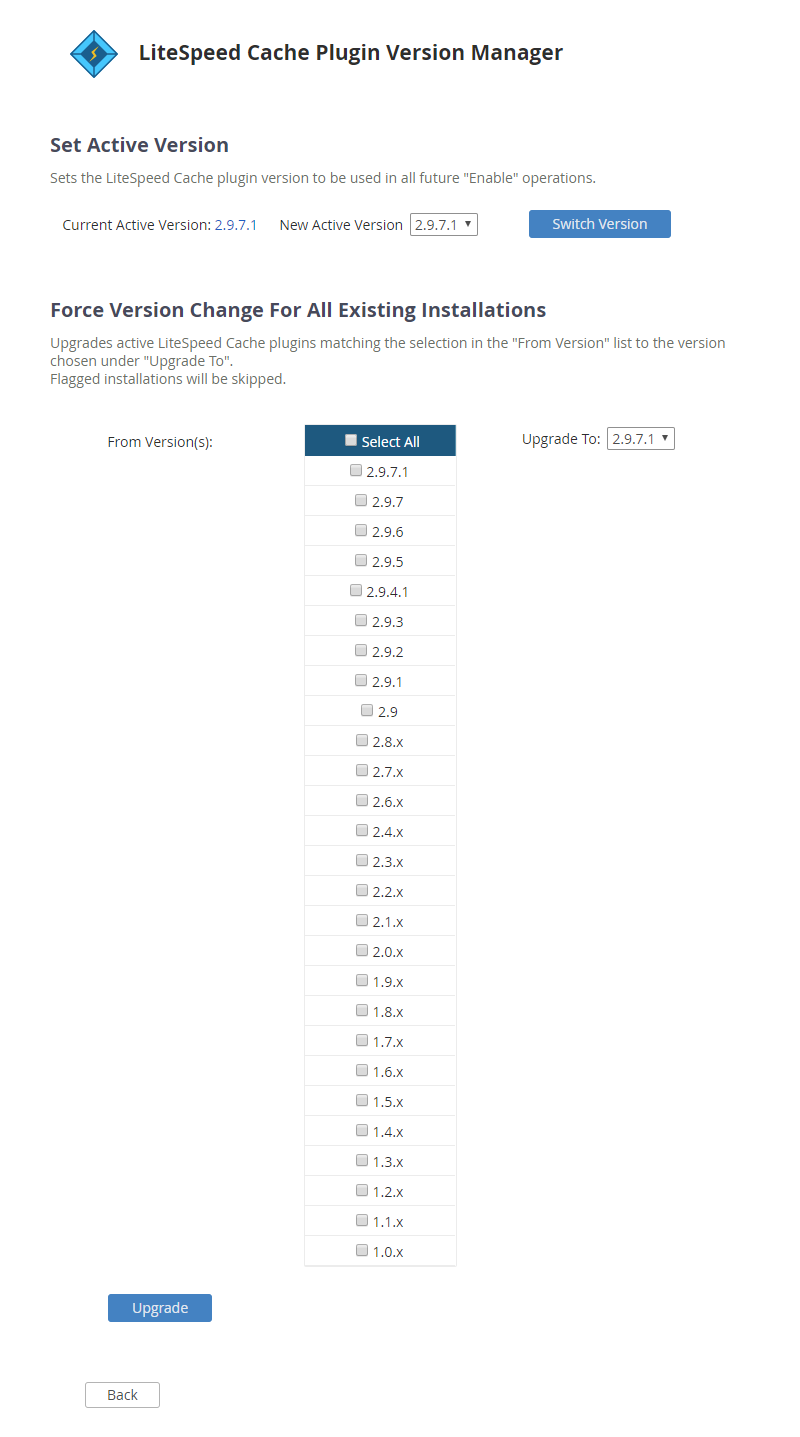
Set Active Version - Allows you to change the Active Version of the LiteSpeed Cache Plugin for WordPress. The Active Version is the LSCache for WordPress version that is used when the WHM plugin enables or mass enables caching for WordPress installations.
-
Force Version Change For All Existing Installations - Allows you to change the version of existing LiteSpeed Cache Plugin for WordPress installations, allowing you to select which to change based on current cache version.
WordPress Dash Notifier
Equivalent CLI commands: dashnotify, dashnotifyremove
Example: ./lscmctl dashnotify -m -plugin litespeed-cache -msgfile /path/to/msg/file (See all CLI commands)
The WordPress Dash Notifier feature is used to recommend a WordPress plugin or broadcast an informational message to all discovered WordPress installations. These messages will appear in the WordPress Dashboard of each site.
This tool is especially useful for hosting providers who wish to suggest the LiteSpeed Cache Plugin for WordPress to their clients, rather than installing it directly for them via Mass Enable.
Recommend A Plugin
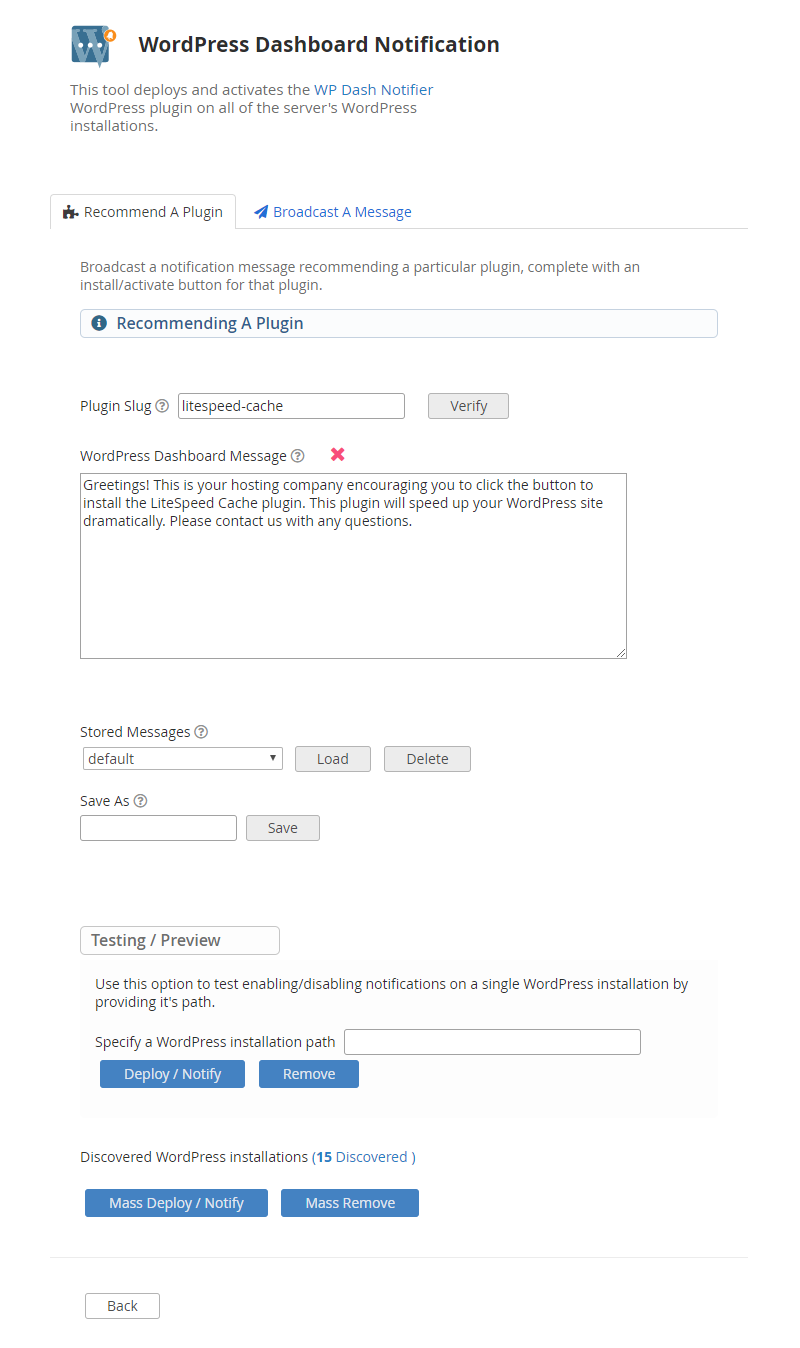
Plugin Slug - The unique slug of a valid WordPress plugin. A download/activate button for this plugin will be included in the displayed notification message.
A plugin's slug can be found by going to the plugin's page in the WordPress Plugin Directory and taking the last part of the URL. An entered slug can be verified by clicking the Verify button.
WordPress Dashboard Message - A message displayed when recommending a plugin. Simple text and HTML are supported.
Stored Messages - Saved messages (including Plugin Slug) that can be loaded or deleted. "default" message cannot be deleted.
Save As - Save the current WordPress Dashboard Message and Plugin Slug using a unique ID (a-zA-Z0-9_-).
Testing / Preview - This option allows you to Deploy / Notify a plugin recommendation or Remove a notification from a single WordPress installation by providing it's path. As the name implies, this is useful for testing how messages will be displayed before notifying en mass.
Mass Deploy / Notify - Recommend a plugin to all discovered WordPress installations. This will install the Dash Notifier plugin for WordPress on all discovered installations and display the recommendation message in their WordPress Dashboard.
Mass Remove - Remove plugin recommendation message (and Dash Notifier plugin) from all discovered WordPress installations.
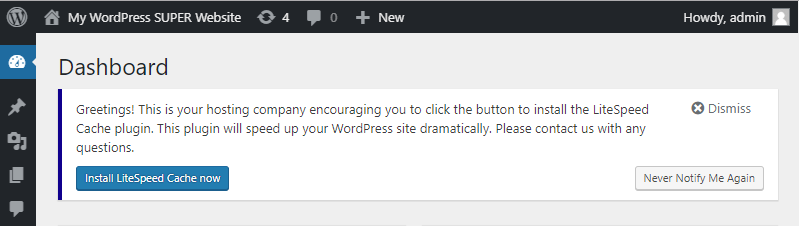
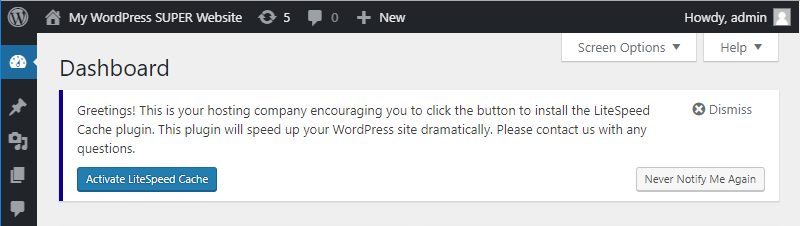
End Result
-
User does not have the plugin ('litespeed-cache') installed:
-
User has plugin ('litespeed-cache') installed, but deactivated:
-
User has 'litespeed-cache' plugin installed and active
No message will be displayed
Broadcast A Message
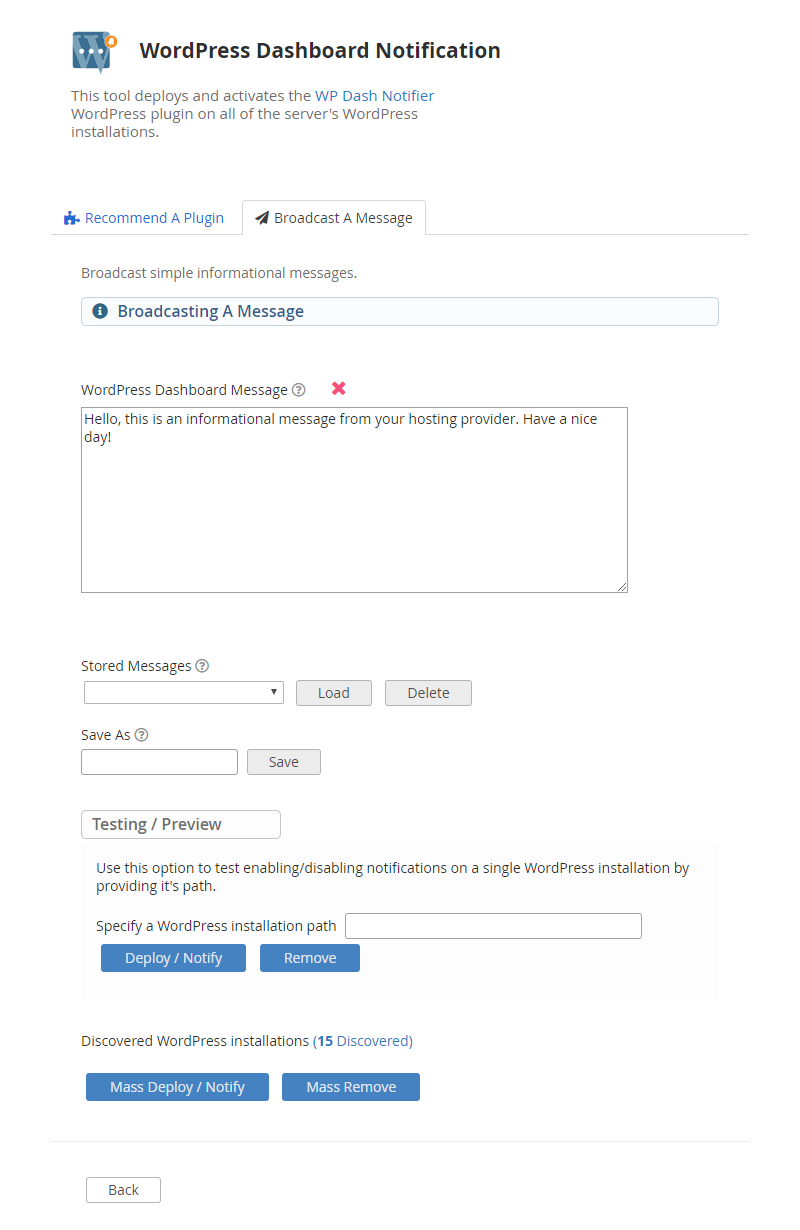
WordPress Dashboard Message - A message displayed when recommending a plugin. Simple text and HTML are supported.
Stored Messages - Saved messages that can be loaded or deleted.
Save As - Save the current WordPress Dashboard Message using a unique ID (a-zA-Z0-9_-).
Testing / Preview - This option allows you to Deploy / Notify a notification message or Remove a notification from a single WordPress installation by providing it's path. As the name implies, this is useful for testing how messages will be displayed before notifying en mass.
Mass Deploy / Notify - Broadcast a notification message to all discovered WordPress installations. This will install the Dash Notifier plugin for WordPress on all discovered installations and display the notification message in their WordPress Dashboard.
Mass Remove - Remove notification message (and Dash Notifier plugin) from all discovered WordPress installations.
End Result

Other Info
-
WordPress users who click the Dismiss button will not be re-notified if the provided dashboard message (and plugin slug when recommending a plugin) match those of the dismissed message.
-
WordPress users who click the Never Notify Me Again button will have the Dash Notifier plugin uninstalled and a
.dash_notifier_bypassfile created in their installation's root directory. These users will not be notified of any further messages while this file exists.
QUIC.cloud IPs
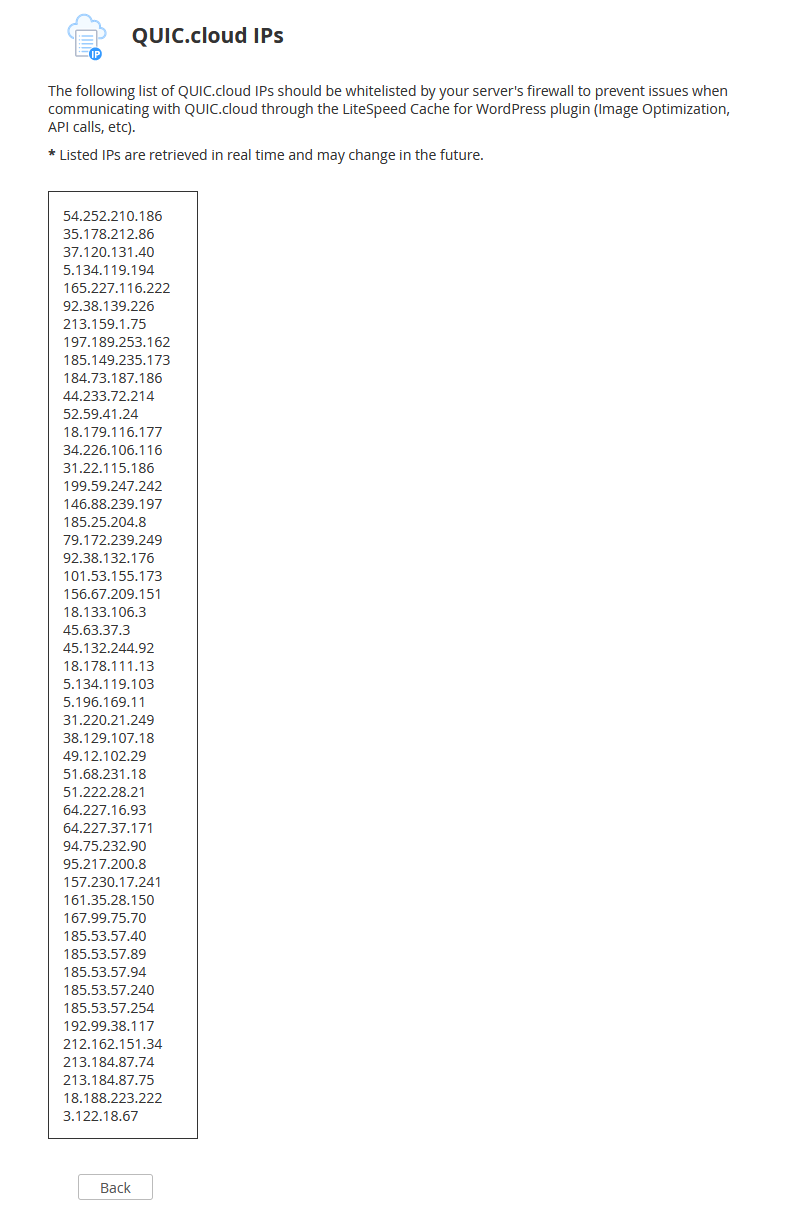
This is an informational page that lists out IPs used when communicating with QUIC.cloud through the LiteSpeed Cache for WordPress plugin (Image Optimization, API calls, etc). The listed IPs are updated in real time and should be whitelisted to avoid issues when using these services.
Cache Redis for Users
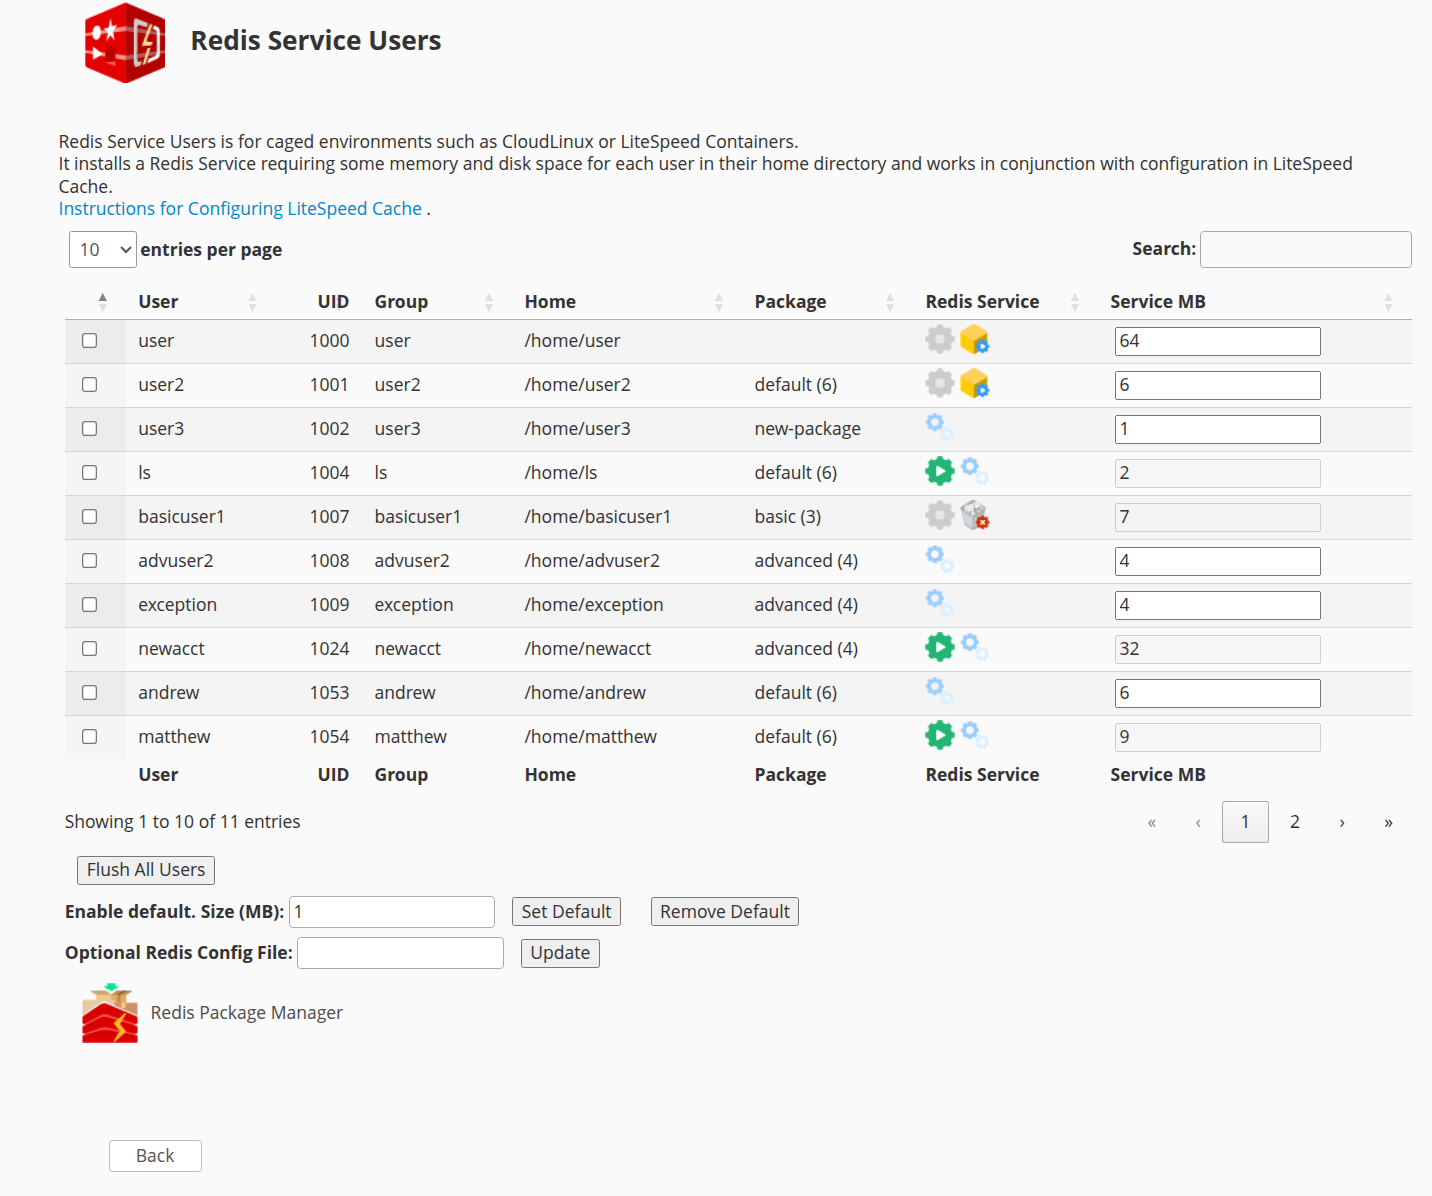
This page lists all of the users on your system. As stated on the screen, this facility is for caged environments like CloudLinux or LiteSpeed Containers.
- CloudLinux: Turning on a caged environment is described in the CloudLinux documentation and here
- LiteSpeed Containers: Turning on LiteSpeed Containers is described in Namespace Containers
When enabled, it installs a Redis Service requiring some memory and disk space for each user in their home directory and works in conjunction with configuration in LiteSpeed Cache.
Each row contains 2 columns of icons. The first column is for full enable and disable of the Redis service for the user:
- To install a Redis service for a particular user press the enable icon on the line for that user:

- Once you have installed the Redis Service you will see the screen refreshed and the icon for that user will appear disabled. This icon is also used for services which are set up and where the service is currently disabled.
- To remove the Redis service for a particular user press the disable icon on the line for that user:

The second column is for finer management of the service definition:
- To set up the service so that a user in cPanel or an administrator later can enable it press the set up icon:
 .
. - To disable the service for a running user, but leave the service so it can be enabled by the cPanel user, press the disable service icon:
 . If using the default service definition this may be in the first column.
 - To remove the setup so that the user in cPanel can no longer start the service, press the remove setup icon:
 .
.
Service MB: Each user gets their own instance of Redis and you can specify the size of the instance. The size is in MB and can be any value from 1 to 1024 with a default of 64. A cPanel user can use the Plugin to enable or disable the service, but you must specify a default or it must be enabled here first and the size specified here is the size used. To change the size, you must disable the service, specify the size and reenable it.
The buttons under the table will change based on boxes checked and the state of the Redis service for each user. When you check a box, only those users with exactly the same state can be checked as well.
- Disable: The same as pressing the disable icon for each user checked.
- Enable: The same as pressing the enable icon for each user checked without a setup.
- Disable Service: The same as pressing the disable service icon for each user checked.
- Set up: The same as pressing the set up icon for each user checked.
- Remove Setup: The same as pressing the remove setup icon for each user checked.
- Enable Service: The same as pressing the enable icon for each user checked who is setup but who's service is disabled.
- Flush All Users: Sends a Redis
flushallcommand to all active Redis services to clear the cache. - Flush: Sends a Redis
flushallcommand to all active Redis service users checked.
Enable default. Size (MB): If you wish to allow users to enable their own services in cPanel, you can specify a size here and then press the Set Default button. If there are existing services you can change the size of the definitions and press the Set Default button which will cause the services to be restarted. Once a default is specified you or the users can enable or disable individual users Redis services. Once you have a default enabled, you can press the Remove Default button, which will remove the default definition and disable all of the services.
Optional Redis Config File: Specify a file containing Redis configuration parameters. We recommend that this file be named /usr/local/lsws/lsns/conf/redis.conf. The contents are usually as simple as:
maxmemory-policy allkeys-lru
Redis Package Manager: The Redis Package Manager lets you setup a default for all users in a package and enable and disable the Redis services for all users in the package. Press this icon to enter the Redis Package Manager.
Redis Package Manager
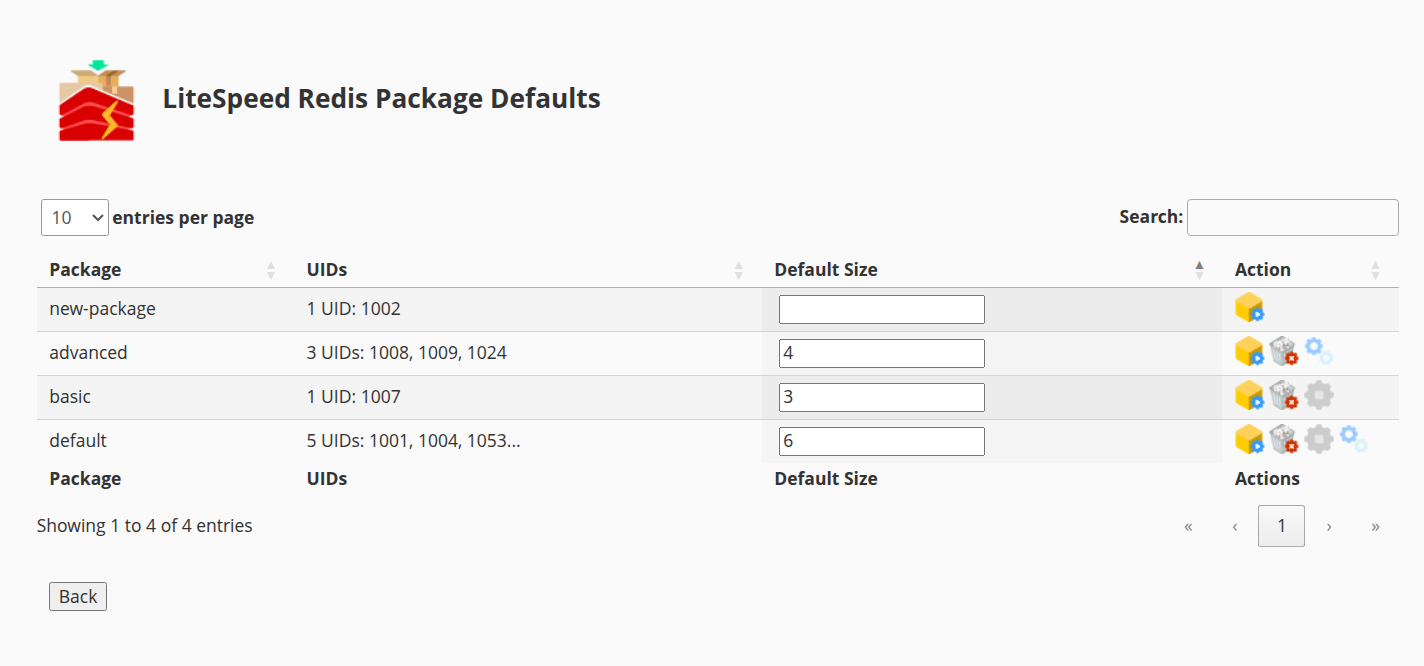
This page lists all of the packages on your system, the total count of users in the package (along with up to 3 of them), a package default size and some actions you can perform.
Default Size: If you wish to allow users to enable their own services in cPanel or wish to bulk manage the users in the package here, enter a size for the Redis Database in megabytes. Select the setup icon to save and activate the default. To remove the default, select the remove icon.
Actions: There may be up to 4 icons here:
- setup Can only be used if you specify a default size. When selected it will save and activate the specified default.
- remove Only visible if you have a specified default, will remove the package default.
- enable Only visible if you have a specified default, will enable all of the users services for the package.
- disable Only visible if you have a specified default and some active services, will disable all of the users services for the package.
How it works
The Redis service is created specific to that user and with a socket within the user's home directory. For CloudLinux the socket is in $HOME/.cagefs/tmp/redis.sock and for LiteSpeed Containers it is in $HOME/.lsns/tmp/redis.sock. As caged environments these directories are mounted to /tmp for the user resulting in a consistent socket name of /tmp/redis.sock for all users.
For LiteSpeed Containers the Troubleshooting section describes steps to help you enter and otherwise diagnose issues with caging.
For CloudLinux there are many tools to help you identify caging issues.
If the Redis services don't come up when you reboot you may be able to fix it by modifying the /etc/systemd/system/user-redis.service file.
In the [Unit] section change:
After=network.target
After=network.target syslog.target lve_namespaces.service lvectl.service cagefs.service
Wants=lve_namespaces.service lvectl.service
Configuring Cache to Use Redis
To use the Redis feature, you must configure it within the LiteSpeed WordPress Cache admin panel within cPanel > Tools > WP Toolkit > WordPress > Plugins > Manage in WordPress > LiteSpeed Cache > Cache > Object:
- Object Cache On. There is a Status block which must say
Redis Extension: *Enabled*. If it says*Disabled*you must install the Redis Extension within WHM > Software > Module Installers > PHP Pecl Manage > Select your version of PHP > Search for and Install Redis and reenter cPanel. - Method:
Redis - Host:
/tmp/redis.sock - Port:
0
Press the Save Changes button. More details configuring LiteSpeed WP Cache are described here.
Monitoring Redis
You may want to see how redis is doing for a particular user. For example, you want want to see how much memory it's using. This is done with the redis-cli program from a command line.
For example, for CloudLinux for the user USER:
redis-cli -s /home/USER/.cagefs/tmp/redis.sock info memory
This command connects to the home /tmp directory socket created by the LiteSpeed Redis Service and runs the CLI command info memory. As discussed above, we recommend that the memory policy be set so that it uses only the necessary amount of memory.
Command Line Interface
Using the WHM panels to rollout a large number of Redis installations for LiteSpeed might be too difficult to do and so we provide a command line interface (CLI). This can also help in installing systems where use of the panels may be problematic. This section has moved to its own page.
Testing Caching
To test your domains, you should see X-LiteSpeed-Cache: hit in the response header. Check here for detailed verification steps.
If X-LiteSpeed-Cache: hit cannot be seen, you may need to do more troubleshooting. For example: check if the LSCache feature has been enabled in your license, if other cache plugins have been disabled, or if cache root and cache policy have been set, etc.
Command-Line Interface - LiteSpeed Cache For WordPress Management
This section has moved to its own page. It covers the various cache management options available through our lscmctl CLI script.
Customize LiteSpeed Cache Plugin For WordPress Before Installation
The following customizations will apply to all LiteSpeed Cache Plugin for WordPress installations made through the WHM Plugin's LiteSpeed Cache For WordPress Management feature or through the lscmctl Command-Line LiteSpeed Cache For WordPress Management Script.
Initial Configuration
Customized Default Setting Values
It is possible to customize your own set of default values for first-time LiteSpeed Cache Plugin for WordPress installations.
To apply this customization, simply copy LiteSpeed Cache Plugin for WordPress' configuration file litespeed-cache/data/const.default.json to the LiteSpeed Cache Plugin for WordPress local source directory at /usr/src/litespeed-wp-plugin/ and change the new configuration as necessary.
Edit this file to add settings, or remove settings, or change default setting values for the LiteSpeed Cache Plugin For WordPress.
These new defaults will be applied to all first-time installations. Settings can be safely removed or otherwise left out of this file if you do not plan to change the default values for those settings.
Tip
The default values for any settings not contained in your custom const.default.json will be automatically set internally by the LiteSpeed Cache Plugin for WordPress.
Note
This feature only affects new LiteSpeed Cache Plugin for WordPress installations and will not override or change any plugin settings for existing installations.
Troubleshooting
For help with troubleshooting common plugin issues, take a look at our Troubleshooting Page.