Configuration
PHP
LiteSpeed works with Plesk PHP out of box. The only requirement is that PHP handler must be set to FastCGI, to avoid mismatched PHP settings. LiteSpeed honors Plesk's PHP settings by default without any extra configuration. However, if CloudLinux PHP Selector is enabled, and you prefer to use that as your PHP manager, extra handlers will be required, as explained later.
Disable PHP Override
You can disable the PHP override in .htaccess with LiteSpeed Web Server.
php_value and php_flag can be used in Apache configuration or .htaccess to override php.ini settings. However, they are only supported by Apache's mod_php handler, which is deprecated in most of the control panel systems, having been replaced by php-fpm, fastcgi or LSPHP. As a result, if you place php_value or php_flag in .htaccess, Apache should return an error. (You can check Plesk's documentation for details).
You could see any one of the following errors:
500 internal server error
    503 Invalid command 'php_flag', perhaps misspelled or defined by a module not included in the server configuration.
    The following error can be found in the domain error log in Domains > example.com > Logs:
    /var/www/vhosts/example.com/httpdocs/.htaccess: Invalid command 'php_value', perhaps misspelled or defined by a module not included in the server configuration
/var/www/vhosts/example.com/httpdocs/.htaccess: Invalid command 'php_flag', perhaps misspelled or defined by a module not included in the server configuration
/var/www/vhosts/example.com/httpdocs/.htaccess: RewriteRule: bad flag delimiters
/var/www/vhosts/example.com/public_html/.htaccess: Invalid command 'suPHP_ConfigPath', perhaps misspelled or defined by a module not included in the server configuration.
LiteSpeed Web Server uses LSPHP, which supports php_value and php_flag usage in .htaccess. You can use these and LSWS will not return a 500 error. LSWS is more tolerant than Apache of these PHP overrides.
In some cases, you may want to disable such PHP overrides in .htaccess for LiteSpeed as well. There is a dedicated Apache directive DisablePhpOverride htaccess, which can be used at the server level httpd.conf to achieve this.
For example, on Plesk, create a file named DisablePhpOverrideLiteSpeed.conf in the following directory, depending upon your system:
/etc/httpd/conf.d/
/etc/apache2/conf.d/
/etc/apache2/conf-enabled
This DisablePhpOverrideLiteSpeed.conf file should contain the following:
<IfModule LiteSpeed>
  DisablePhpOverride htaccess
</IfModule>
Customized Configuration
As of LiteSpeed Web Server v5.3, PHP is auto detected. Manual PHP external app configuration is no longer required, and Plesk itself is the preferred PHP manager.
However, if you want to have a customized configuration for a particular PHP version, you may need to manually create the external app and configure it.
You can create lsphpXX (e.g. lsphp70, lsphp71, lsphp72, etc) one by one, from LSWS Admin Console.
Simply change the Name, Address and Command settings to correspond with the correct PHP version.
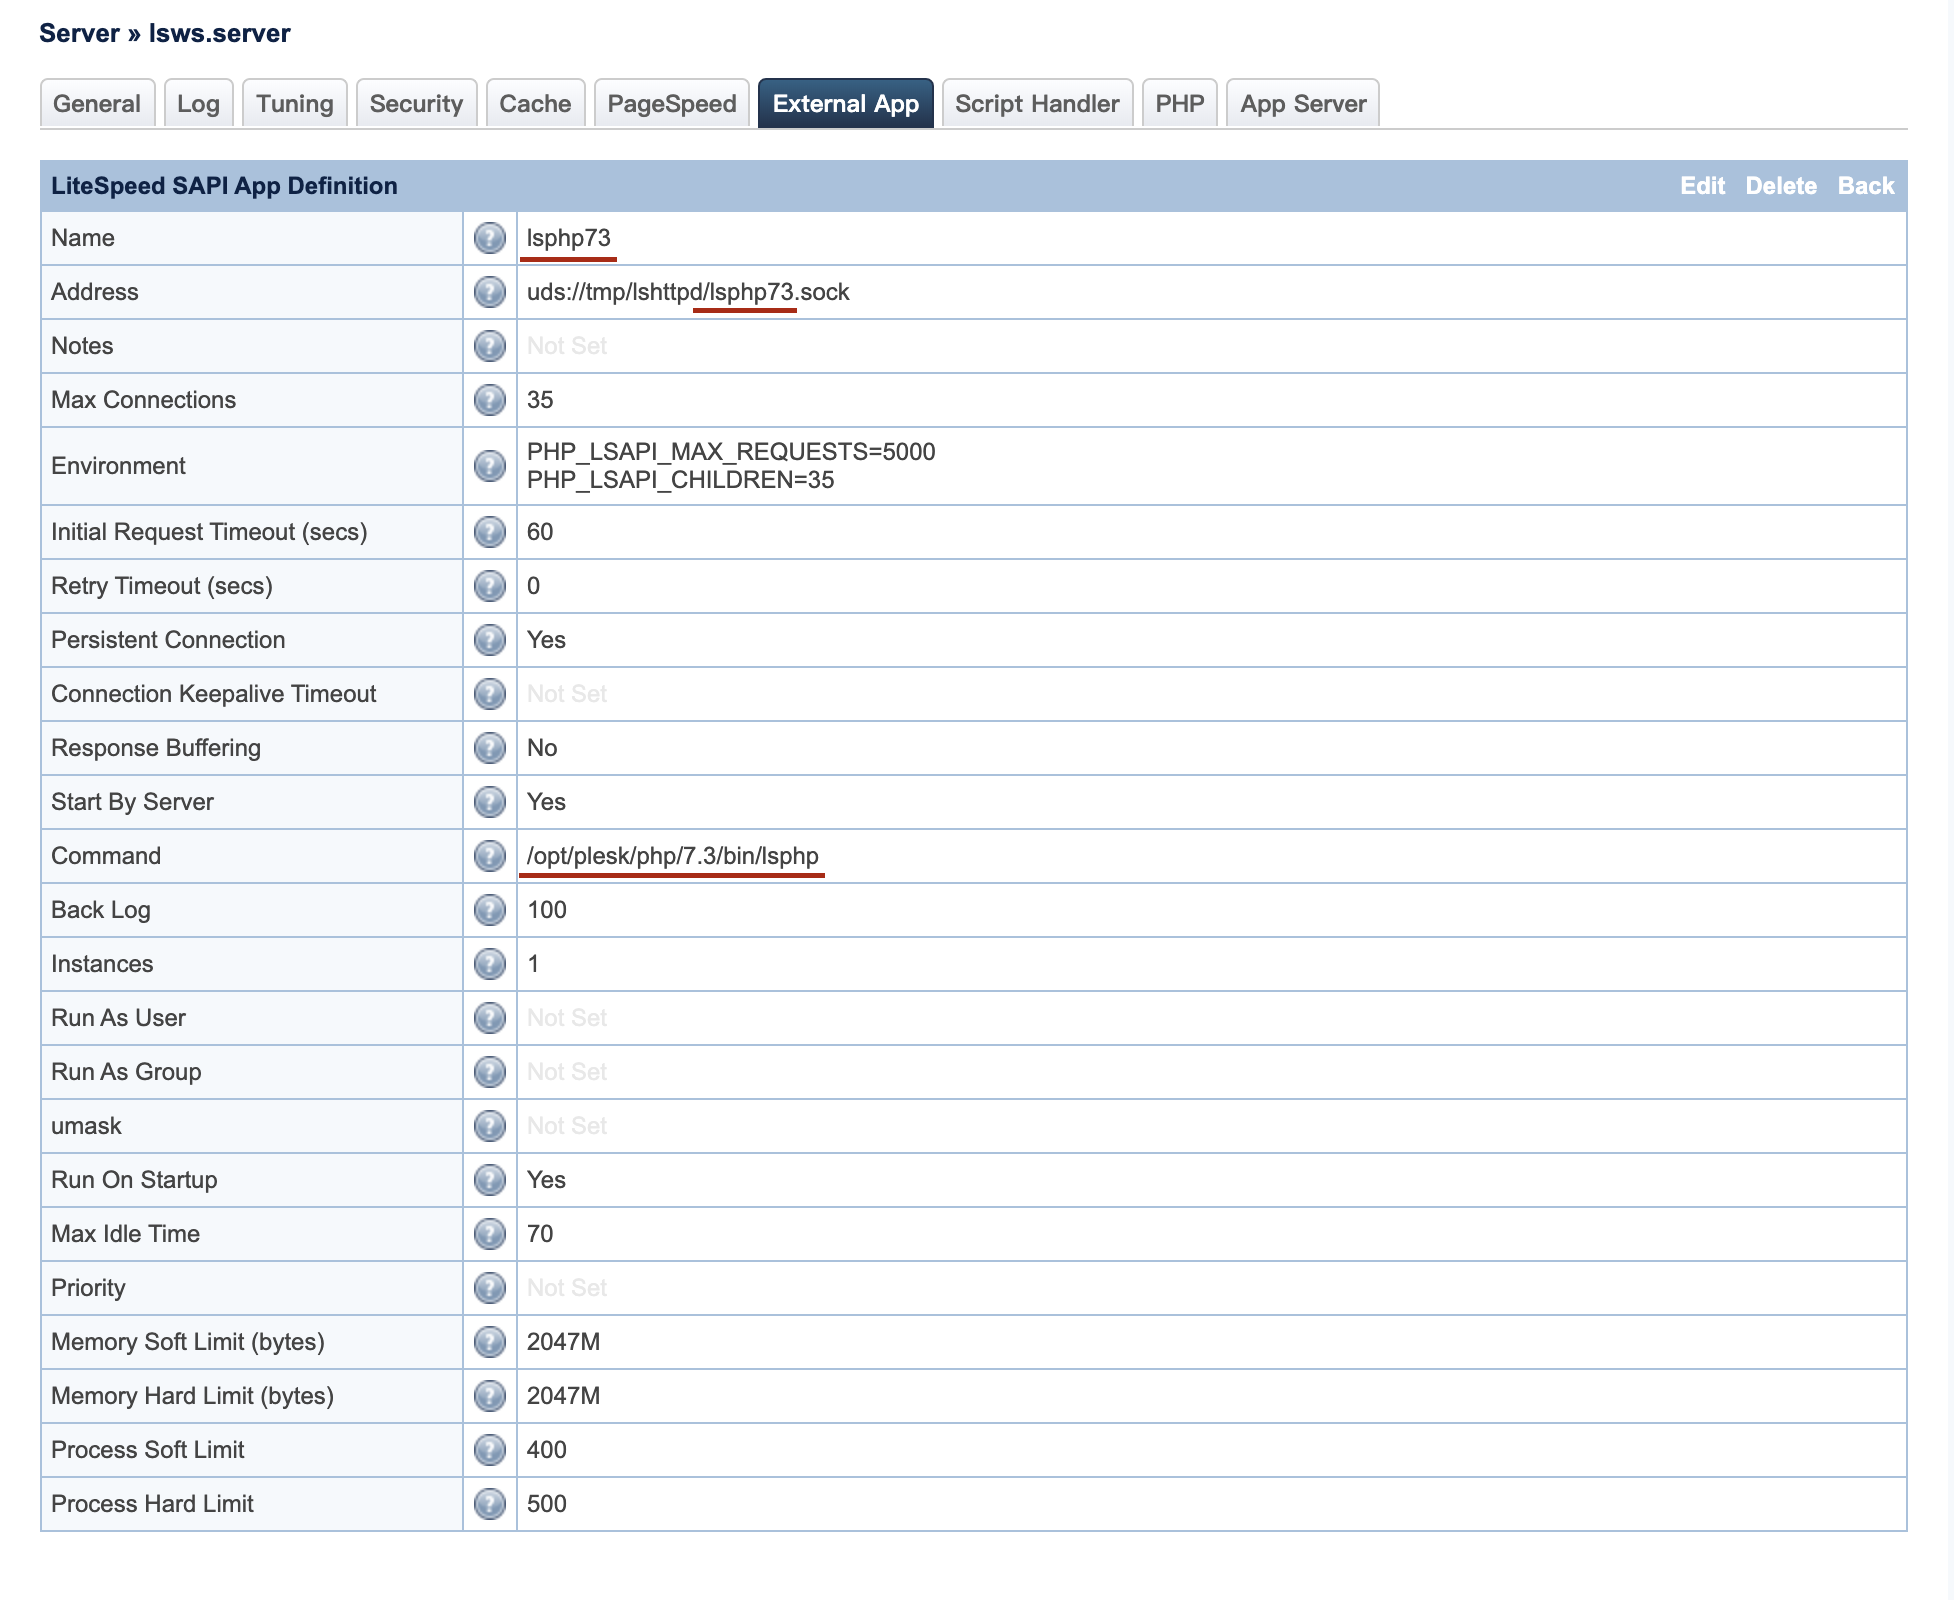
If you prefer using the command line instead of the GUI tool, you can edit the LSWS configuration file (usually found at /usr/local/lsws/conf/httpd_config.xml) by adding the following to the <extProcessorList>...</extProcessorList> section:
  <extProcessor>
    <type>lsapi</type>
    <name>lsphp70</name>
    <address>uds://tmp/lshttpd/lsphp70.sock</address>
    <maxConns>35</maxConns>
    <env>PHP_LSAPI_MAX_REQUESTS=5000</env>
    <env>PHP_LSAPI_CHILDREN=35</env>
    <initTimeout>60</initTimeout>
    <retryTimeout>0</retryTimeout>
    <persistConn>1</persistConn>
    <respBuffer>0</respBuffer>
    <autoStart>1</autoStart>
    <path>/opt/plesk/php/7.0/bin/lsphp</path>
    <backlog>100</backlog>
    <instances>1</instances>
    <extMaxIdleTime>10</extMaxIdleTime>
    <priority>0</priority>
    <memSoftLimit>2048M</memSoftLimit>
    <memHardLimit>2048M</memHardLimit>
    <procSoftLimit>400</procSoftLimit>
    <procHardLimit>500</procHardLimit>
  </extProcessor>
  <extProcessor>
    <type>lsapi</type>
    <name>lsphp71</name>
    <address>uds://tmp/lshttpd/lsphp71.sock</address>
    <maxConns>35</maxConns>
    <env>PHP_LSAPI_MAX_REQUESTS=5000</env>
    <env>PHP_LSAPI_CHILDREN=35</env>
    <initTimeout>60</initTimeout>
    <retryTimeout>0</retryTimeout>
    <persistConn>1</persistConn>
    <respBuffer>0</respBuffer>
    <autoStart>1</autoStart>
    <path>/opt/plesk/php/7.1/bin/lsphp</path>
    <backlog>100</backlog>
    <instances>1</instances>
    <extMaxIdleTime>10</extMaxIdleTime>
    <priority>0</priority>
    <memSoftLimit>2048M</memSoftLimit>
    <memHardLimit>2048M</memHardLimit>
    <procSoftLimit>400</procSoftLimit>
    <procHardLimit>500</procHardLimit>
  </extProcessor>
  <extProcessor>
    <type>lsapi</type>
    <name>lsphp72</name>
    <address>uds://tmp/lshttpd/lsphp72.sock</address>
    <maxConns>35</maxConns>
    <env>PHP_LSAPI_MAX_REQUESTS=5000</env>
    <env>PHP_LSAPI_CHILDREN=35</env>
    <initTimeout>60</initTimeout>
    <retryTimeout>0</retryTimeout>
    <persistConn>1</persistConn>
    <respBuffer>0</respBuffer>
    <autoStart>1</autoStart>
    <path>/opt/plesk/php/7.2/bin/lsphp</path>
    <extMaxIdleTime>10</extMaxIdleTime>
    <memSoftLimit>2048M</memSoftLimit>
    <memHardLimit>2048M</memHardLimit>
    <procSoftLimit>400</procSoftLimit>
    <procHardLimit>500</procHardLimit>
  </extProcessor>
  <extProcessor>
    <type>lsapi</type>
    <name>lsphp73</name>
    <address>uds://tmp/lshttpd/lsphp73.sock</address>
    <maxConns>35</maxConns>
    <env>PHP_LSAPI_MAX_REQUESTS=5000</env>
    <env>PHP_LSAPI_CHILDREN=35</env>
    <initTimeout>60</initTimeout>
    <retryTimeout>0</retryTimeout>
    <persistConn>1</persistConn>
    <respBuffer>0</respBuffer>
    <autoStart>1</autoStart>
    <path>/opt/plesk/php/7.3/bin/lsphp</path>
    <extMaxIdleTime>10</extMaxIdleTime>
    <memSoftLimit>2048M</memSoftLimit>
    <memHardLimit>2048M</memHardLimit>
    <procSoftLimit>400</procSoftLimit>
    <procHardLimit>500</procHardLimit>
  </extProcessor>
  <extProcessor>
    <type>lsapi</type>
    <name>lsphp74</name>
    <address>uds://tmp/lshttpd/lsphp74.sock</address>
    <maxConns>35</maxConns>
    <env>PHP_LSAPI_MAX_REQUESTS=5000</env>
    <env>PHP_LSAPI_CHILDREN=35</env>
    <initTimeout>60</initTimeout>
    <retryTimeout>0</retryTimeout>
    <persistConn>1</persistConn>
    <respBuffer>0</respBuffer>
    <autoStart>1</autoStart>
    <path>/opt/plesk/php/7.4/bin/lsphp</path>
    <extMaxIdleTime>10</extMaxIdleTime>
    <memSoftLimit>2048M</memSoftLimit>
    <memHardLimit>2048M</memHardLimit>
    <procSoftLimit>400</procSoftLimit>
    <procHardLimit>500</procHardLimit>
  </extProcessor>
Per-domain php.ini
LiteSpeed can take advantage of Plesk's' feature to enable per-domain php.ini for Apache. A domain example.com may have a few subdmains such as: sub1.example.com, sub2.example.com etc. This feature allows each domain, including subdomains, to load its own unique php.ini from its document root.
Example
With per-domain php.ini enabled, if you update the PHP settings of the main example.com domain and then check the phpinfo() page, you will see that the path displayed for the loaded configuration file is /var/www/vhosts/system/example.com/etc/php.ini
Similarly, if you update the PHP settings of the sub1.example.com domain and then check the phpinfo() page, you will see that the path displayed for the loaded configuration file is /var/www/vhosts/system/sub1.example.com/etc/php.ini.
sub2.example.com will show /var/www/vhosts/system/sub2.example.com/etc/php.ini, an so on.
LiteSpeed Web Server does not enable per-domain php.ini by default. The phpinfo() for example.com and every example.com subdomain, will display the loaded configuration file as /var/www/vhosts/system/example.com/etc/php.ini.
If the any PHP setting of any of these domains is updated, only the main domain's php.ini will be updated. As a result, PHP settings applied to individual domains are ignored, and only one php.ini is used for the entire subscription. Only the configured values of the PHP settings of the most recently updated domain will be used.
As expected, LSWS assigns one PHP handler per account (subscription) by default. All domains share the same handler (detached worker group).
While per-domain php.ini is possible, it is not as efficient, as each domain needs its own PHP handler.
You can enable per-domain php.ini via manual configuration. Edit /usr/local/lsws/conf/httpd_config.xml , locate the <phpConfig> section, then add the following:
<phpAppByDomain>1</phpAppByDomain>
Restart LSWS and run the pkill lsphp command to make the changes take effect.
CloudLinux PHP Selector
When CloudLinux PHP Selector is enabled in addition to Plesk's PHP settings, it can be unclear which PHP selector is in effect. LiteSpeed automatically honors Plesk's PHP selection out of the box without extra configuration, so if you wish to use CloudLinux PHP Selector, you will need to make some changes:
- Set up an extra handler for LiteSpeed, which will force Plesk PHP to point to CloudLinux for non
alt-phpxxversions. - In Plesk's PHP settings, choose a non-
alt-phpversion.
These actions together will cause the CloudLinux PHP Selector to be in effect.
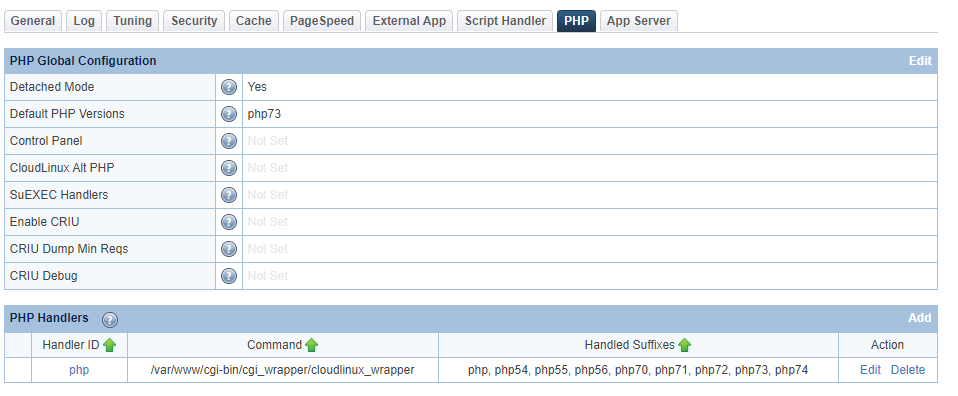
Set up Extra Handler
Navigate to LSWS Web Admin Console > Server > PHP > Add PHP Handlers and set the following:
- Handler ID:
php - Command:
/var/www/cgi-bin/cgi_wrapper/cloudlinux_wrapper - Handled Suffixes:
php, php54, php55, php56, php70, php71, php72, php73, php74
The above settings will force the listed Plesk PHP versions to use CloudLinux PHP selector.
If you prefer, you could edit LiteSpeed's configuration directly:
vi /usr/local/lsws/conf/httpd_config.xml
Add the following within <phpConfig> ... </phpConfig> tags:
<phpHandler>
  <id>php</id>
  <command>/var/www/cgi-bin/cgi_wrapper/cloudlinux_wrapper</command>
  <suffixes>php, php54, php55, php56, php70, php71, php72, php73, php74</suffixes>
</phpHandler>
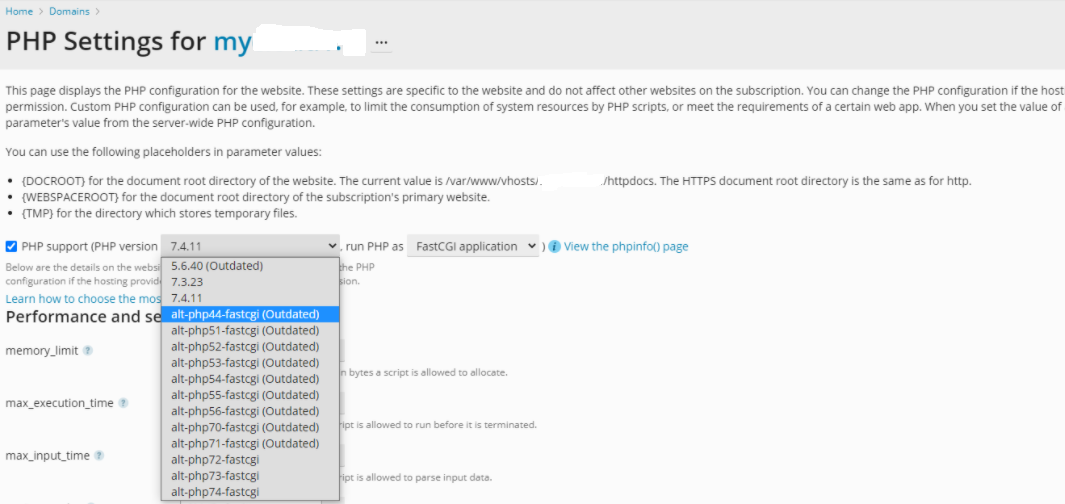
Choose Plesk PHP
Once the handler is created, navigate to Plesk's PHP settings, and choose any PHP version that is not one of the alt-php versions (i.e. one of the versions listed in the newly-created PHP handler). This will ensure that CloudLinux PHP selector is used.
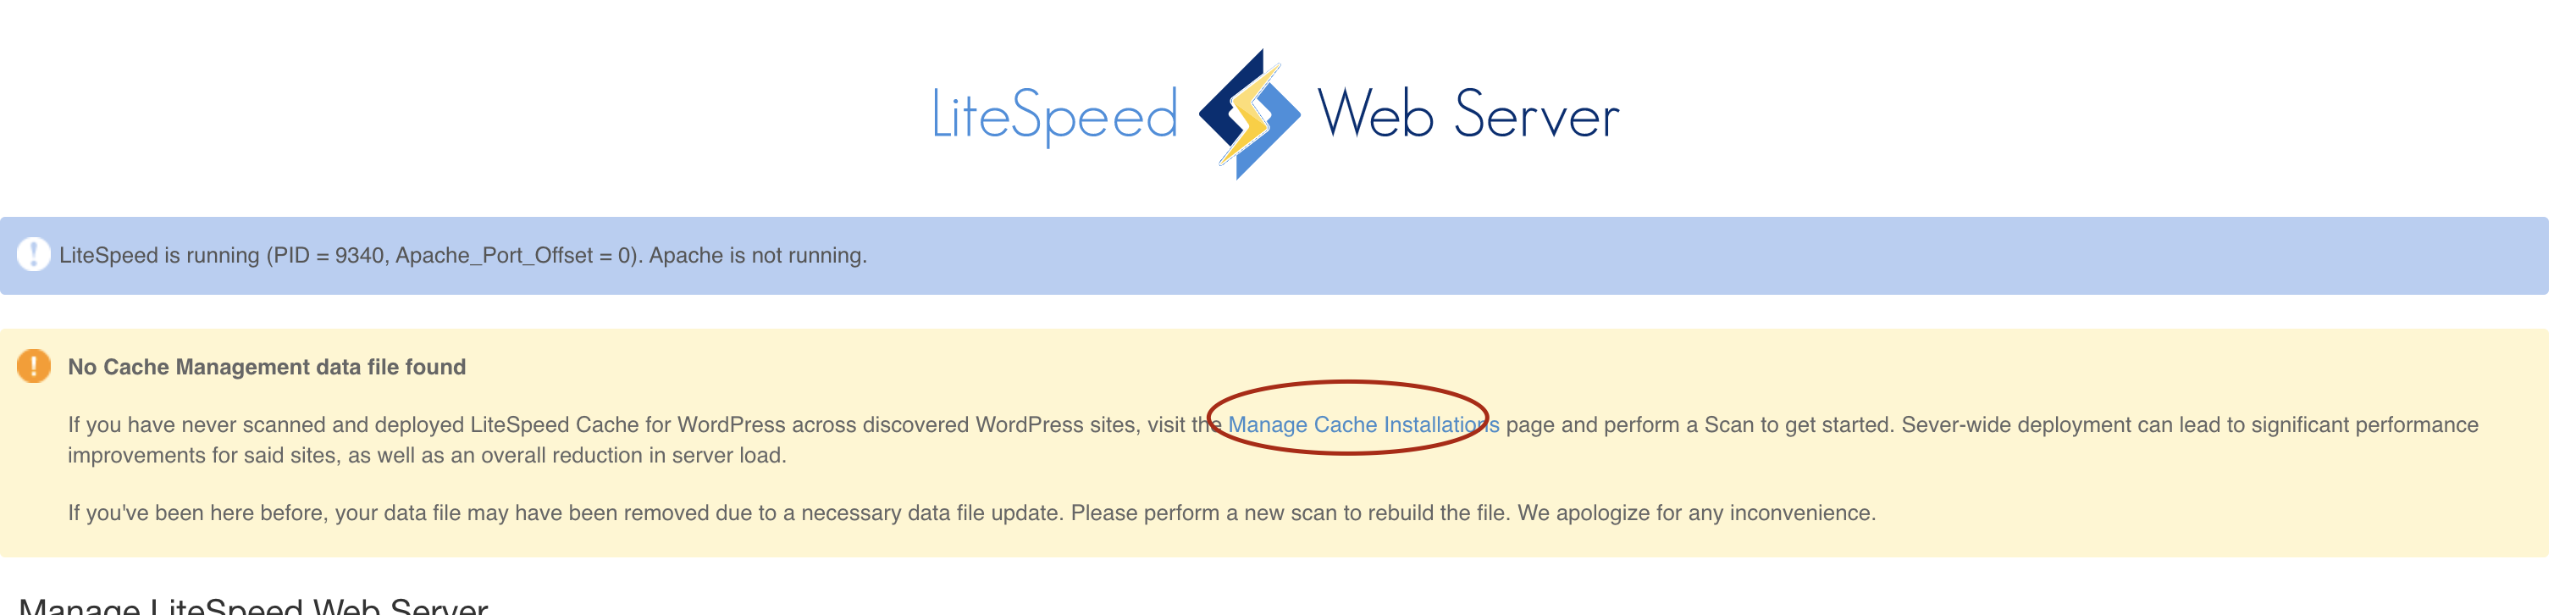
LiteSpeed Cache
You can mass install the LSCache plugin in all of the WordPress installations on your server using the LiteSpeed Plesk Extension. After you have installed the LiteSpeed Plesk Extension, you may see a No Cache Management data file found message, like so:
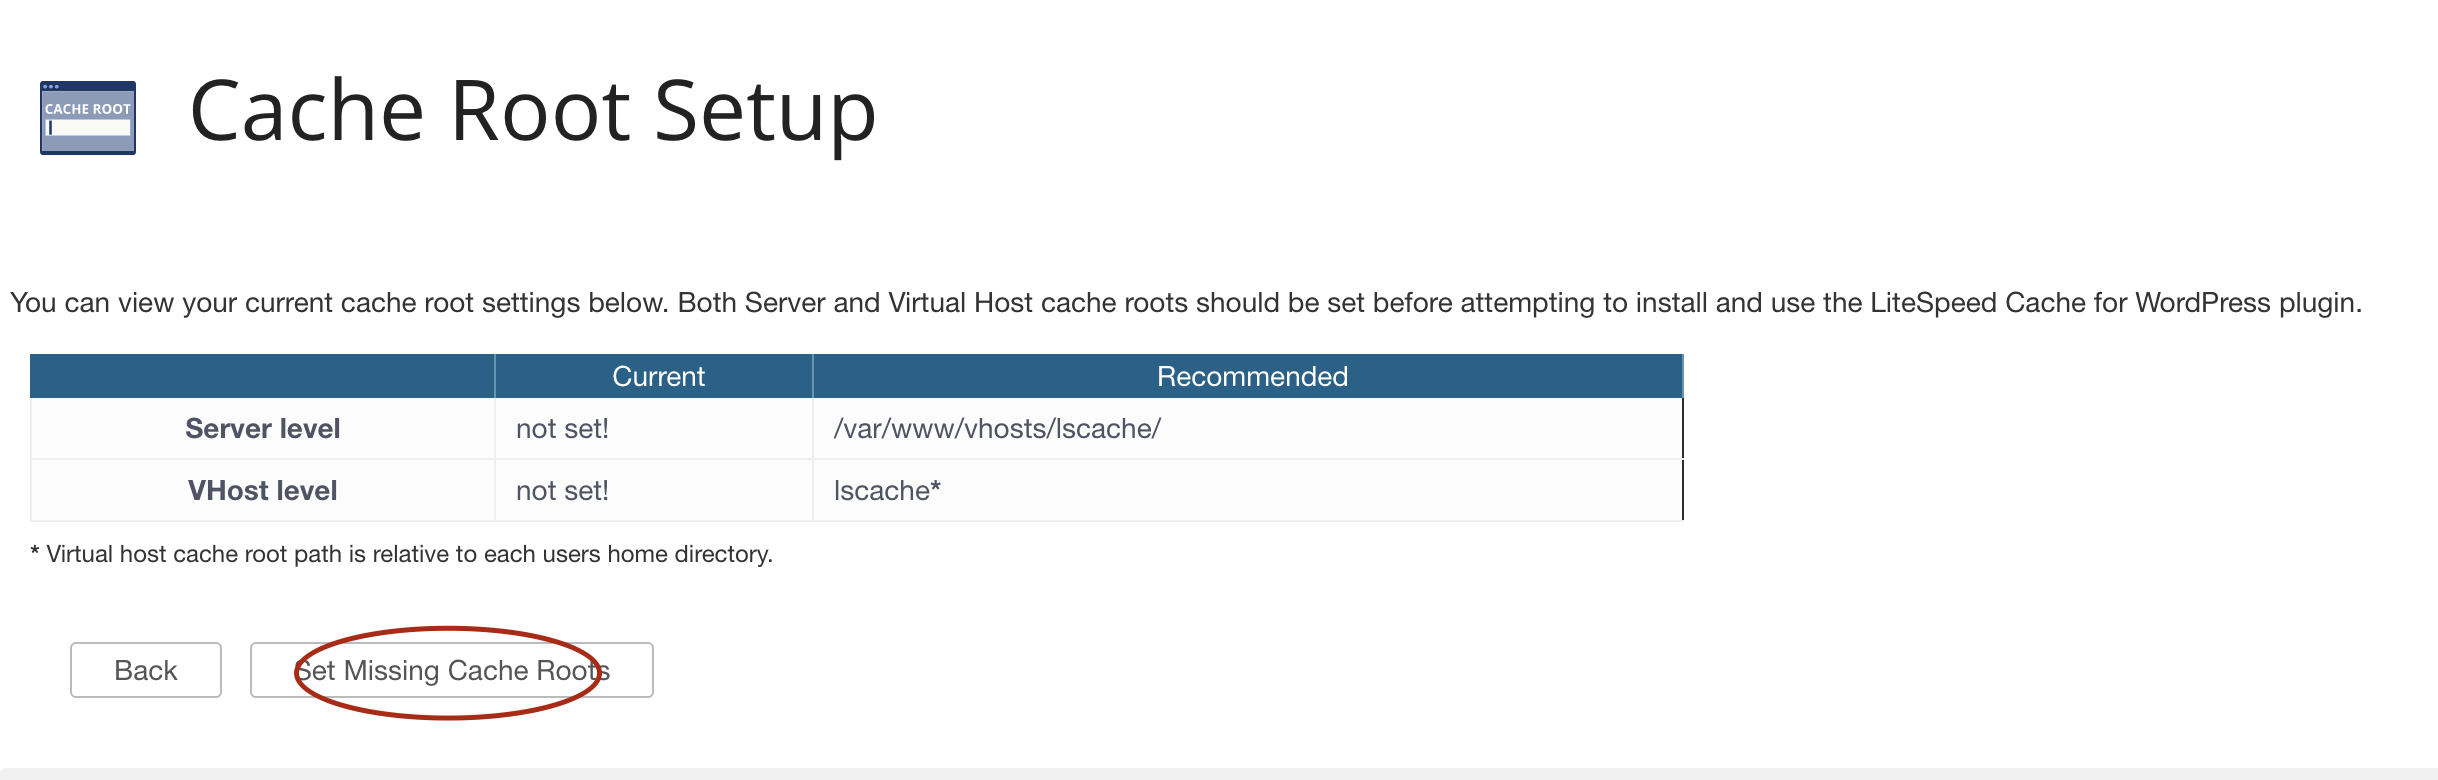
Set Cache Root
Click Manage Cache Installations.
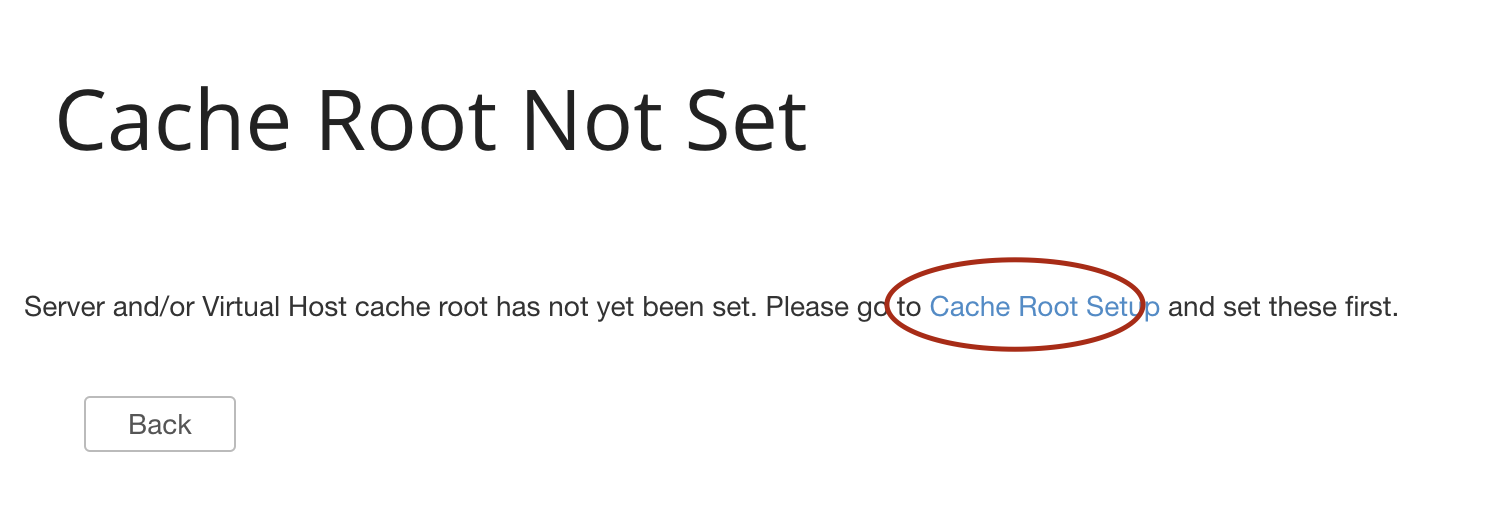
Click Set Missing Cache Roots.
Scan and Enable
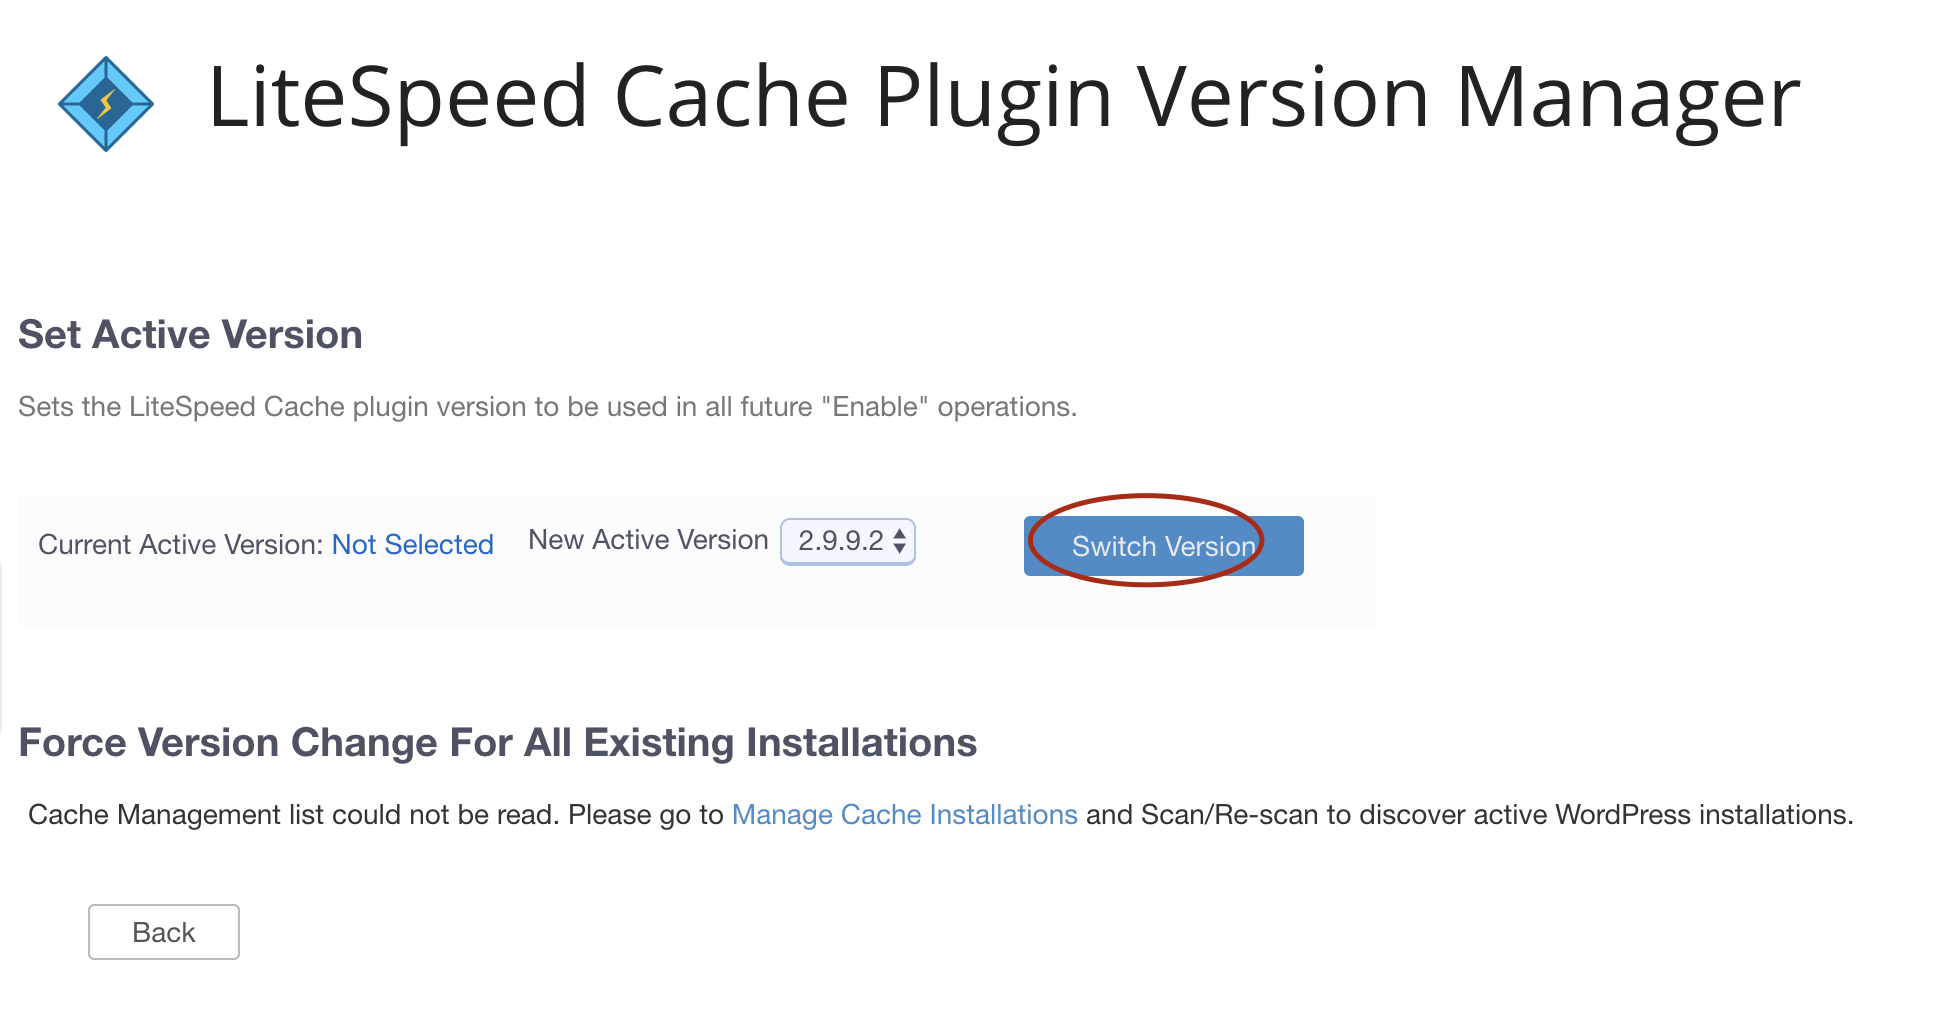
After successfully setting up the cache root, go back to extension main page and click on Manage Cache Installations again.
The next step will be to scan for WordPress installations across the server, and install LSCache for WordPress (LSCWP) on them, but first, you'll need to choose which version of the LSCache plugin to install.

Usually you should choose the latest version available.
The scan will take a while, depending on how many sites you have.
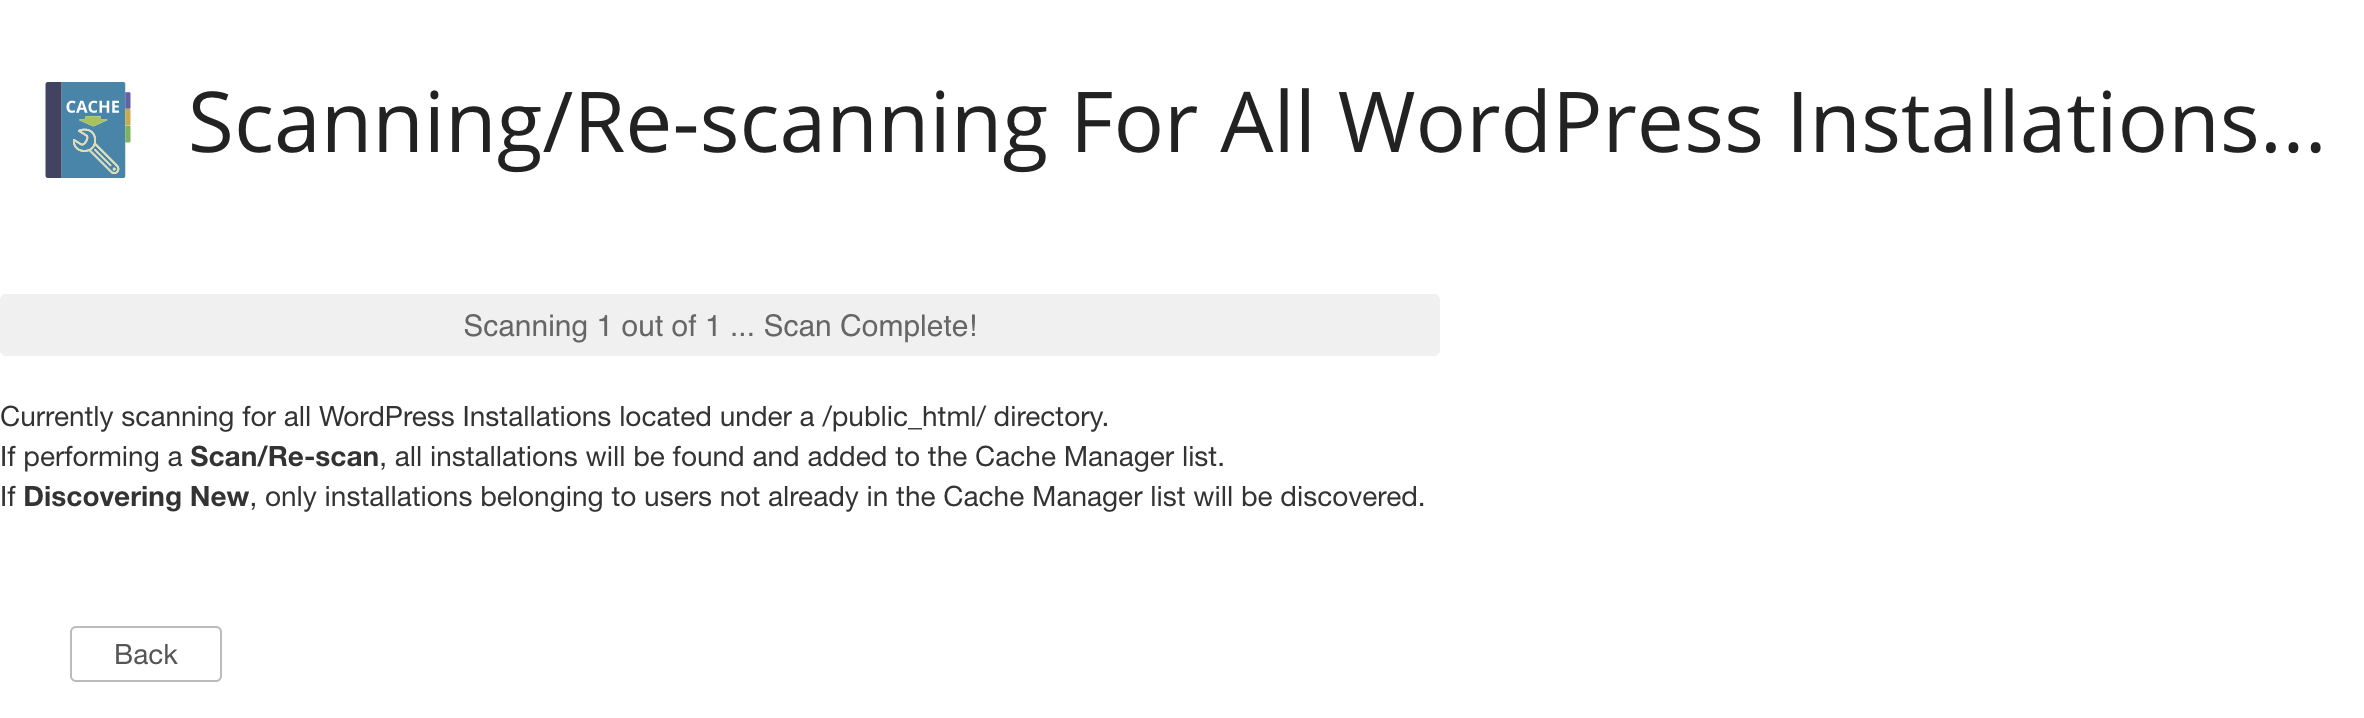
Once the scan is complete, you will be able to manage the WordPress sites the scan discovered. In the future, you can use the Discover New button, which will save time as it will only scan the sites that have not been scanned before.
Now you can choose to enable the LiteSpeed Cache Plugin for WordPress individually, or run bulk activation across multiple sites.
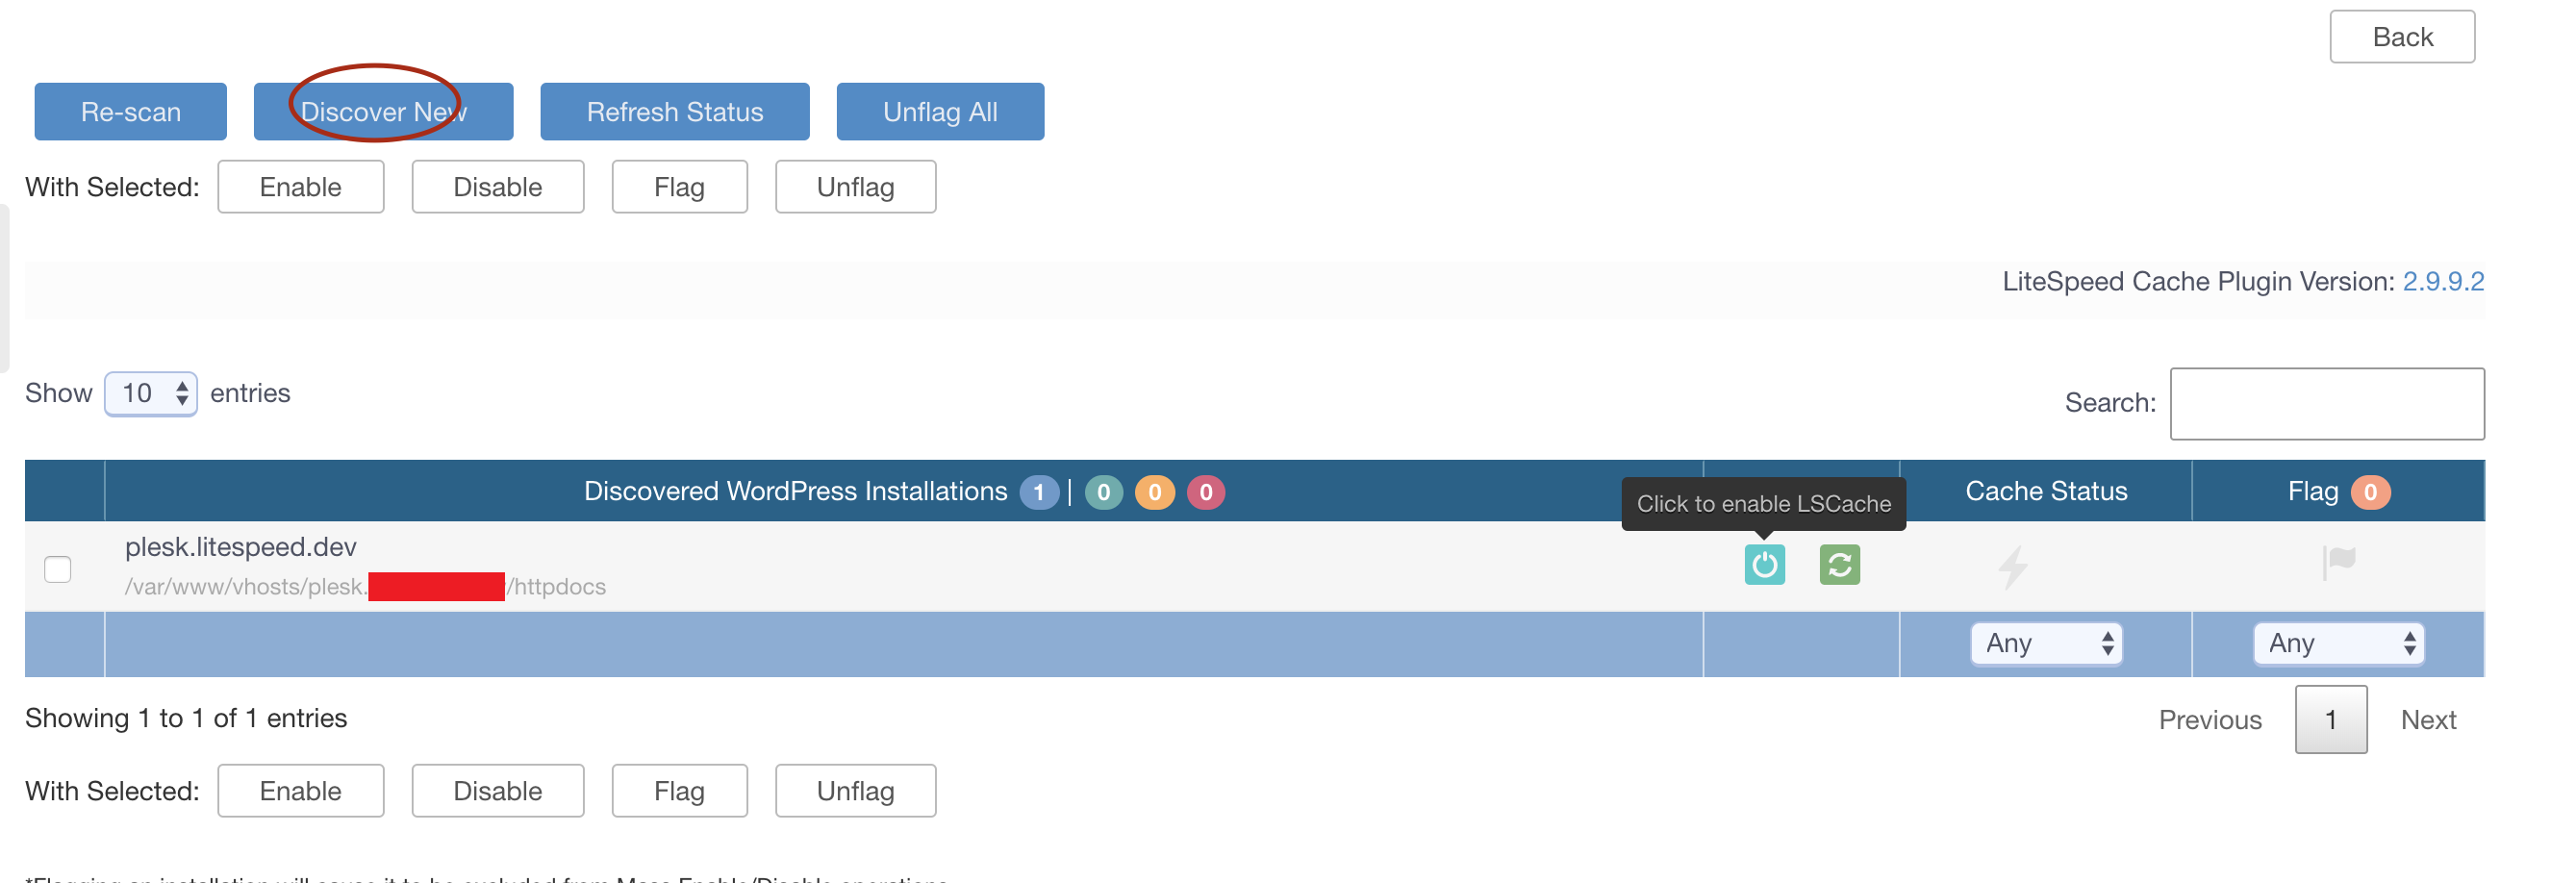
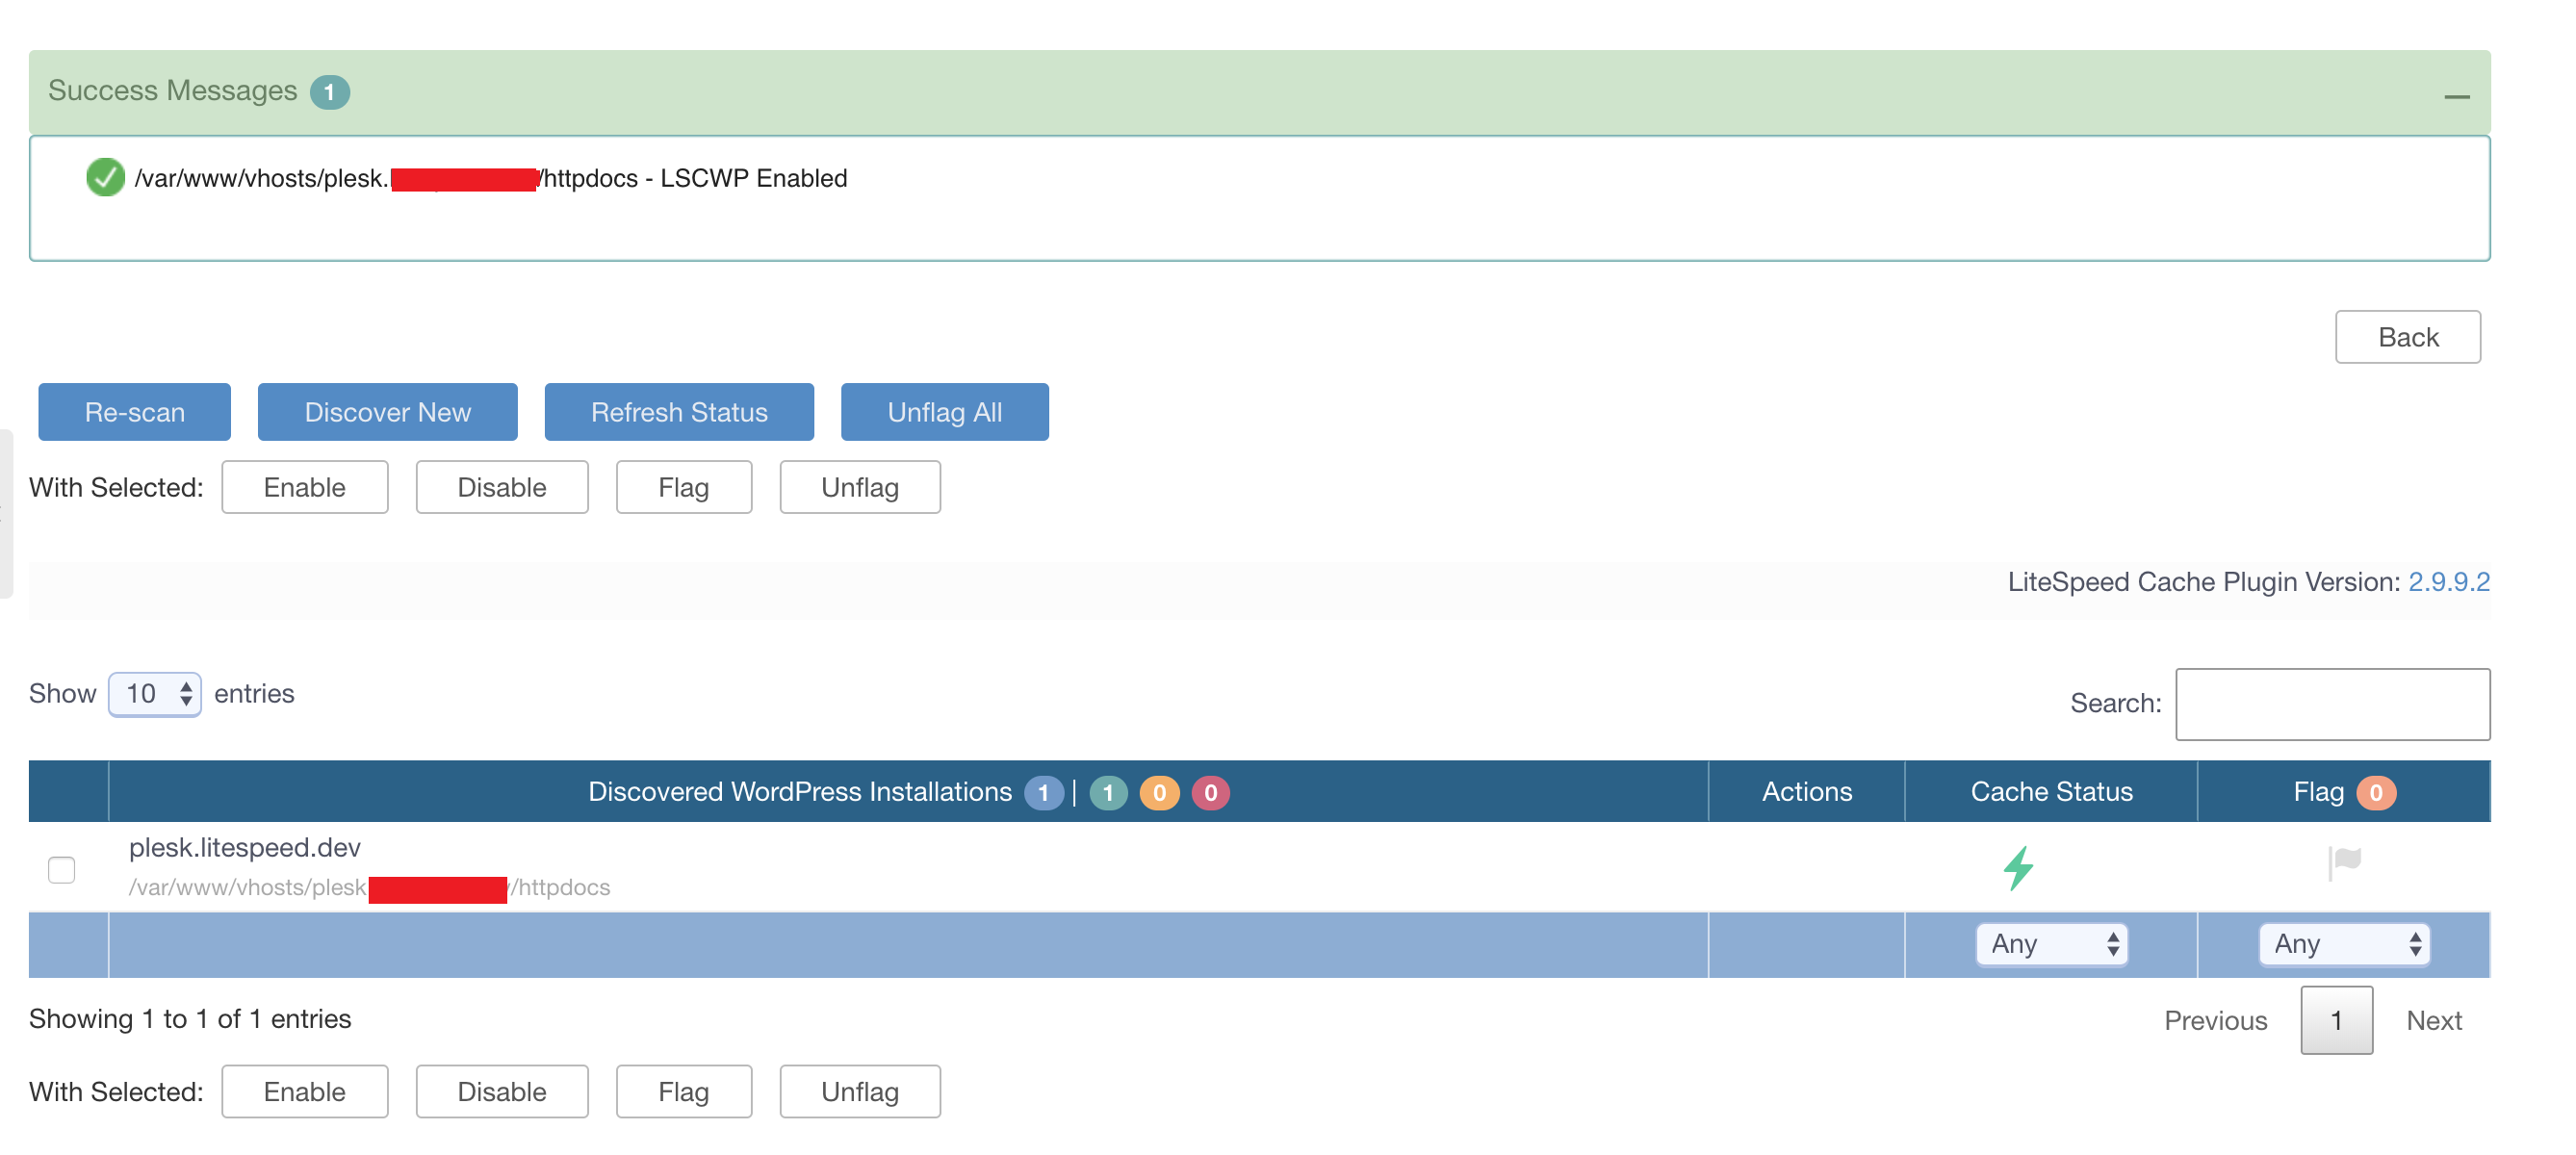
Once LSCWP is successfully activated, you will see a green light symbol in Cache Status column.
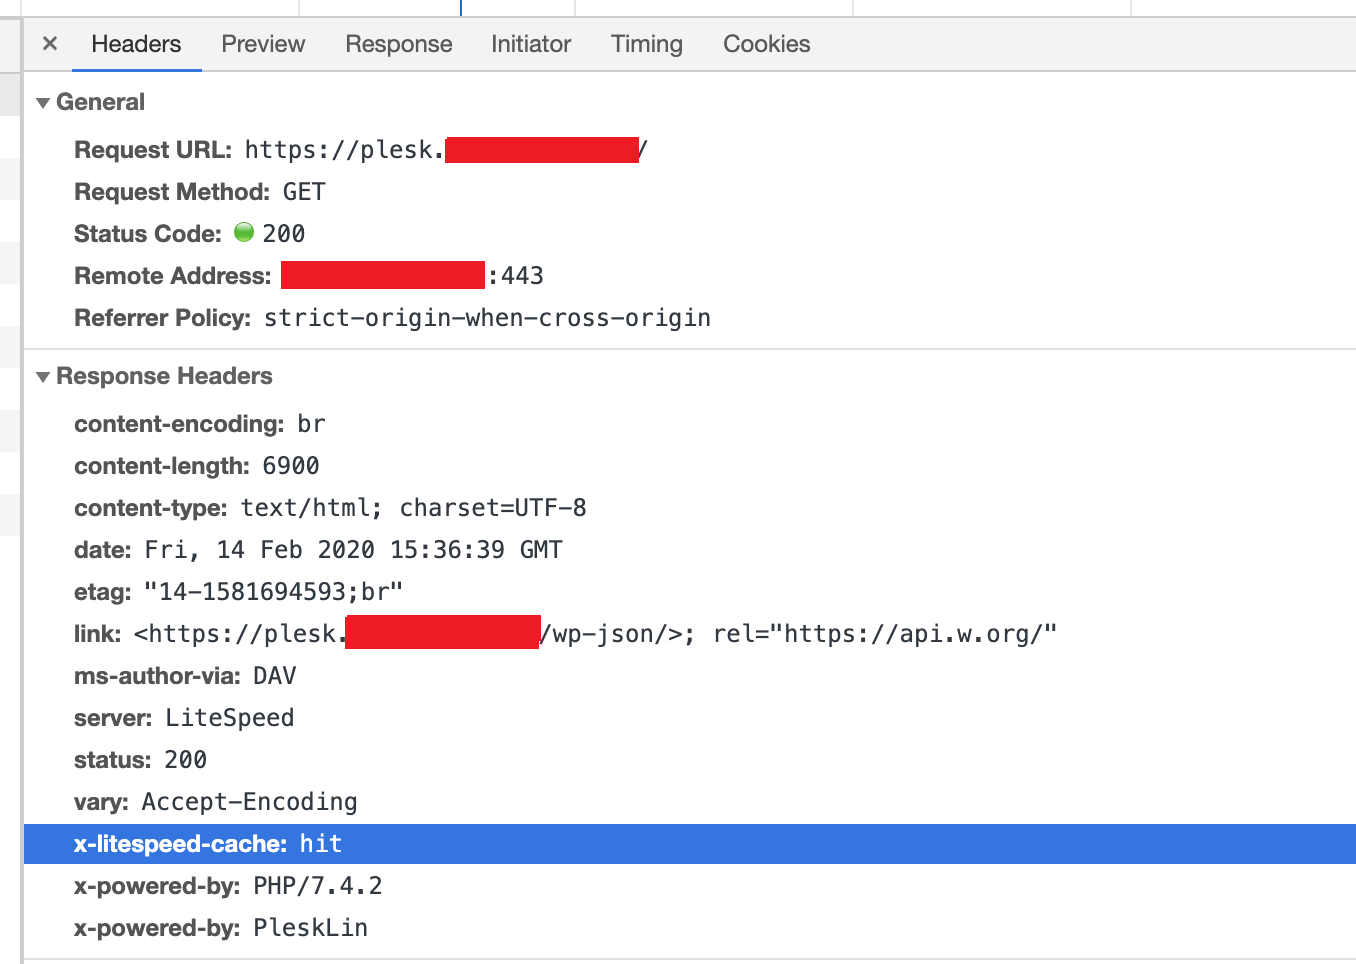
If you wish to verify a site is cached, look for the x-litespeed-cache: hit response header. This indicates the caching is working.
QUIC
QUIC connections will use UDP port 443. Please make sure your firewall is not blocking it.
HTTP/2 and HTTP/3 via Apache Config
You can enable and disable a variety of protocols in httpd.conf, using the SpdyEnabled directive.
Example
Disable all protocols
<IfModule LiteSpeed>
SpdyEnabled off
</IfModule>
Example
Enable HTTP protocols and disable everything else
<IfModule LiteSpeed>
SpdyEnabled http2 http3
</IfModule>
HTTP protocols are enabled by default, while SPDY protols are disabled by default.
| Parameter | Function | Default Value |
|---|---|---|
spdy2 | Enable SPDY/2 | Disabled |
spdy3 | Enable SPDY/3 | Disabled |
http2 | Enable HTTP/2 | Enabled |
http3 | Enable HTTP/3 | Enabled |
off | Disable all protocols |
Tip
When you use this directive to explicitly enable one or more protocols, anything not selected will be disabled. For example, SpdyEnabled http2 will enable HTTP/2, while SPDY/2, SPDY/3 and HTTP/3 will be disabled. Be careful not to inadvertantly disable a protocol you wanted to use!
Cache Redis for Users
Cache Redis for Users installs and activates Redis for each user you wish to configure object cache for. This only operates in environments where you have a sandboxed (caged) system like CloudLinux or LiteSpeed Containers. Each user's cached data is independent guaranteeing speed and security.
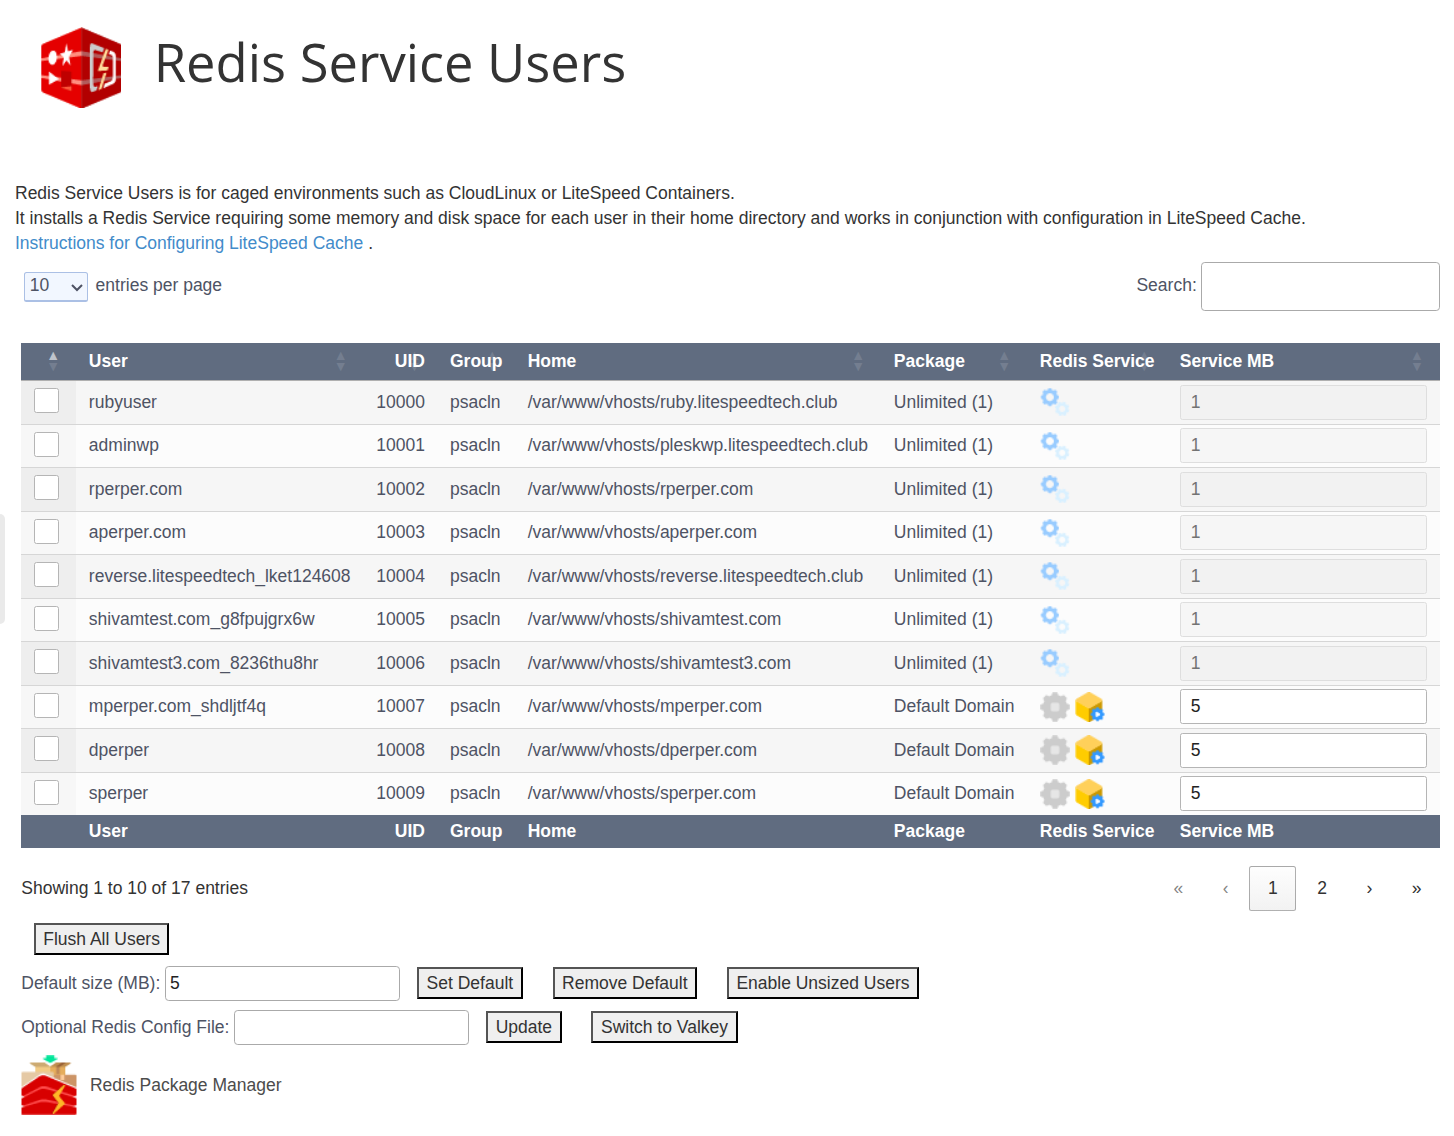
This page lists all of the users on your system. As stated on the screen, this facility is for caged environments like CloudLinux or LiteSpeed Containers.
- CloudLinux: Turning on a caged environment is described in the CloudLinux documentation and here
- LiteSpeed Containers: Turning on LiteSpeed Containers is described in Namespace Containers
When enabled, it installs a Redis Service requiring some memory and disk space for each user in their home directory and works in conjuction with configuration in LiteSpeed Cache.
Each row contains 2 columns of icons. The first column is for full enable and disable of the Redis service for the user:
- To install a Redis service for a particular user press the enable icon on the line for that user:
 . Once you have installed the Redis Service you will see the screen refreshed and the icon for that user will appear disabled. This icon is also used for services which are set up and where the service is currently disabled.
 - To remove the Redis service for a particular user press the disable icon on the line for that user:
 .
. - If the service is enabled elsewhere and you wish to disable this particular user for now press the Disable Service button
 .
.
The second column is for finer management of the service definition:
- To set up the service so that a user in Plesk or an administrator later can enable it press the set up icon:
 .
. - To disable the service for a running user, but leave the service so it can be enabled by the Plesk user, press the disable service icon: . If using the default service definition this may be in the first column.
- To remove the setup so that the user in Plesk can no longer start the service, press the remove setup icon:
 .
.
Service MB: Each user gets their own instance of Redis and you can specify the size of the instance. The size is in MB and can be any value from 1 to 1024 with a default of 64. A Plesk user can use the Plugin to enable or disable the service, but it must be enabled here first and the size specified here is the size used. To change the size, you must disable the service, specify the size and reenable it.
The buttons under the table will change based on boxes checked and the state of the Redis service for each user. When you check a box, only those users with exactly the same state can be checked as well.
- Disable: The same as pressing the disable icon for each user checked.
- Enable: The same as pressing the enable icon for each user checked without a setup.
- Disable Service: The same as pressing the disable service icon for each user checked.
- Setup: The same as pressing the setup icon for each user checked.
- Remove Setup: The same as pressing the remove setup icon for each user checked.
- Enable Service: The same as pressing the enable icon for each user checked who is set up but whose service is disabled.
- Flush All Users: Sends a Redis
flushallcommand to all active Redis services to clear the cache. - Flush: Sends a Redis
flushallcommand to all active Redis service users checked.
Default size (MB): For users with no specified size (either directly here or in packages), you can specify a size to be used. Press Set Default to save the setting and display additional buttons:
- Enable Unsized Users: This enables Redis for all users which do not have a size specified here or in packages. Note that this includes new users as well. The text will change to Disable Unsized Users to disable Redis for all unsized users.
- Remove Default: Removes the default value, stops all running unsized Redis services and assures that new users will not start Redis.
Optional Redis Config File: Specify a file containing Redis configuration parameters. We recommend that this file be named /usr/local/lsws/lsns/conf/redis.conf. The contents are usually as simple as:
maxmemory-policy allkeys-lru
Switch to Valkey: Press this button to use Valkey rather than Redis. Valkey is plug compatiable with Redis and is described here. Pressing this button will install Valkey on your system (if it is not already there) and restart all running Redis services to use Valkey. You can press Switch to Redis to switch back to Redis.
How it works
The Redis service is created specific to that user and with a socket within the user's home directory. For CloudLinux the socket is in $HOME/.cagefs/tmp/redis.sock and for LiteSpeed Containers it is in $HOME/.lsns/tmp/redis.sock. As caged environments these directories are mounted to /tmp for the user resulting in a consistent socket name of /tmp/redis.sock for all users.
For LiteSpeed Containers the Troubleshooting section describes steps to help you enter and otherwise diagnose issues with caging. For CloudLinux there are many tools to help you identify caging issues.
Packages
In the Redis Service Users screen described above there is a column named Package, which in Plesk represents service plans. If you organize your users into separate service plans you can enable and disable all of the users in a given service plan using the Redis Package Manager. The biggest advantage to using packages is that as users are added to service plans, Redis services will be created to service them. To manage packages press the Redis Package Manager icon.
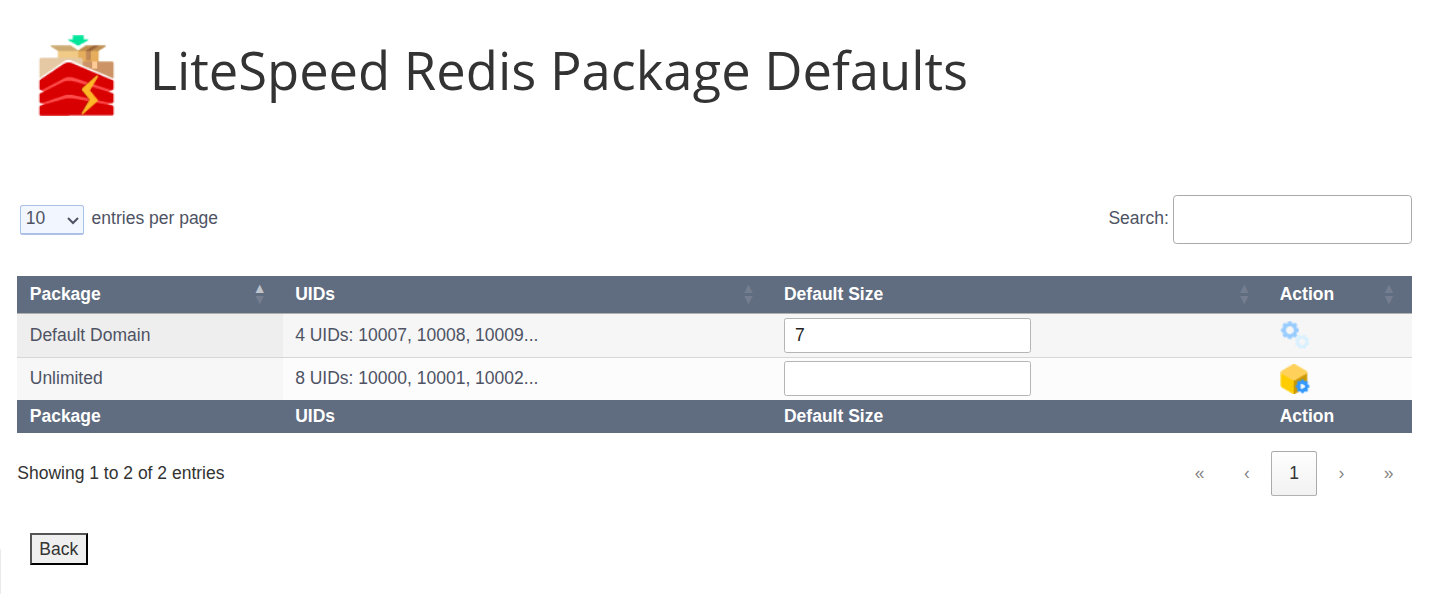
On this screen the Package column is the service plan, the UIDs column is a count of UIDs in the service plan and up to 3 of their numbers. Default Size is the size in MB for the Redis service to be activated. The Action column represents the actions you can perform, and—as for the Redis Service User screen—will change based on the state of the Redis package definition.
To set up a package, enter a Default Size for the package and press the Set Package Default icon
To then activate the services for all of the users, press the Enable All Users icon 
If you have manually disabled Redis for one or more users, this same icon will be displayed but will be renamed Enable Pending Users. Click this icon to activate the services for all manually disabled users.
Once enabled, you can disable all of the users in the package by pressing the Disable All Users icon 
Finally, to remove the configuration definition for the Package you can press the Remove Package Default icon
Configuring Cache to Use Redis
To use the Redis feature, you must configure it within the LiteSpeed WordPress Cache admin panel within Plesk > Customers > Domain > Login > LiteSpeed Cache > Cache > Object:
- Object Cache On. There is a Status block which must say
Redis Extension: Enabled. If it saysDisabledyou must install the Redis Extension; see the Plesk documentation for doing that. - Method:
Redis - Host:
/tmp/redis.sock - Port:
0
Press the Save Changes button. More details configuring LiteSpeed WP Cache are described here.
Monitoring Redis
You may want to see how Redis is doing for a particular user. For example, you might want to see how much memory it's using. This is done with the redis-cli program from a command line.
For example, for CloudLinux for the user USER:
redis-cli -s /var/www/vhosts/USER/.cagefs/tmp/redis.sock info memory
This command connects to the home /tmp directory socket created by the LiteSpeed Redis Service and runs the CLI command info memory. As discussed above, we recommend that the memory policy be set so that it uses only the necessary amount of memory.
Command Line Interface
Using the Plesk PlugIn panels to rollout a large number of Redis installations for LiteSpeed might be too difficult to do and so we provide a command line interface (CLI). This can also help in installing systems where use of the panels may be problematic.
This is done with the program:
/opt/psa/admin/sbin/modules/litespeed/redis_user_action.sh
This program must be run as root and can be used to do most everything that can be done with the Cache Redis panels. If there is an error it will return a non-zero program return code.
The use of this program begins with the first parameter which is an action. Additional parameters depend on the action specified.
| Action | Description | Additional Parameters | Example |
|---|---|---|---|
cleanup | Stops and deletes the service for a user and deletes the configuration | UID | ./redis_user_action.sh cleanup 10011 |
configdel | Removes the redis configuration file from the redis user services and restarts them. | None | ./redis_user_action.sh configdel |
configupd | Adds/updates the redis configuration file for the redis user services and restarts them. | Fully qualified configuration file name | ./redis_user_action.sh configupd /usr/local/lsws/lsns/conf/redis.conf |
defaultsizeget | Displays the default redis configuration size. | None | ./redis_user_action.sh defaultsizeget |
defaultsizeset | Sets the default redis configuration size. | Size in MB (0 to delete) | ./redis_user_action.sh defaultsizeset 10 |
disable | Removes the user's configuration and deactivates the redis service for one or more users. The USER HOME_DIR and SIZEMB triplet can repeat 1 or more times. | - LSWS_HOME_DIR: LiteSpeed home directory. - USER: User's name. - HOME_DIR: User's home directory. - SIZEMB: Redis size in MB for this service. Not used but must be specified. | ./redis_user_action.sh disable /usr/local/lsws user /var/www/vhosts/user 0 user2 /var/www/vhosts/user2 0 |
disablepkg | Deletes all of the services for the users in a package. | Package name | ./redis_user_action.sh disablepkg Unlimited |
disablesetup | Removes the user's configuration for one or more users. The USER HOME_DIR and SIZEMB triplet can repeat 1 or more times. | - LSWS_HOME_DIR: LiteSpeed home directory. - USER: User's name. - HOME_DIR: User's home directory. - SIZEMB: Redis size in MB for this service. Not used but must be specified. | ./redis_user_action.sh disablesetup /usr/local/lsws user /var/www/vhosts/user 0 user2 /var/www/vhosts/user2 0 |
disableunsized | Disables the Redis services previously enabled with enableunsized and makes sure that new unsized users are not started automatically. | None | ./redis_user_action.sh disableunsized |
enable | Configures and activates the redis service for one or more users. The USER HOME_DIR and SIZEMB triplet can repeat 1 or more times. | - LSWS_HOME_DIR: LiteSpeed home directory. - USER: User's name. - HOME_DIR: User's home directory. - SIZEMB: Redis size in MB for this service. | ./redis_user_action.sh enable /usr/local/lsws user /var/www/vhosts/user 10 user2 /var/www/vhosts/user2 20 |
enablepkg | Creates and starts redis services for each user referenced in a package. You must run lspkgctl to define the size of the package before enabling it. | Package name | ./redis_user_action.sh enablepkg default |
enablesetup | Creates the size entry for the user but does not start the service. Similar to enable in that you must specify the LiteSpeed home directory and the user information. | - LSWS_HOME_DIR: LiteSpeed home directory. - USER: User's name. - HOME_DIR: User's home directory. - SIZEMB: Redis size in MB for this service. | ./redis_user_action.sh enablesetup /usr/local/lsws user /var/www/vhosts/user 10 user2 /var/www/vhosts/user2 20 |
enableunsized | Creates and starts redis services for all users which does not have an individual or package size defined. This includes new users. | None | ./redis_user_action.sh enableunsized |
getdefaultenabled | Returns a program return code of 0 if you have unsized users enabled. | None | ./redis_user_action.sh getdefaultenabled |
getuseredis | Returns a program return code of 0 if redis is enabled; 1 if valkey is enabled. | None | ./redis_user_action.sh getuseredis |
list | Lists running services | None | ./redis_user_action.sh list |
listdefaultusers | Lists users which do not have an assigned size directly or in packages. | None | ./redis_user_action.sh list defaultusers |
setuseredis | Sets redis as service for this facility and restarts all user services. | None | ./redis_user_action.sh setuseredis |
setusevalkey | Sets valkey as service for this facility (installs it if necessary) and restarts all user services. | None | ./redis_user_action.sh setusevalkey |
TLS
You can enhance Plesk's security features by enabling TLS 1.3 and disabling weak cipher suites.
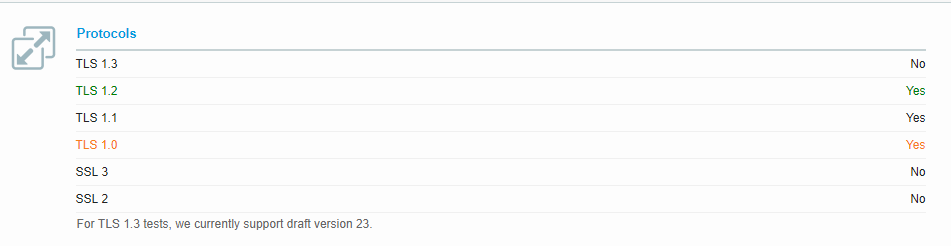
By default, Plesk configuration enables TLS1.0 , TLS1.1 and TLS1.2. This guide will show you how to enable TLS 1.3.
This guide is made and tested on Plesk 17.8 and Centos 7.5. For Debian/Ubuntu Plesk ,configuration files should be located in /etc/apache2/mods-available/ssl.conf.
Don't forget, as with all changes to Apache config files, you will need to restart the server when the adjustments below are made. Restart with the following command:
systemctl restart lsws
Enable TLS1.3
Edit the file /etc/httpd/conf.d/ssl.conf.
Find the following line and comment out (you can use # ):
<IfModule mod_ssl.c>
SSLProtocol +TLSv1 +TLSv1.1 +TLSv1.2
SSLCipherSuite HIGH:!aNULL:!MD5
</IfModule>
Replace it with:
<IfModule LiteSpeed>
SSLProtocol TLSv1.1 TLSv1.2 TLSv1.3
SSLCipherSuite HIGH:!aNULL:!MD5
</IfModule>
This enables TLS1.1 , TLS1.2 and TLS1.3
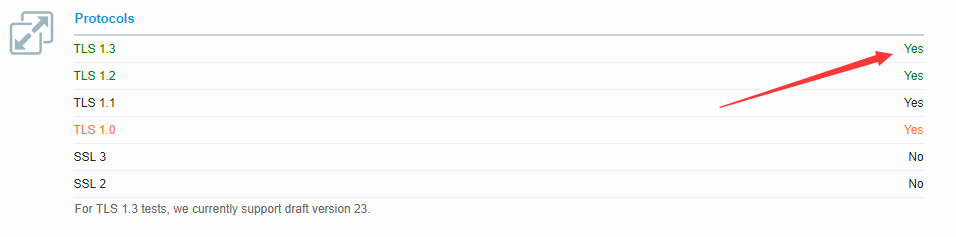
If you want to disable TLS1.1 as well, then change the line to:
SSLProtocol TLSv1.2 TLSv1.3
Disable Weak Cipher Suites (Optional)
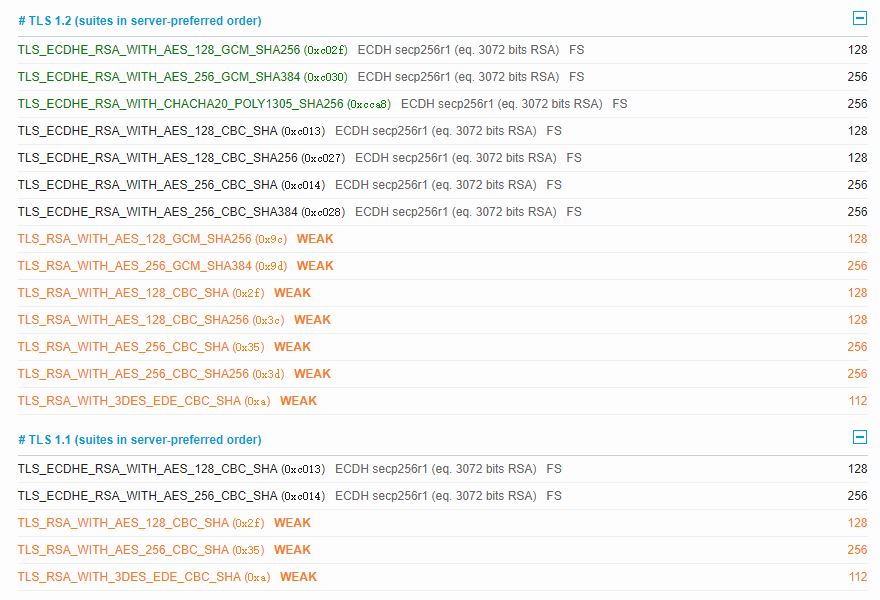
By default, Plesk also comes with some weak cipher suites. If you want to disable them, find the following line:
SSLCipherSuite HIGH:!aNULL:!MD5
And replace it with:
SSLCipherSuite TLS_CHACHA20_POLY1305_SHA256:TLS_AES_128_GCM_SHA256:TLS_AES_256_GCM_SHA384:TLS_ECDHE_RSA_WITH_AES_128_GCM_SHA256:TLS_ECDHE_RSA_WITH_AES_256_GCM_SHA384:TLS_ECDHE_RSA_WITH_AES_128_CBC_SHA256:TLS_ECDHE_RSA_WITH_AES_128_CBC_SHA:TLS_ECDHE_RSA_WITH_AES_256_CBC_SHA384:TLS_ECDHE_RSA_WITH_AES_256_CBC_SHA:TLS_ECDHE_RSA_WITH_AES_128_CBC_SHA:TLS_ECDHE_RSA_WITH_AES_256_CBC_SHA
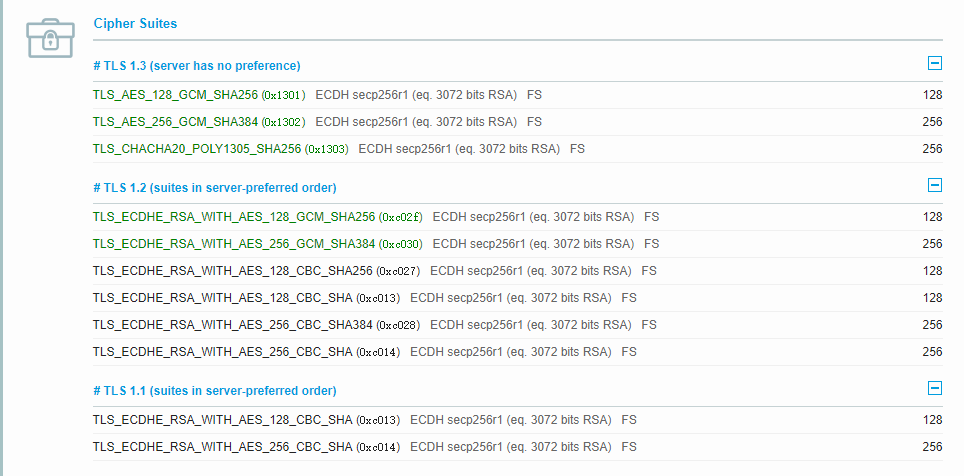
Be aware, this may cause CPU load.
Testing is done through SSL Labs.
OCSP Stapling
Online Certificate Status Protocol (OCSP) is an alternative to the Certificate Revocation List (CRL) protocol, and is used to check whether an SSL Certificate has been revoked. OCSP is an improvement over CRL because it allows the server to query the responder directly and then cache the response.
Requirements:
- Non-self-signed SSL Certificate
- Port 443 enabled for https
Enable OCSP
As of this writing, Plesk has not enabled OCSP by default, though it has been a feature request for some time.
As a workaround, create a file named lsocsp.conf and place it in the following directory depending upon your system:
- For CentOS, the
/etc/httpd/conf.d/directory - For Debian, the
/etc/apache2/conf.d/directory - For Ubuntu and Debian 11, the
/etc/apache2/conf-enableddirectory
This lsocsp.conf file should contain the following:
<IfModule Litespeed>
SSLStaplingCache shmcb:/var/run/ocsp(128000)
SSLUseStapling on
</IfModule>
Restart LiteSpeed Web Server to make your changes take effect.
Verify OCSP is Working
There are three ways to verify that OCSP stapling is working.
- METHOD 1: Visit SSL Labs, run the test for your domain, and search the results for
OCSP stapling. - METHOD 2: Check the
/dev/shm/lsws/ocspcache/directory. If files have been created there, then your OCSP stapling is working. - METHOD 3: Use the
opensslcommand:If OCSP stapling is working, it will showopenssl s_client -connect Your_Domain:443 -status | grep "OCSP Response Status"ok. Check OCSP Response Status in the OCSP Response Data section. It should besuccessful.
Note
The OCSP response is cached for 1 day. If you change your SSL certificate provider and see a cached OCSP response for a domain, you can safely remove the cache files under OCSP cache folder, but do not remove the folder itself.
WebAdmin Console
The LiteSpeed WebAdmin Console uses port 7088 instead of 7080 for Plesk. Check your firewall to see if port 7088 has been enabled. Then you should be able to access WebAdmin through https://SERVER_IP:7088.
Plesk Login Page
You can set up a Plesk login page that doesn't require a port number in the URL, for example, https://192.0.2.0:8443 could become https://example.com.
Create a vhost in Plesk, and then place the following rewrite rule in its .htaccess:
RewriteRule ^(.*)$ https://127.0.0.1:8443/$1 [P,L]
Disable Apache Fallback
LiteSpeed Web Server cannot function without a valid license. For that reason, when a valid license cannot be verified, LSWS automatically switches to Apache. This is done to minimize disruption to the websites hosted on the server.
As of LSWS v6.2.2 you can override this behavior. Add an empty .stay_with_lsws file to the /usr/local/lsws/admin/tmp/ directory, like so:
touch /usr/local/lsws/admin/tmp/.stay_with_lsws
When LSWS fails to detect a valid license, if this file is found, LSWS will not switch to Apache. Any websites hosted on the server will go down, and users will be unable to access them.