Settings
You can configure LSCJoomla to work according to your site's particular needs.
LiteSpeed Cache Configuration
From the Joomla! Administration area, navigate to System > Global Configuration > LiteSpeed Cache. There you will find the following tabs of settings that you may adjust as needed:
Basic Tab
On this tab, you can turn caching on and off, determine the length of time to cache the site, define purging behavior on updates, and turn logging on and off.
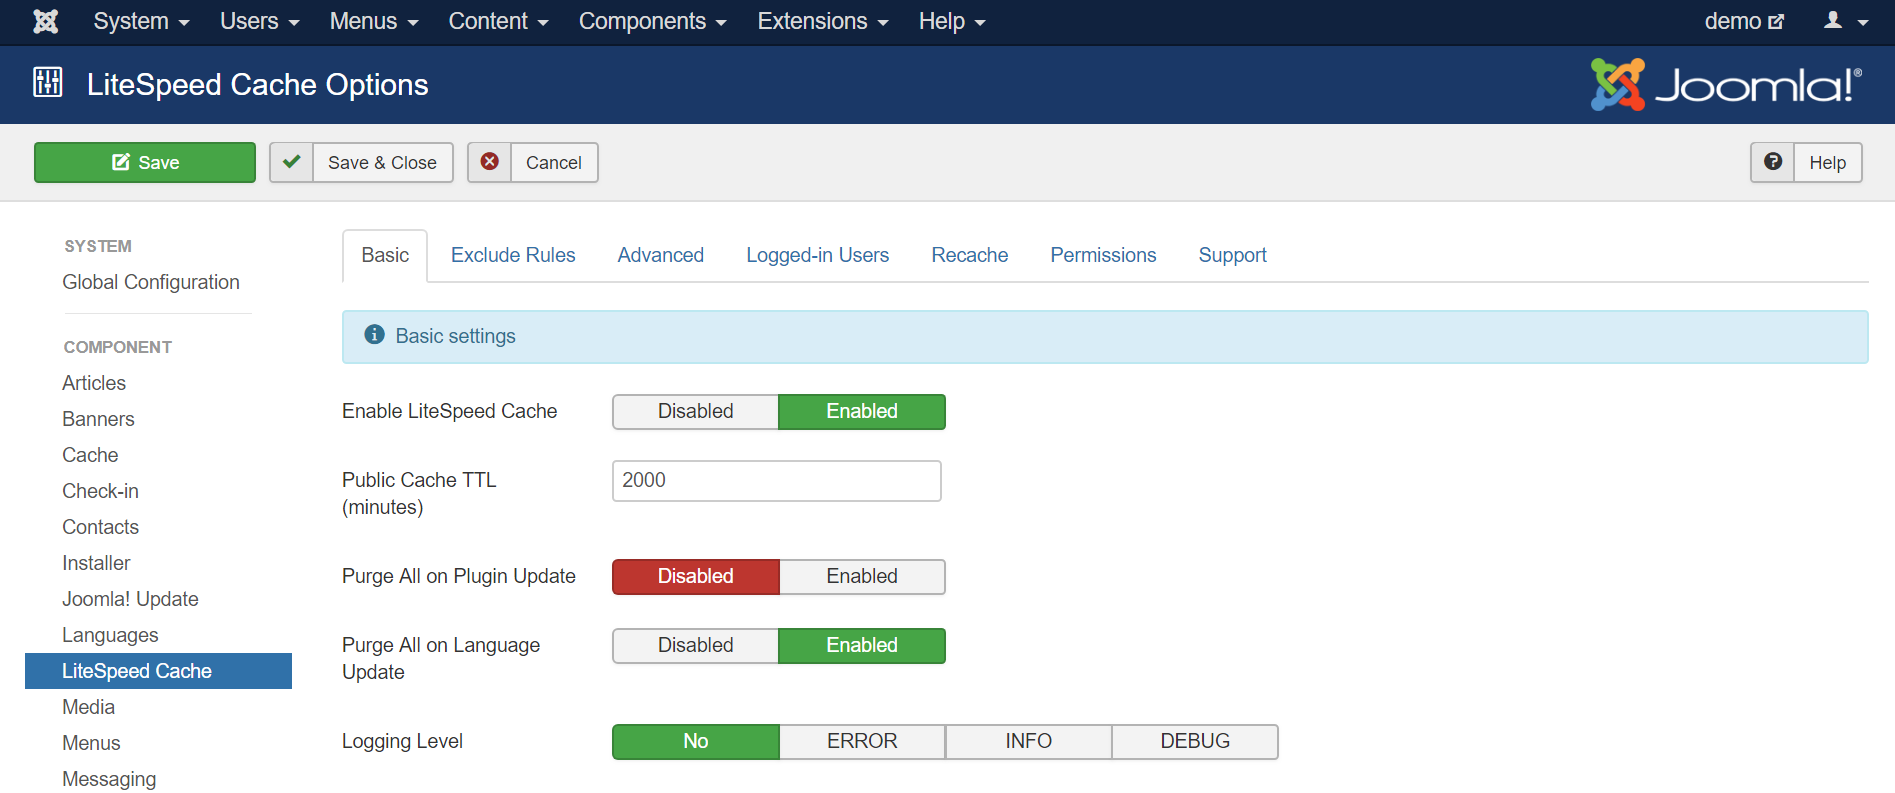
Enable LiteSpeed Cache
By default, caching is already enabled once you install and enable the plugin. If you need to stop caching your site for whatever reason, you can press Disable to turn it off. Simply press Enable to get it back up and running again.
Public Cache TTL
"TTL" stands for "Time to Live," and it refers to the length of time a web page is valid within the cache. The default is 2000 minutes, but if you have a site that updates frequently, you might want to make that number smaller. Similarly, if you have a site that is fairly static and rarely changes, you can make that number much larger.
Note
LSCache’s "smart purge" technology allows you to confidently set a high TTL, knowing that if content changes during that time, the cache will automatically be purged for any pages that are relevant to that change.
Purge All on Plugin Update
If you are concerned that plugin updates are going to change some of the pages of your site (thereby causing the cached copies to become outdated), then you should enable this setting. It’s disabled by default, because usually plugin updates have minimal effect (if any) on the displayed content.
Purge All on Language Update
This is similar to the previous setting, except it refers to language updates, and it is enabled by default.
Logging Level
You can leave logging off in most cases. It’s handy to turn on logging when you are trying to diagnose a problem. If you’ve contacted our support team for help with an issue, chances are we’ll ask you to turn on logging and we’ll also tell you which level would be appropriate.
Tip
If you are turning on LSCJoomla's logging, you might also want to enable Joomla's own debug log. Visit Extensions > Plugins, find the System - Debug plugin, visit the Logging tab, and set Log Almost Everything to Yes. Now you should be able to see Joomla logs in /home/YOUR_ACCOUNT/public_html/administrator/logs, or another folder defined in System > Global Configuration > System > Path to Log Folder.
Any time you turn on logging, it should be temporary, as logs can eat up disk space pretty quickly.
Exclude Rules Tab
Your site may have pages that should not be cached. This tab allows you to specify exceptions. Any pages covered by the following rules will not be cached.
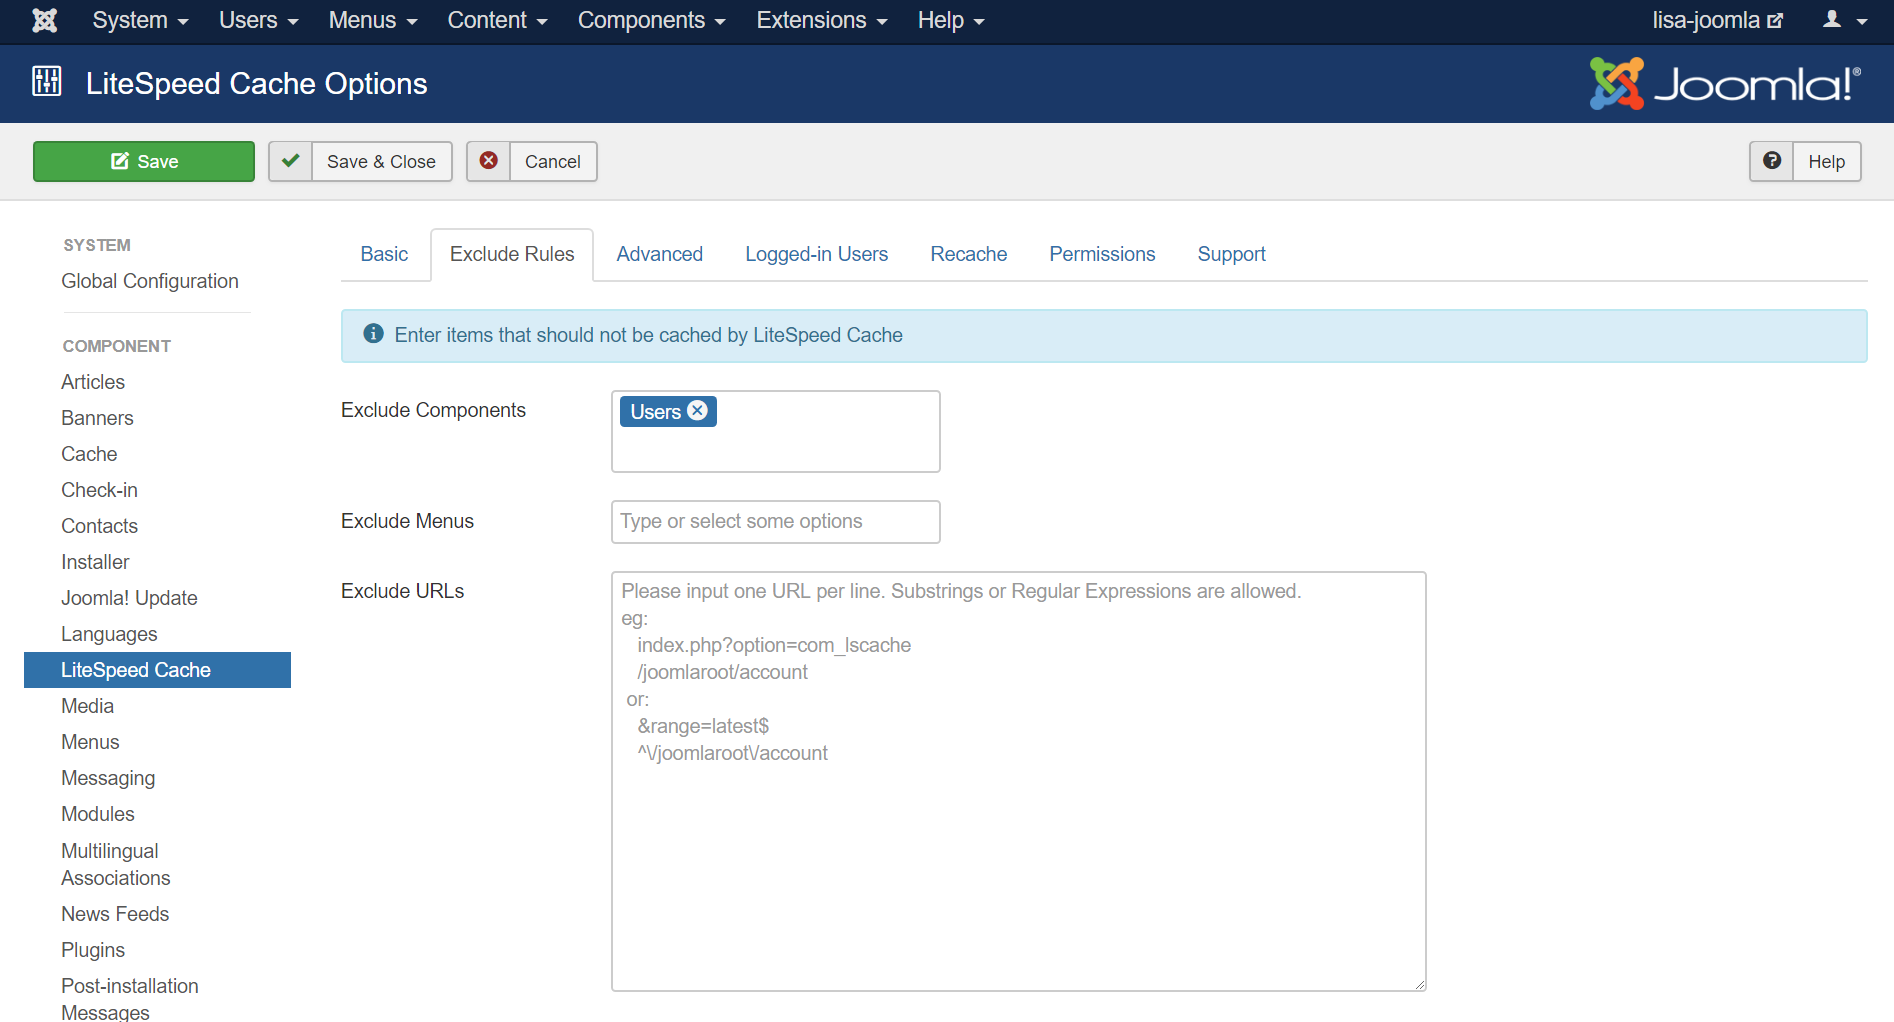
Exclude Components
If you have site components that behave oddly when cached, you can exclude them here. Put your cursor in the box, and a list of available components will appear. Select any component(s) you wish to add to the exclude list. By default the "Users" component is not cached.
Exclude Menus
This field works similarly to the previous one. Put your cursor inside the box, and select any menus to exclude. When you choose a menu, every page that is a part of that menu is excluded from the cache.
Exclude URLs
Use this box to enter individual paths that should not be cached. Enter the paths one per line. You may use regular expressions.
Verify a Page is Not Being Cached
If you have configured LSCache to exclude certain content, you can use this method to verify that it works as expected:
- From a non-logged-in browser, navigate to the page, open the Network tab in the developer tools, refresh the page, and click the first listed resource. This should be the URI of the page, as described above.
- Look for the
X-LiteSpeed-Cache-Control: no-cacheheader. If you find it, then the page has successfully not been served via LSCache.
It's also a good idea to make sure that the browser is not caching the page. For that to be true, you need to look for two headings: - cache-control: no-cache, must-revalidate, max-age=0 - expires: Wed, 11 Jan 1984 05:00:00 GMT
Tip
The date in the expires header can be any date that is prior to the current date.
If either of those headers is not present, or has a different value, the browser is likely caching your page. This can lead to serving outdated or stale content. Typically, browser caching is accidentally enabled via bad optimization rules that add the cache control header to dynamic requests. Check your .htaccess file to fix this.
Advanced Tab
You can set up ESI here (a must if you are trying to cache an ecommerce site), give yourself the ability to clear the cache from a secure link outside of Admin, set a different TTL for the homepage, and set up LSCache to save separate views for mobile and desktop. 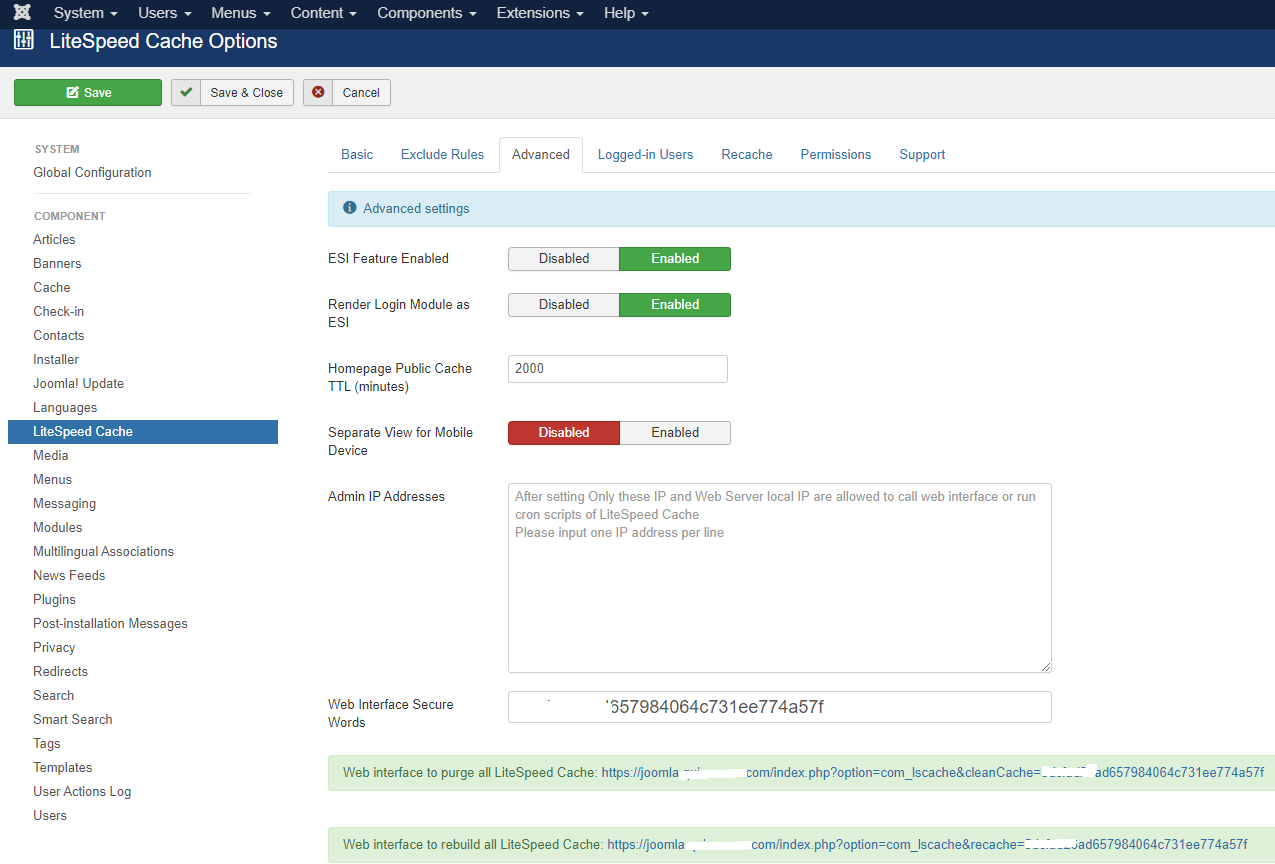
ESI Feature Enabled
LiteSpeed's implementation of ESI (Edge Side Includes) brings caching to the next level by allowing you to mix public and private content on a single page, and still serve that page from cache. ESI is an important aspect of any eCommerce caching strategy.
ESI must be enabled both in the plugin and at the server level. ESI is enabled by default in the plugin (but you can turn it off, if you don't need it). The ESI feature is disabled by default at the server level. You will need to enable ESI in LiteSpeed Enterprise before using ESI-related features in the plugin.
Warning
OpenLiteSpeed does not support ESI, so you cannot use this feature with OpenLiteSpeed.
Want to learn more about ESI? This blog post explains it in some depth.
Render Login Module as ESI
This setting is enabled by default. It allows you to "punch a hole" for the login module on any page where it appears, so that those pages may continue to be cached publicly, while the login module itself is cached privately.
Without ESI, every page that contains a login module would need to be cached privately or not at all after a user logs in.
Note
If you have already configured the login module separately in the LiteSpeed Cache Settings (ESI Module Settings) screen, this setting will not override your previous configuration.
Homepage Public Cache TTL
Use this setting to choose a different TTL than the other pages on your site. This is useful if you have a static home page (set the TTL very high) or a home page that changes much more frequently than the rest of the site (set the TTL very low). The default is 2000 minutes, which is the same as the default main TTL setting.
Separate View for Mobile Device
This option enables users to display a separate HTML for mobile and desktop views. This is primarily used for non-responsive themes, but can also be used in situations where different modules are loaded depending on browser type.
Display Purge Message
This setting controls whether you see a message each time the cache is purged. It's enabled by default, but if you don't need to see a notification, you can disable the settings.
Clean Cache Secure Words
Sometimes you don't want to go to the bother of logging in to the Administration area in order to purge the cache. With this setting you don't have to. Specify a secure string to attach to the end of a special URL, and you may clear the cache at any time by visiting that URL from your browser.
For example, if your Clean Cache Secure Words is set to abracadabra, then you could clear the cache by visiting the following URL:
http://example.com/joomlapath/index.php?option=com_lscache&cleancache=abracadabra
We do recommend you choose something more secure than abracadabra, though.
If the cache was successfully cleared, you will see the confirmation message, All LiteSpeed Cache Purged!.
Web interface to purge all LiteSpeed Cache
To manually purge all LiteSpeed Cache from the web interface, click the Web interface to purge all LiteSpeed Cache URL. You can bookmark this URL to avoid logging into the Joomla backend in the future.
Web interface to rebuild all LiteSpeed Cache
To manually start the crawler to rebuild all LiteSpeed Cache, click the Web interface to rebuild all LiteSpeed Cache URL. You can also set up a cron job to do this periodically.
To run the above crawler, your curl_exec cannot be disabled in your php.ini settings. Also you will need to enable the crawler feature at the server level, which is most likely disabled by default, if you are on shared hosting. You may need to contact your hosting provider.
If curl_exec was disabled from php.ini, you may see an error similar to:
Warning: curl_exec() has been disabled for security reasons in /home/joomla/public_html/plugins/system/lscache/lscache.php on line 1564
If the crawler feature is not enabled at the server level, you may see an error like the following: 
Run Crawler Once Manually
You can click the Web interface to rebuild all LiteSpeed Cache link to run the crawler manually. It will only run once until completion.
Run Crawler as Cron Job
To set up the crawler as a cron job, you can simply use curl to retrieve the cachelink URL (please replace the URL with your own value):
curl -N https://yourdomain.com/index.php?option=com_lscache&recache=1234567890abcdef1234567890abcdef
Example
Set up the above cron job daily to run at 0:00, in crontab -e user:
0 0 * * * curl -N https://yourdomain.com/index.php?option=com_lscache&recache=1234567890abcdef1234567890abcdef
Tip
If your website blocks requests from empty user agents, and returns either a 443 or 406 error, you can use this curl command instead:
curl -N --user-agent "Mozilla/4.0 (compatible; MSIE 6.0; Windows NT 5.1; SV1)" "https://yourdomain.com/index.php?option=com_lscache&recache=1234567890abcdef1234567890abcdef"
How to Keep the Page Cached More Often
The Homepage Public Cache TTL (minutes) setting defines how long before the cache will be expired. The default setting is 2000 minutes, which is around 33 hours.
To keep the page cached most of the time, you can either set a longer Time to Live (TTL) to make the cache valid for a longer time, or run the crawler periodically before the TTL is up and the cache expires. For example, for a 2000 minute TTL, running the crawler cron job daily will keep the pages cached all the time.
Logged-in Users Tab
These settings pertain to caching for users who are logged in. By default caching for logged-in users is disabled.
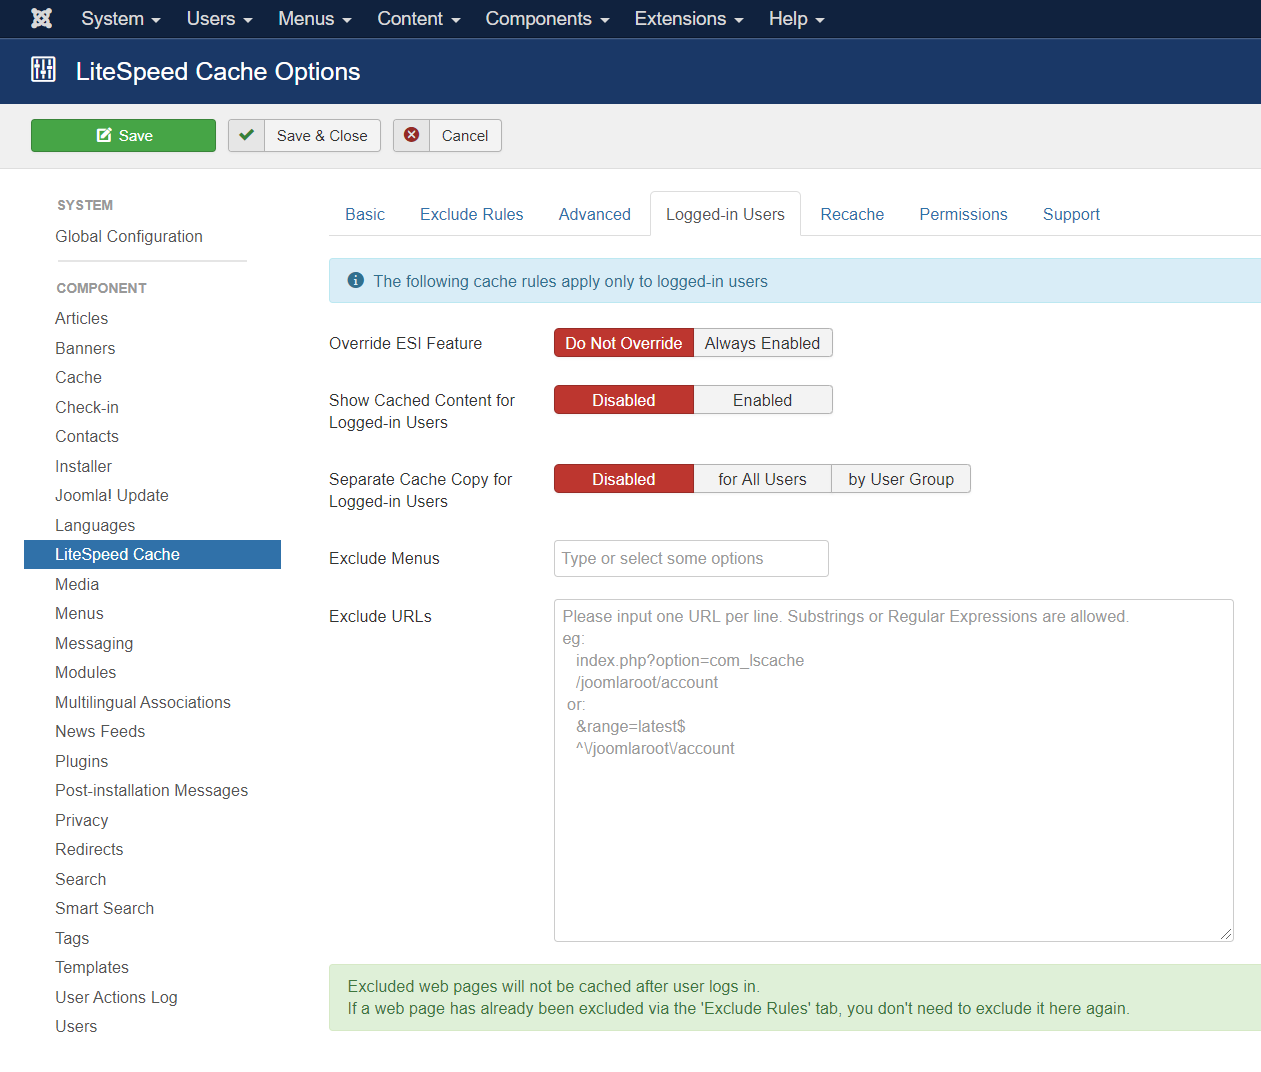
Override ESI Feature
This setting determines whether the global ESI setting should be honored for logged-in users. You may wish to have ESI enabled for logged-in users at all times, regardless of whether it's enabled for guests. In that case, select Always Enabled.
By default Do Not Override is selected, which means that logged-in users will have ESI enabled or disabled according to the global settings.
Show Cache Content for Logged-in Users
When this setting is enabled, logged-in users are served cached content. It's disabled by default, which means that once a user logs in, they are no longer served from cache at all.
Separate Cache Copy for Logged-in Users
LiteSpeed Cache can store multiple cached copies of the same page. This setting configures whether to do this for logged-in users, and if so, how many copies should be saved.
Disabled: logged-in users and logged-out users are both served from public cache and only one cache copy is stored. This is the default behavior.for All Users: there will be two copies of the page stored in public cache: one for all logged-out users to share, and one for all logged-in users to share.by User Group: one copy is stored for all logged-out users, but then there are multiple copies stored for logged-in users based on their user group. So, if you have three user groups, there would be three logged-in cache copies: one customized to each group.
Note
This setting is dependent on Show Cache Content for Logged-in Users. If that setting is disabled, then this one is ignored.
Exclude Menus
This setting is the same as the Exclude Menus setting on the Exclude Rules tab, however it only applies to logged-in users.
If you have already excluded menus from public cache, there is no need to repeat the exclusions here. Any menus added here will be excluded in addition to those.
Exclude URLs
Similar to the above setting, this one is the same as the Exclude URLs setting on the Exclude Rules tab, and it, too, only applies to logged-in users.
If you have already excluded URLs from public cache, there is no need to repeat the exclusions here. Any URLs added here will be excluded in addition to those.
Recache Tab
Usually, when a page is purged from the cache, it remains uncached until a visitor comes along and requests the page. These settings change that behavior.
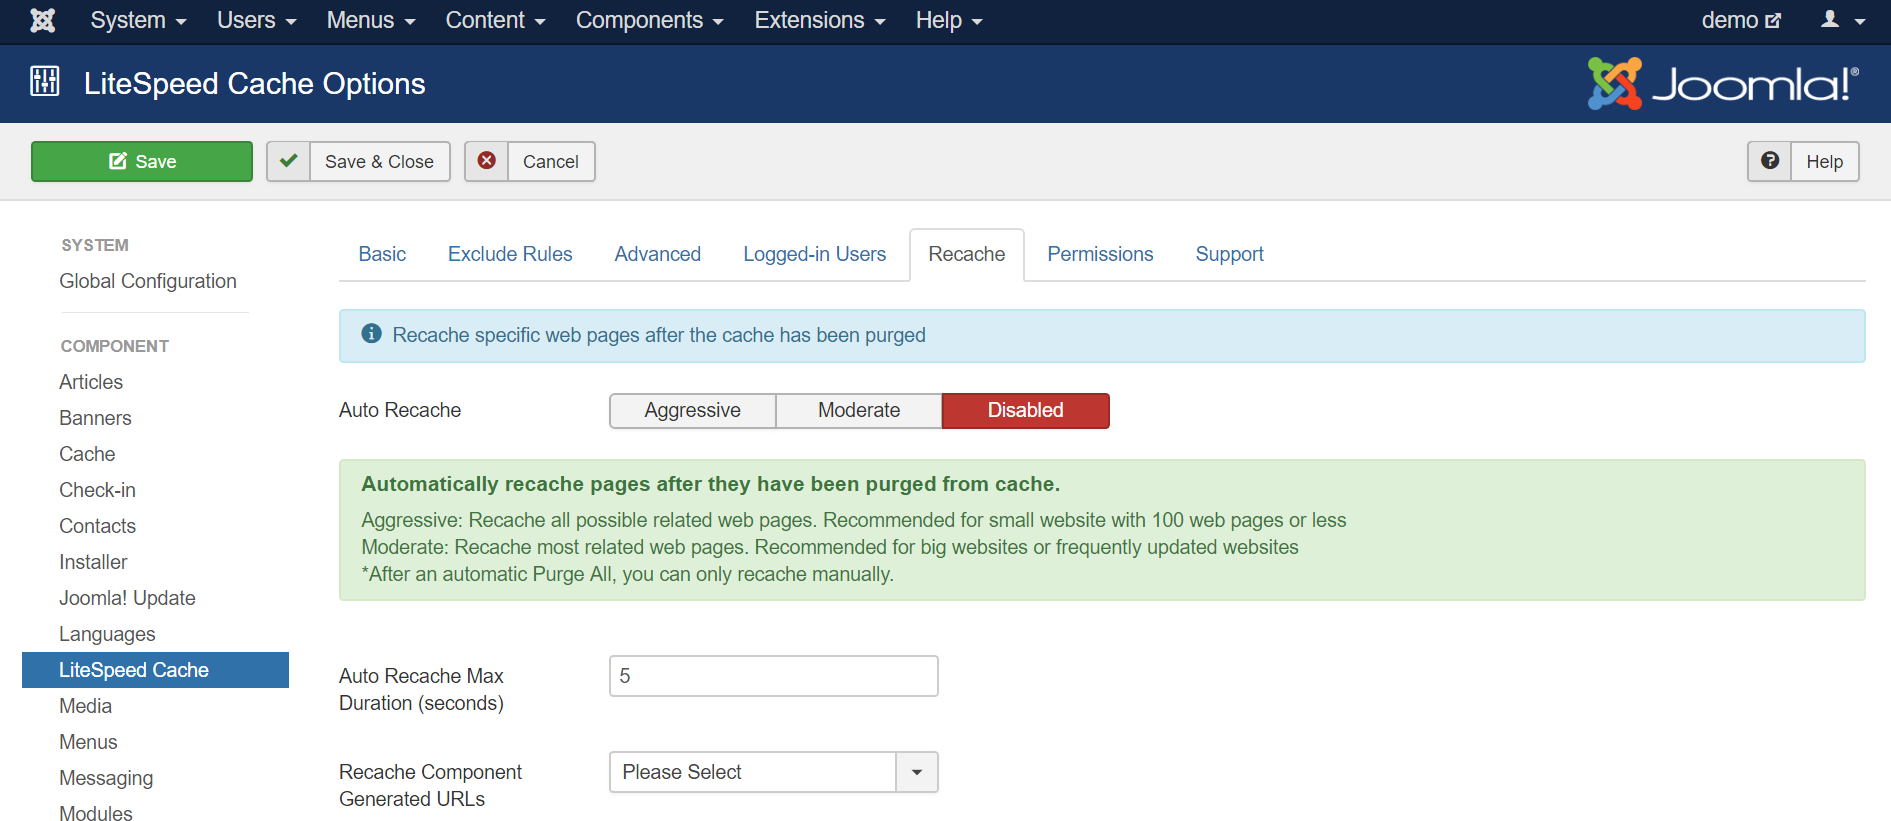
Auto Recache
With Auto Recache enabled, LiteSpeed will automatically re-cache purged pages, which means that your site’s visitors will have a lower chance of ever encountering uncached content. It's a good thing to keep your cache warm in this manner, however it has the potential to impact server performance.
If you have plenty of resources, and server performance isn't at risk, choose Aggressive. The aggressive option is very thorough about recaching all of the pages that are related to a particular purge. If you prefer to use fewer resources, select Moderate, which recaches most of the related pages, but may miss some of them.
Note
Auto Recache doesn't kick in after an automatic Purge All command. If you wish to re-populate the cache in that event, you will need to do so manually from the LiteSpeed Cache Settings (ESI Module Settings) screen, located in the Components menu.
Auto Recache Max Duration
Another way to control server impact is by setting a maximum recaching duration. For example, you can specify that the server should spend at most 10 seconds recaching content. After that, it should stop, even if all of the recaching is not complete. The default value here is 5 seconds, but you can adjust that based on what your server can handle.
Recache Component Generated URLs
This option allows you to recache URLs that are generated by a component but are not part of the menu system.
Permissions Tab
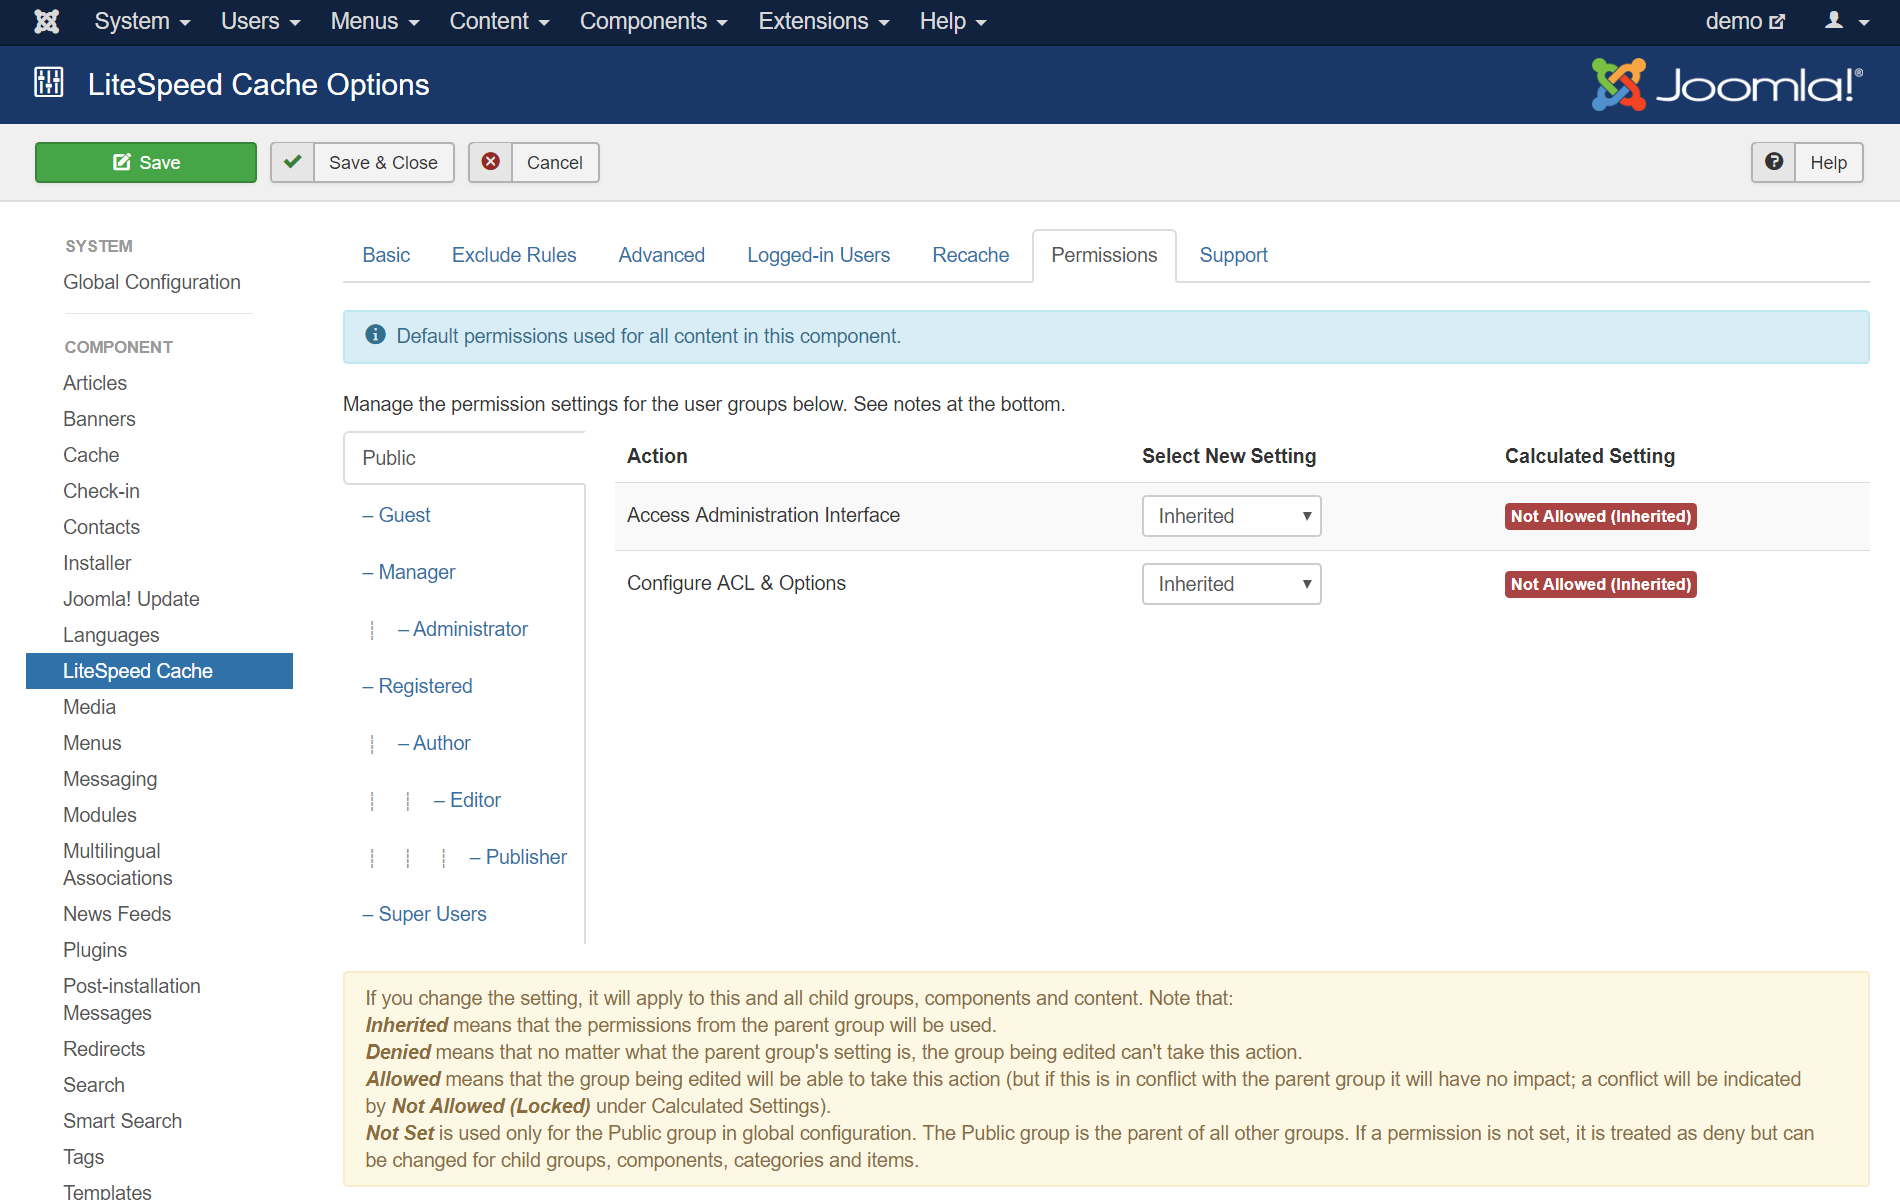
This is a standard Joomla! permissions page, and every setting defaults to Inherited. There should be no need to change anything here.
Support Tab
Technically, this screen doesn't contain settings at all, but simply links to places where you can get support.
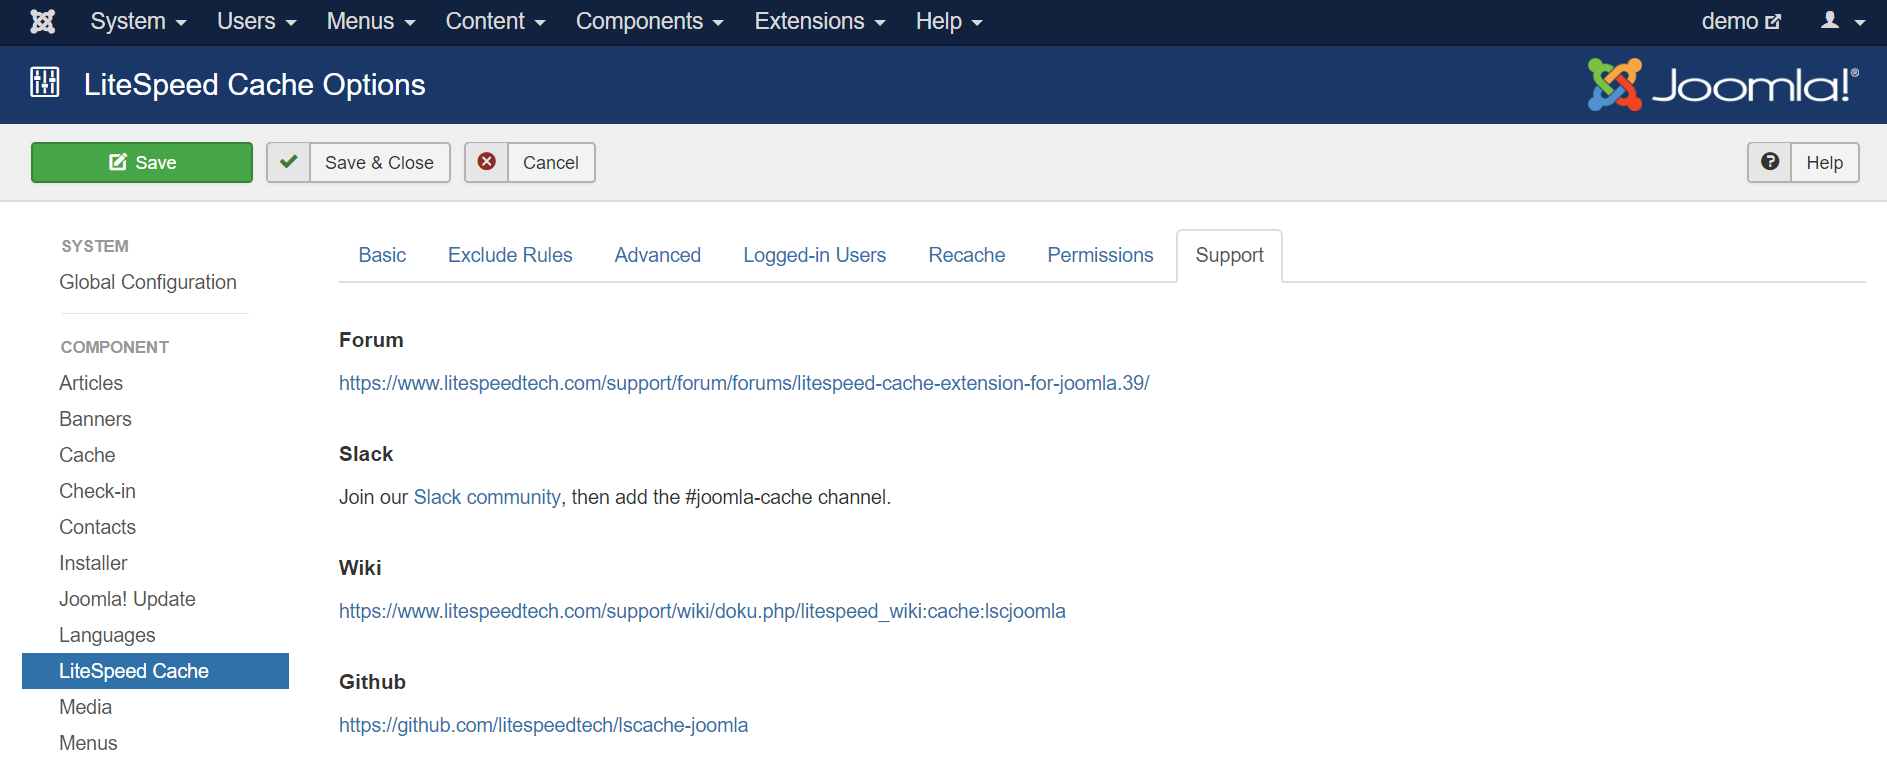
The resources listed here are all self-serve or community support channels. Please see Official LiteSpeed Support for personalized assistance.
Forum
Visit our Joomla forum.
Slack
Join our Slack community, then join the #joomla-cache channel.
Wiki
The LSCJoomla wiki has been deprecated in favor of this new documentation, which you are reading right now. If you need it, the permalink is: https://docs.litespeedtech.com/lscache/lscjoomla/
Github
Check out the extension's open source code in our GitHub repository.
ESI Settings
ESI allows you to cache certain blocks on your site differently than the rest of the page. This is useful for eCommerce, for example, as you could cache a shopping cart module in private cache, while the rest of the page remained in public cache.
LiteSpeed Cache for Joomla allows you to set up any module as an ESI block. ESI module cache is independent from page cache, and may be shared by multiple pages with different cache settings.
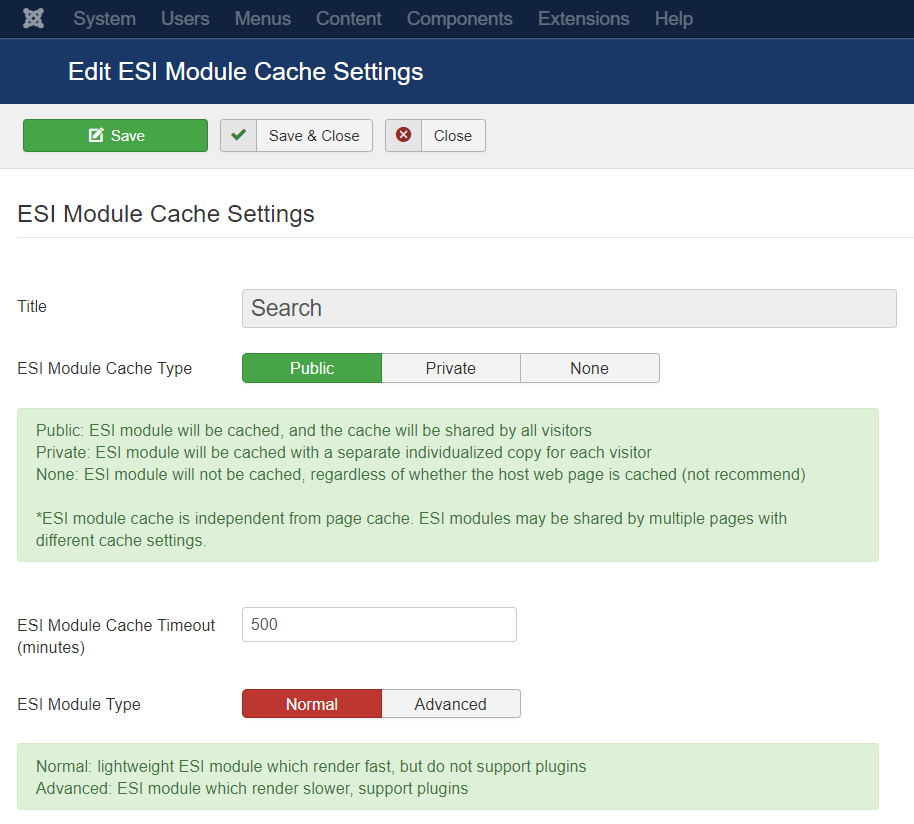
ESI Module Cache Types
There are three ways to cache an ESI module:
- Public: ESI module will be cached, and the cache will be shared by all visitors
- Private: ESI module will be cached with a separate individualized copy for each visitor
- None: ESI module will not be cached (not recommend)
ESI module cache settings work independently of the page cache. It doesn't matter whether the page they appear on is in public cache, private cache, or is not cached at all (though, there is no real benefit to using ESI on an uncached page).
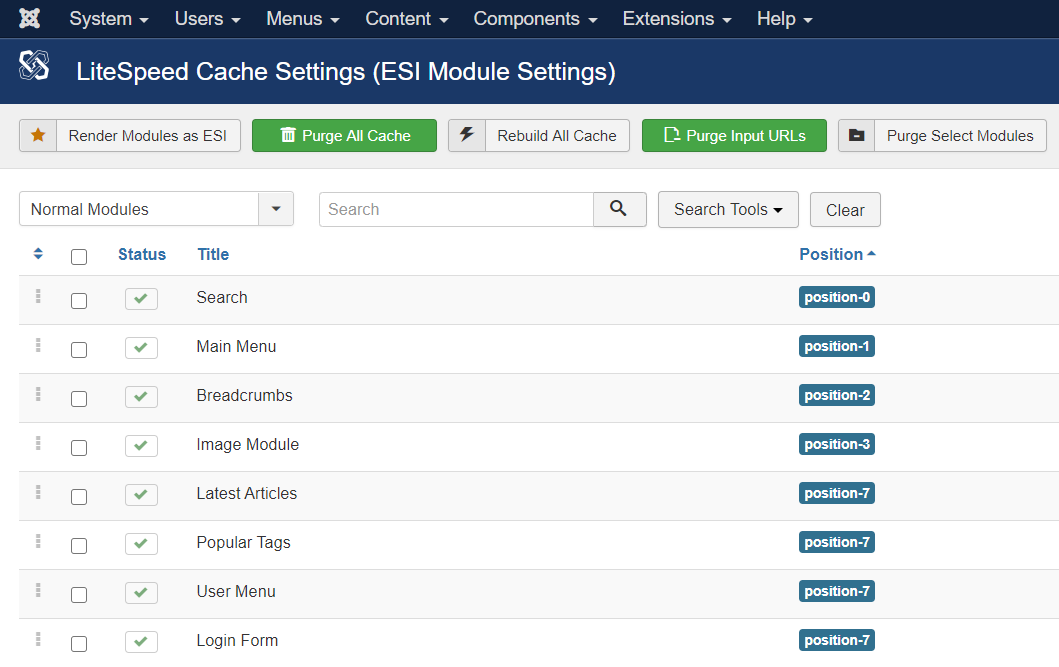
Where to Set
Navigate to Components > LiteSpeed Cache. You should see a list of Normal Modules.
How to Set
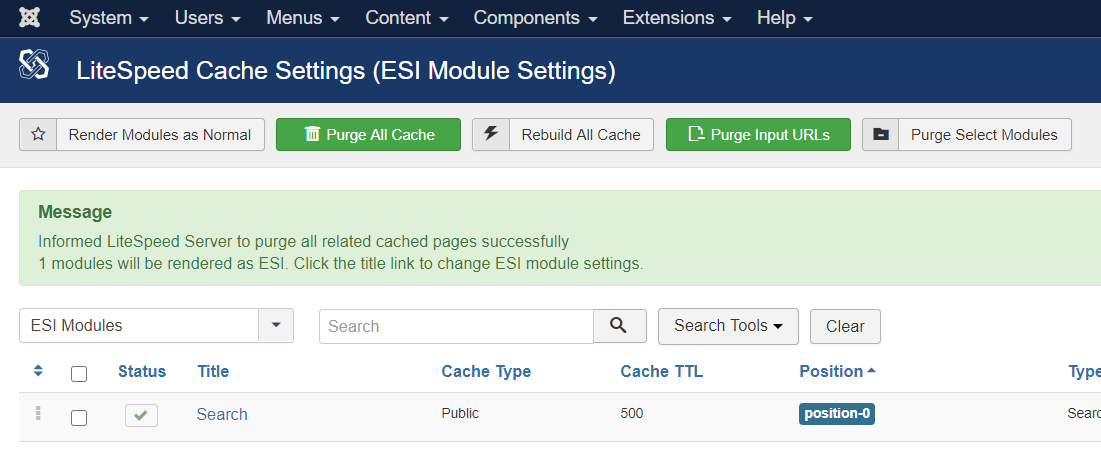
Select the listed module you want to be rendered as ESI, and click the Render Modules as ESI button. In the above screenshot, the Search module has been selected. You will see that once you press the button, the screen will change, and will display only the ESI modules.
Tip
You can get back to the Normal Modules view via the drop-down box where ESI Modules is currently displayed.
From the ESI Modules view, you can click on the module name to bring up the options for that module.
ESI Module Cache Type
Public is the default ESI Module Cache Type option. You may want to choose Private for modules with personalized information, such as Login and Shopping Cart modules. Only select None when the module is absolutely not cache compatible. Having any uncached content on a page will slow that page down dramatically, so if you can avoid having uncached ESI modules, we recommend that you do avoid it.
ESI Module Cache Timeout
Set the time (in minutes) that the content of this module can be considered valid.
ESI Module Type
Your ESI modules may be Normal or Advanced. The normal ESI modules are rendered quickly, but do not support plugins. If a plugin is important to the content of your ESI block, select Advanced. The rendering will be slower, but the plugin will be supported.
Revert Back to Normal Module
In the ESI Modules view, select the module you want to revert, and click the Render Module As Normal button. The module will no longer be rendered as an ESI module.