Admin
Suppressing non-critical banners
Sometimes the LiteSpeed Cache plugin for WordPress adds informational banners to your WordPress dashboard, such as this one:
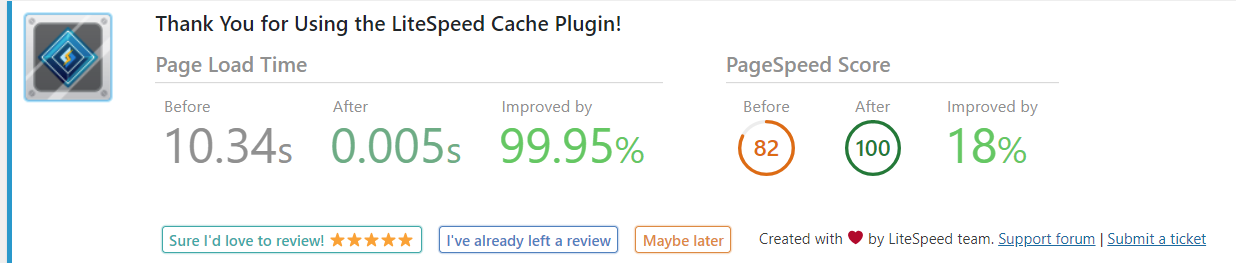
These banners are meant to be informational, but they are not critical to the functioning of the plugin. As of LSCWP v3.0, these banners are opt-in only, meaning that by default, they are not displayed. If you would like to opt in to seeing LiteSpeed news (hotfixes, new releases, available beta versions, promotions, and other updates) on your dashboard, navigate to LiteSpeed Cache > General > General Settings and set Notifications to ON.
Note
This setting does not suppress notifications such as Purged all caches successfully. and other messages related to the functioning of the plugin.
Admin IP commands
The LSCWP_CTRL Admin IP commands give you access to certain actions from the browser window by way of a simple query string.
To trigger one of these actions for a page, access the page with the ?LSCWP_CTRL=ACTION query string appended to the end of the URL.
Example
To purge the https://example.com/2023/todays-blog-post/ blog post, visit this URL: https://example.com/2023/todays-blog-post/?LSCWP_CTRL=PURGE.
The PURGE action, and most others, are restricted by IP address. You can give trusted users and admins access to all the actions by adding their IP addresses in Toolbox > Debug Settings > Admin IPs. You do not need to be logged in to use these actions.
Action | Used for | Admin IP required | |
|---|---|---|---|
NOCACHE | Display a page without caching it. An example use case is to compare a cached version of a page with an uncached version. | Yes | |
before_optm | View the page without any of the optimizations enabled. | No | |
SHOWHEADERS | Display all of the cache headers associated with a page in the Inspect tool. | Yes | This may be useful for debugging purposes, as certain cache headers are normally not shown. |
PURGE | Purge all cache tags associated with the page, except the blog ID tag. Pages with the same cache tag will be purged as well. | Yes | |
PURGESINGLE | Purge only the URL cache tag associated with the page. | Yes |
Note
Actions are case-sensitive.
WordPress CLI
This documentation has moved to its own page. Please see WordPress CLI.
Using a default configuration
The const.default.ini file contains the default configuration for LSCWP. It can be used, for example, by hosting providers to change the default settings for the plugin. The file is located in /wp-content/litespeed-cache/data.
As of v3.3 of our WHM plugin, hosting providers can use a custom const.default.ini file when enabling or mass-enabling LSCWP by placing the file in /usr/src/litespeed-wp-plugin. This file will then be used for all sites installing a new copy of LSCWP.
Changes to const.default.ini do not prevent users from changing their plugin settings.
Using multiple optimization plugins
LiteSpeed Cache for WordPress has many optimization features in addition to our signature full-page cache, and as such, you probably do not need any other similar plugins. If you still want to use one of the other WordPress optimization plugins for whatever reason, that should not be a problem, as long as you do not use the same features in both.
For example, if you are using our full-page cache and our CDN support, make sure that page cache and CDN support are disabled in any other plugin you use. Similarly, if you are using a minification function in another plugin, keep minification disabled in our plugin.
Duplicating functionality bogs down your server at best and breaks your site at worst. So do not do it!
To learn more about this, see our blog.
Compatibility check
Not all cache plugins are good candidates to pair with LiteSpeed. To avoid duplicating our functions, a plugin must either:
- Not include the same cache and optimization functions as LiteSpeed Cache; or
- Include cache and optimization functions that can be disabled one by one.
Set up another plugin
Before you install and activate LiteSpeed Cache, you should first get the other plugin working to your satisfaction. Doing this first will make it easier to follow the plugin’s instructions without worrying about how it will affect LiteSpeed’s setup.
Once the plugin is installed, activated, and set up to your liking, purge that plugin’s cache to ensure there are no conflicts from the start. Then disable the cache and all of the duplicate optimization functions that you plan to use in LSCWP.
Set up LSCWP
Install and activate LSCWP. Enable the cache and any optimization features you wish to use in LSCWP.
Verify
At this point, you should have both plugins working together in harmony, but you’ll want to do a quick test, just to be sure. To verify that your pages are actually being cached by LiteSpeed, you can follow these steps.
If the page was not cached by LiteSpeed, then something in your setup is not quite right. Contact us if you need help!
If the page was cached by LiteSpeed, then the setup is finished. Don’t forget to take a look at your LiteSpeed Cache settings and see if anything needs adjustment. In general, the default settings are fine, but you might want to tweak a few things since you’ve got the other plugin running, too.
Translate LSCache for WordPress
LSCWP is written in U.S. English, so we rely on our international users to help us translate the plugin for worldwide use. If you are fluent in a language other than U.S. English and have a few minutes to contribute to our plugin, we would appreciate it!
Is your language needed?
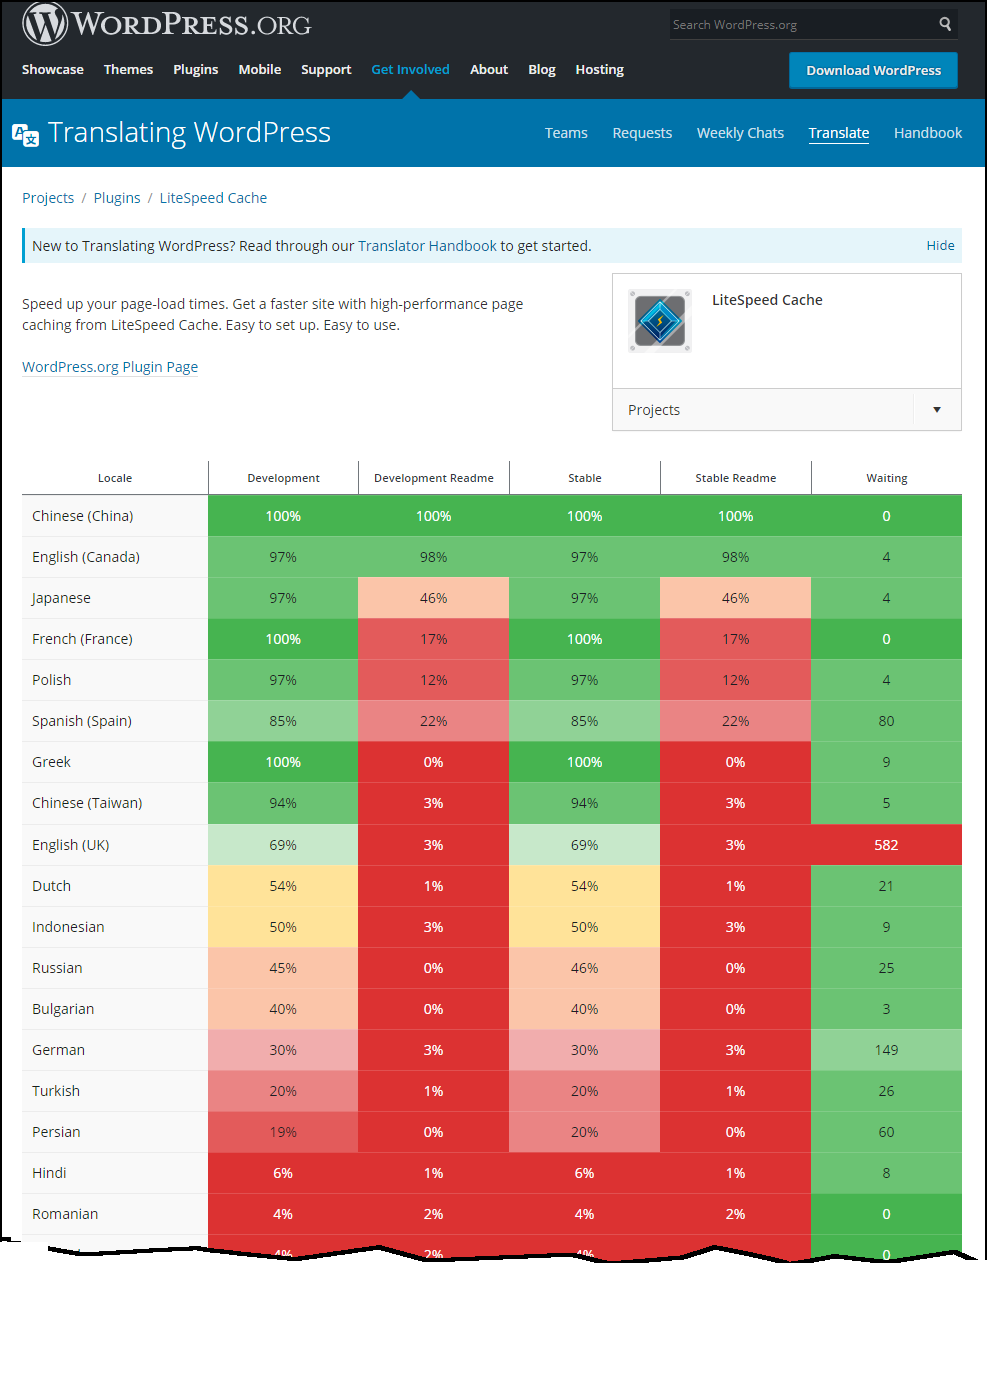
We have a few languages very well covered, so you’ll want to check the Translating WordPress page for LiteSpeed Cache and look for your language (and geographic location, if applicable). If there are red or yellow boxes next to the language, then your expertise is needed.
As you can see, we have quite a few red boxes as of this writing, as well as several more pages of them beyond where the screenshot ends. The most important column is the Stable column. Languages with shades of red in the Stable column have less than a third of the plugin translated.
Submit a translation
All you need is a WordPress.org login. Once you are logged in, you can click the link and start translating at your own pace.
The instructions are the same for whichever language and geographic location you choose, but for simplicity’s sake, let’s say you’re from Spain and would like to contribute to the Spanish (Spain) translation.
Click Spanish (Spain) to be brought to the es_ES translation page.
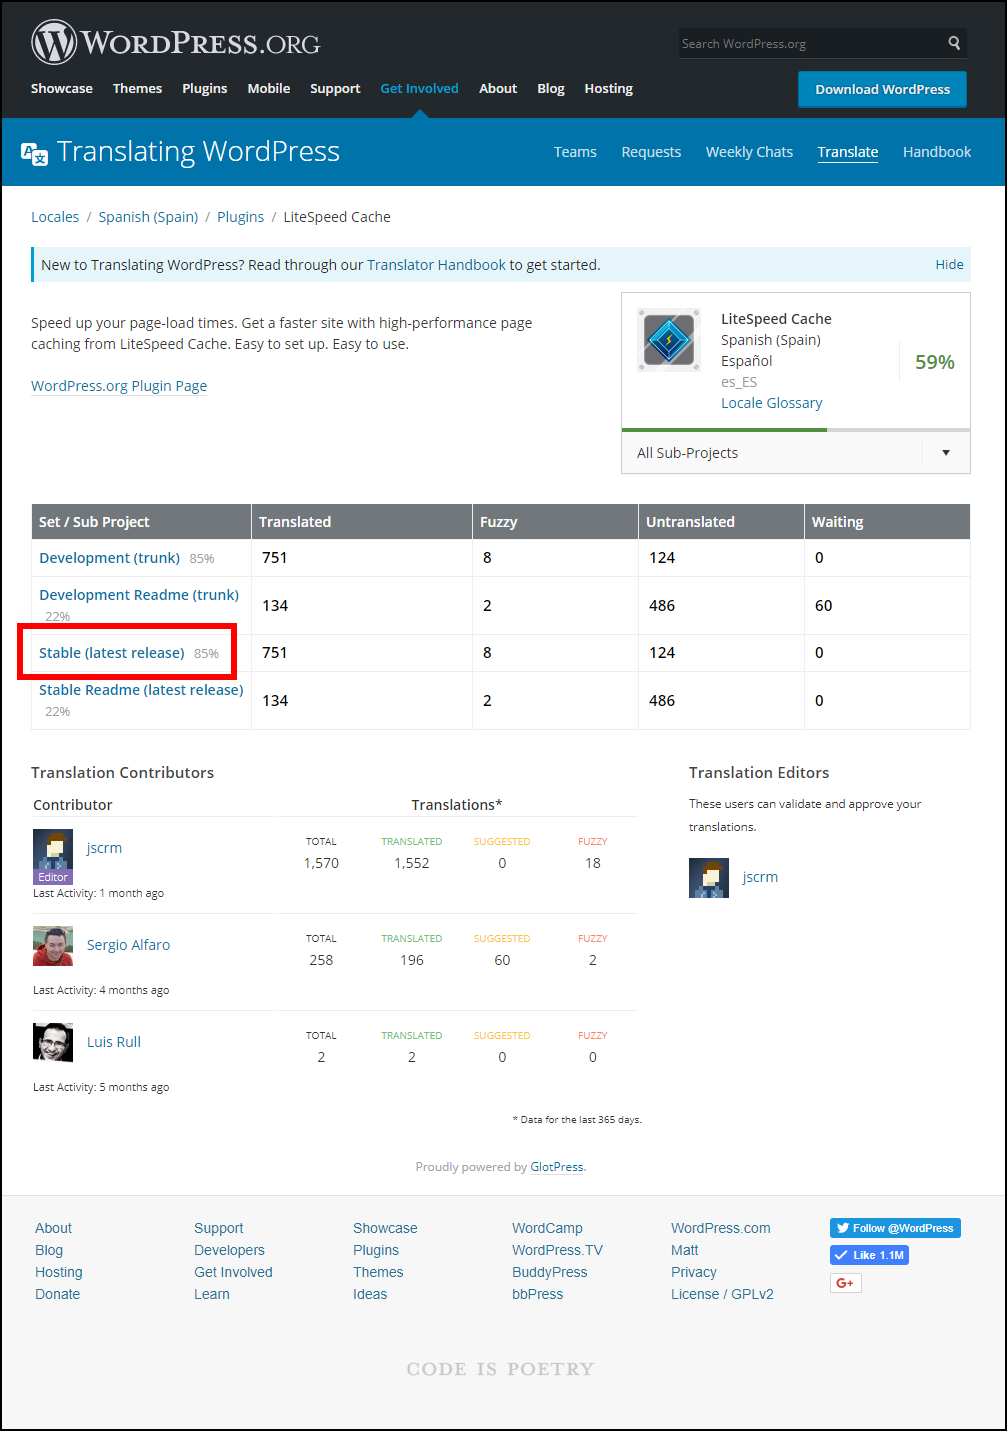
The most important section to work on first is Stable (latest release), so click on it to see which strings are still missing translations.
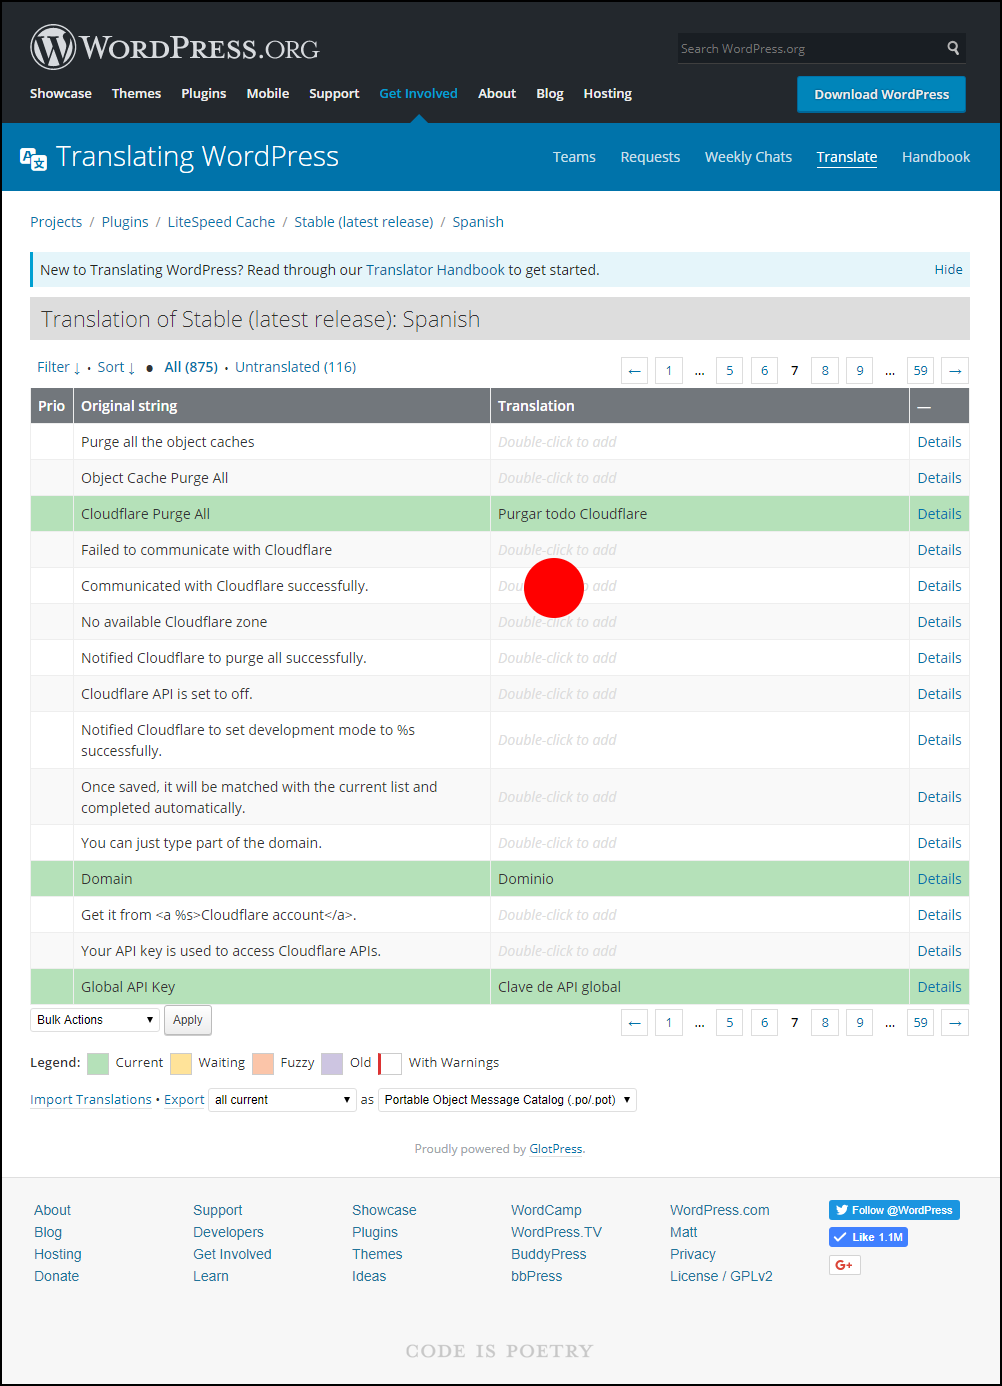
You’ll be brought to a list of strings and their current translations, if any.
This list may look overwhelming if it is not well populated. However, you are not required to translate every single string. You could spend half an hour and do thirty of them, ten of them, or even just one. Every contribution, even a small one, gets us closer to a complete translation.
When you see a string you’d like to translate (for example, Communicated with Cloudflare successfully), double-click the Translation column for that string and enter your translation in the box.
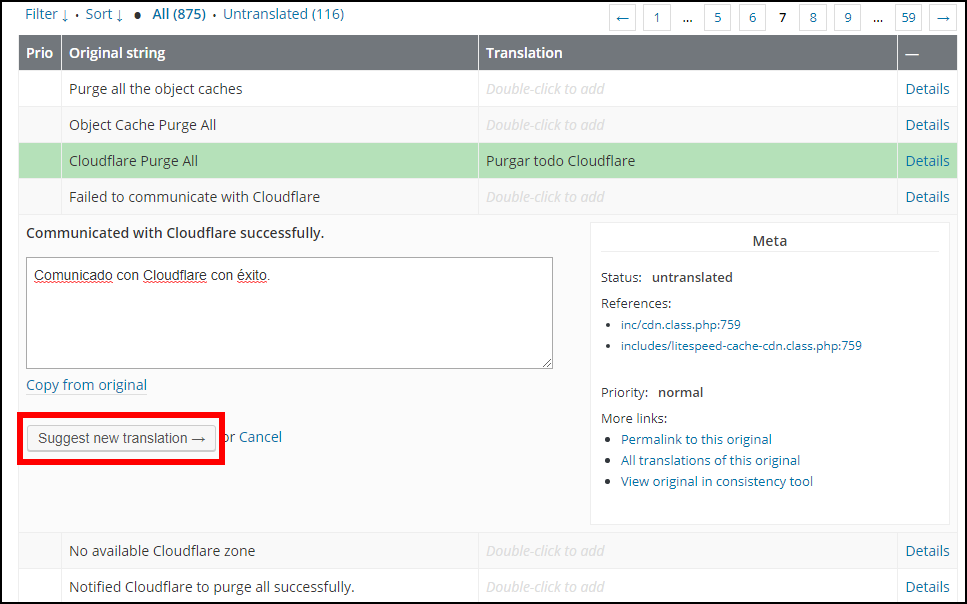
Click the Suggest new translation button. Congratulations, you have successfully translated your first string.
Approval
All translations must be approved by an editor for your language before they are incorporated into the plugin.
If you would like to be a translation editor for LSCache, just keep translating! We will notice you and apply to WordPress.org to give you editor access. Additionally, we’ll add you to our Slack team, where you can communicate with our other editors and be kept in the loop about new plugin updates and needed translations.
Thank you for helping us make LSCWP accessible for a global audience!
Enabling and limiting the crawler
These instructions apply to the WordPress LSCache crawler and other CMS LSCache crawlers where available.
Because the crawler can consume considerable resources, server administrators control whether it is enabled. In a control panel environment, such as cPanel, the crawler is disabled by default and can only be enabled by an admin through Apache configuration. In the LSWS Native environment, the crawler is enabled by default and can be disabled at the server or virtual host level in LSWS v5.3.5 and above.
Warning
We do not recommend enabling the crawler for shared hosting setups unless the server has enough capacity to handle it!
Shared hosting / control panel environment
As of LSWS v5.1.16, there are four different approaches you can take to crawling on your server:
- You can disable it for the entire server.
- You can disable it for the entire server and selectively enable it for specific virtual hosts.
- You can enable it for the entire server.
- You can enable it for the entire server and selectively disable it for specific virtual hosts.
Enabling the crawler
To enable the crawler in either of the second two scenarios, add this “Crawler Snippet” to the appropriate configuration or include file:
<IfModule Litespeed>
    CacheEngine on crawler
</IfModule>
The exact location of the relevant configuration or include file varies depending on the control panel you use (if any) and which of the options above you want to enact. See below for instructions relevant to your setup.
Tip
This snippet should not be added to .htaccess. It must be added to an Apache configuration file.
After you’ve added the Crawler Snippet in the appropriate location, you should gracefully restart the server.
Limiting the crawler
Currently, the following variables are available for use with the Crawler function:
CRAWLER_USLEEPsets a minimum allowed value for the Delay field.CRAWLER_LOAD_LIMITsets a default value for the Server Load Limit field.CRAWLER_LOAD_LIMIT_ENFORCEsets a maximum allowed value for the Server Load Limit field.
To use these variables, add them one per line to the appropriate configuration file. For example:
<IfModule LiteSpeed>
    CacheEngine on crawler
    SetEnv CRAWLER_USLEEP 1000
    SetEnv CRAWLER_LOAD_LIMIT 5.2
</IfModule>
Disabling the crawler
You may disable the crawler for an Apache virtual host in any situation. Add CacheEngine -crawler to the Apache virtual host configuration, like this:
<IfModule LiteSpeed>
    CacheEngine -crawler
</IfModule>
cPanel/WHM
Server level
Change your working directory to:
/usr/local/apache/conf/includes/for EA3/etc/apache2/conf.d/includes/for EA4
Add the Crawler Snippet and optional server variables to the pre_main_global.conf file.
Global virtual host level
Change your working directory to:
/usr/local/apache/conf/userdata/for EA3/etc/apache2/conf.d/userdata/for EA4
If these directories do not exist, create them.
Add the Crawler Snippet and optional server variables to the lscache_vhosts.conf file.
Apply these changes to all virtual hosts by running the following command:
/scripts/ensure_vhost_includes --all-users
Note
You only need to run this command once. It activates the configuration for all users, including new users created by WHM. There is no need to edit the cPanel skeleton file.
Individual virtual host level
Change your working directory to:
- For EA3:
/usr/local/apache/conf/userdata/std/2_4/<user>/<domain>/ - For EA4:
/etc/apache2/conf.d/userdata/std/2_4/<user>/<domain>/
If your site supports HTTPS (SSL), also change to the appropriate working directory:
- For EA3:
/usr/local/apache/conf/userdata/ssl/2_4/<user>/<domain>/ - For EA4:
/etc/apache2/conf.d/userdata/ssl/2_4/<user>/<domain>/
Note
2_4 in the path is an example. You can replace it with the appropriate version, such as 2 or 2_2.
If these directories do not exist, create them.
Add the Crawler Snippet and optional server variables to the lscache_vhosts.conf file. This enables the crawler for this virtual host only.
Apply these changes by running the following command:
/scripts/ensure_vhost_includes --user=<user>
Plesk
Server level
Change your working directory to:
/etc/httpd/conf.d/for CentOS/etc/apache2/conf.d/for Debian/etc/apache2/conf-enabled/for Ubuntu
Add the Crawler Snippet and optional server variables to lscache.conf. If it does not exist, create it.
Global virtual host level
Change your working directory to /usr/local/psa/admin/conf/templates/custom/domain.
Create the directory if it does not exist.
Copy /usr/local/psa/admin/conf/templates/default/domain/domainVirtualHost.php to this location.
Edit the file and add the Crawler Snippet and optional server variables after the mod_suexec.c block.
Reconfigure all virtual hosts. This regenerates configuration files for all virtual hosts:
/usr/local/psa/admin/bin/httpdmng --reconfigure-all
Individual virtual host level
Change your working directory to /var/www/vhosts/system/<domain_name>/conf/.
Create a file called vhost.conf, or vhost_ssl.conf for HTTPS sites, if it does not already exist.
Add the Crawler Snippet and optional server variables to this file.
Reconfigure this virtual host. This regenerates configuration files for this virtual host:
/usr/local/psa/admin/bin/httpdmng --reconfigure-domain <domain_name>
DirectAdmin
Server level
Add the Crawler Snippet and optional server variables to /etc/httpd/conf/extra/httpd-includes.conf.
Global virtual host level
Create a /usr/local/directadmin/data/templates/custom/cust_httpd.CUSTOM.2.pre file and add the Crawler Snippet and optional server variables to it.
Apply these changes to all virtual hosts by running the following commands:
cd /usr/local/directadmin/custombuild
./build rewrite_confs
LiteSpeed Native
The cache crawler is enabled by default in an LSWS Native environment.
To disable it at the server level, you need to use LSWS 5.4 or above. This version added the Cache Features function to control it.
In the LSWS WebAdmin interface, navigate to LSWS Admin > Configuration > Server > Cache. In Cache Features, check On, uncheck Crawler, check ESI, and uncheck Not Set.
If Not Set is checked, the other three values will be ignored and the default values will be used. By default, all three are checked.
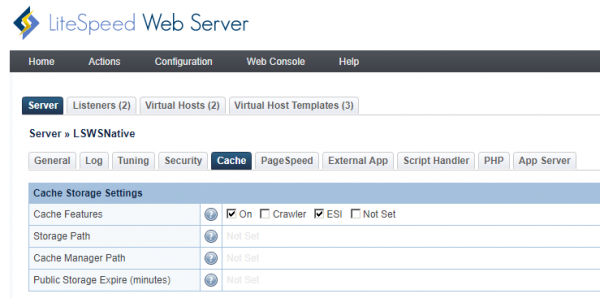
To disable the cache crawler at the LSWS Native virtual host level, navigate to LSWS Admin > Configuration > Virtual Host > VH Name > Cache and set Cache Features in the same manner as above. If Not Set is checked, the other three values will be ignored and the server-level configuration will be inherited.
Warning
Do not set Enable LiteMage to On, as this setting will also enable the crawler, even if Crawler is unchecked.
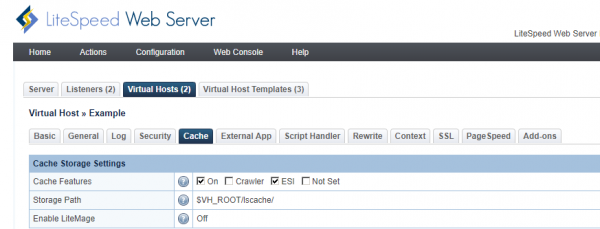
To add optional server variables, navigate to Server > External App and add the variables to the Environment setting, one per line. For example:
CRAWLER_USLEEP=1000
CRAWLER_LOAD_LIMIT=5.2
Verifying crawler status
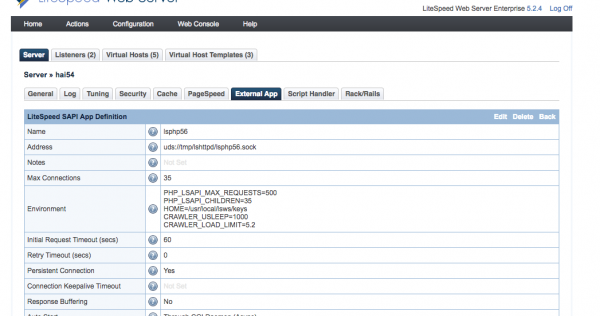
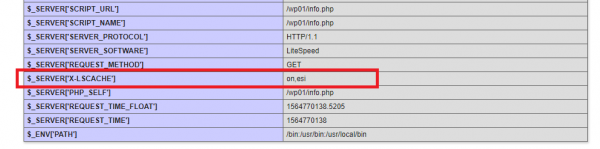
To determine whether the crawler is enabled or disabled, check the phpinfo page and look at the value of the X-LSCACHE server variable. If the variable contains crawler, the crawler is enabled at the server level. If it does not, as in the example and screenshot below, the crawler is disabled at the server level.
$_SERVER['X-LSCACHE'] on,esi
Tip
The X-LSCACHE server variable controls only LiteSpeed’s own crawler. Third-party crawlers do not use the value of X-LSCACHE and cannot be controlled that way.
You can also check the crawler status in the LiteSpeed Cache for WordPress plugin. Navigate to Crawler > Summary. If Crawler Cron is set to Disable and you see the following warning, the crawler is disabled at the server level:
Warning: The crawler feature is not enabled on the LiteSpeed server. Please consult your server admin.
Changing your cache storage location
If you would like to change where LiteSpeed stores your cached content, use the LITESPEED_DATA_FOLDER constant.
Example
To set your cache storage directory to cache/litespeed, add the following line to your wp-config.php file:
define('LITESPEED_DATA_FOLDER', 'cache/litespeed');
Replacing WordPress cron
WordPress cron controls the publishing of scheduled posts and the running of LiteSpeed’s QUIC.cloud optimization queues, among other things.
WP-Cron runs when PHP is triggered. To speed up your site, LiteSpeed Cache aims to minimize PHP usage. Avoiding PHP is good for performance, but it can delay scheduled tasks.
We recommend taking control of the WP-Cron system away from PHP and giving it to your system cron instead.
Here’s how to set that up in cPanel:
Disable WP-Cron
Add the following to your site’s wp-config.php file:
define('DISABLE_WP_CRON', true);
This tells WordPress not to run cron automatically when PHP is triggered.
Add a new job to system cron
In cPanel, navigate to Tools > Advanced > Cron Jobs.
Under Common Settings, choose one of the predefined intervals. We recommend Once Per Five Minutes (*/5 * * * *), but you can run it more or less frequently.
Set Command to:
wget -q -O - https://example.com/wp-cron.php?doing_wp_cron >/dev/null 2>&1
Press the Add New Cron Job button.
You’ve now set wp-cron to run every five minutes for the example.com domain.
Tip
There are several ways to run wp-cron, but to avoid negating the benefits of our caching system, we recommend using wget instead of WP-CLI or PHP CLI.
Debug
In some cases, a strict security system may block a WP-Cron request. To test whether this is happening on example.com, run this command, replacing USERNAME with your cPanel username:
wget -O /dev/null https://example.com/wp-cron.php?doing_wp_cron >> /home/<username>/cron.log 2>&1
Check the /home/<username>/cron.log file and make sure the HTTP response header returns 200 OK.
Setting up CloudFront CDN
Create a CDN with CloudFront

- Set up AWS CloudFront CDN.
- Get your CloudFront Domain Name.
- Make sure your site can be visited directly through the CloudFront Domain Name.
Set up in the LSCache plugin
- From the WordPress dashboard, navigate to LiteSpeed Cache > CDN > CDN Settings.
- Set Use CDN Mapping to
ON. - Enter your CloudFront domain name as the CDN URL.
- Enable the relevant Include buttons, such as Images and CSS. For this example, since we do not include JavaScript, remove
.jsfrom Include File Types. - Set Original URL to your original domain name, including a subfolder if you are using one.
Verify
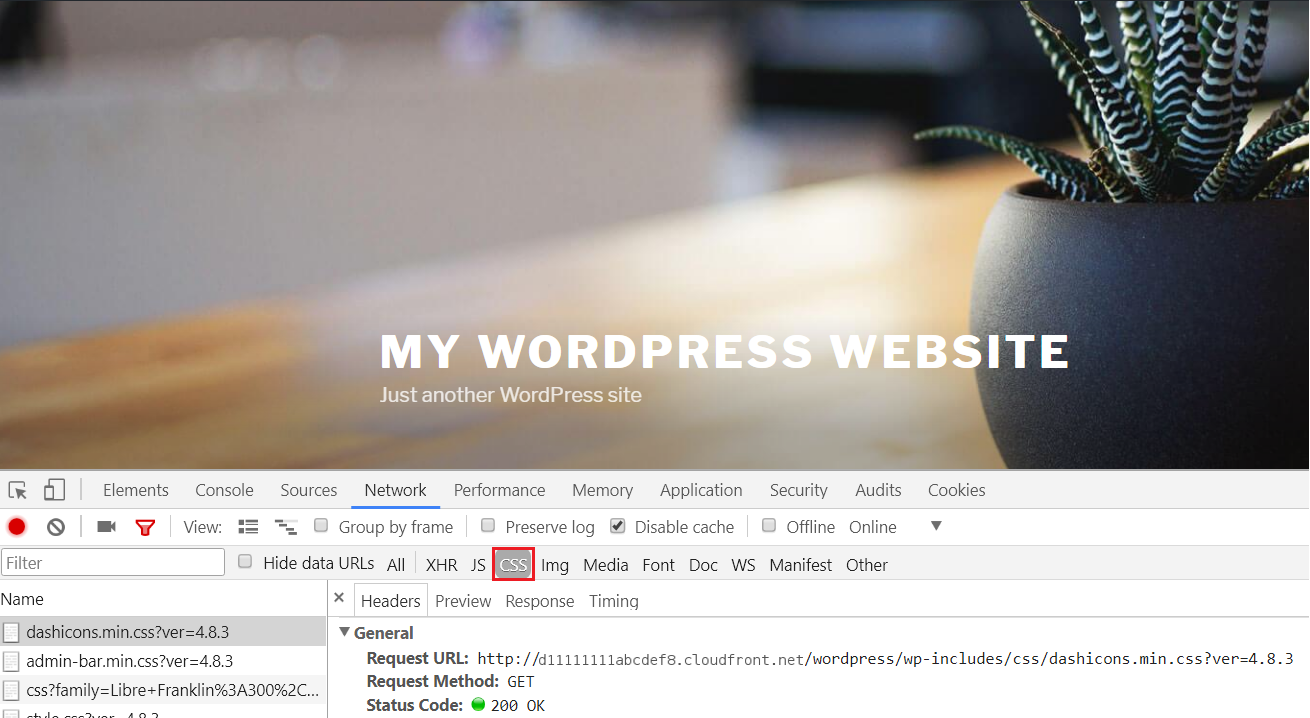
Check that the CSS is served from CloudFront:
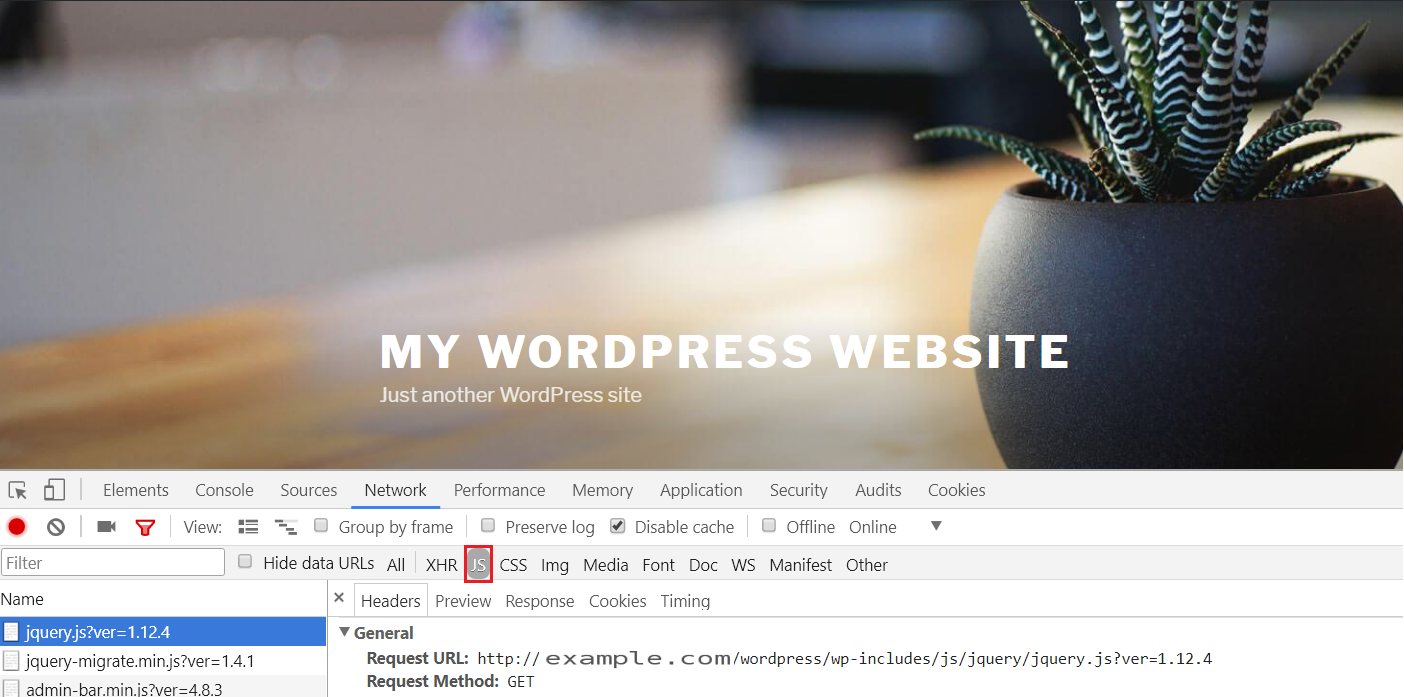
Check that the JavaScript is served from the original domain:
Turning WordPress shortcodes into ESI blocks
You can turn WordPress shortcodes into ESI blocks with LiteSpeed Cache. This allows you to cache the contents of a shortcode in a different way from the rest of the page. To learn more about ESI, see our blog post.
If you have a mycalendar shortcode, for example, that inserts a calendar into your page, you might use it like this:
[mycalendar month="November" year="2018"]
To turn it into an ESI block, use it like this:
[esi mycalendar month="November" year="2018"]
By default, shortcode contents are stored in public cache, and the TTL defaults to the value stored in LiteSpeed Cache > Cache > TTL > Default Public Cache TTL. You can change this with a few parameters. To store the shortcode contents in private cache for five minutes (or 300 seconds), use:
[esi mycalendar month="November" year="2018" cache="private" ttl="300"]
Limitations
While LiteSpeed Cache can cache shortcode contents, it cannot purge them on demand. Shortcode ESI blocks expire when the TTL is reached, but specific events cannot trigger a purge. LiteSpeed cannot know which events should trigger a purge because different shortcodes have different events that make their contents outdated.
For example, the following shortcode caches the mycalendar block for the same length of time as your site’s default TTL:
[esi mycalendar month="November" year="2018"]
If someone edits an event before the TTL is reached, the ESI block may be out of date.
There are two ways to handle this issue:
- Ask the shortcode plugin’s author to use our API to trigger a purge when block content changes.
- Use a short TTL and accept that the content may be out of date briefly.
Get the plugin author involved
If it is important for specific events to purge the shortcode contents, share this API call with the shortcode plugin’s author. Replace mycalendar with the actual name of the shortcode you want to purge:
do_action( 'litespeed_purge', 'esi.mycalendar' );
This is the most precise way to keep shortcode content up to date and cached according to the shortcode’s requirements.
Do it yourself
If it is not critical for shortcode content to be accurate up to the minute, use the ttl parameter to cache it for a short time. If you can live with content that is an hour old, set ttl="3600". If you prefer five minutes, set it to ttl="300".
You can set the content not to be cached by using ttl="0", but this is not recommended. Any time a page contains uncached content, PHP must be invoked to generate it. PHP uses valuable resources and significantly slows down a page. It is better to cache your content for a short time than not to cache it at all.
Cookies and cache
The relationship between cookies and caching can be easily misunderstood. When people talk about “caching cookies” or “not caching cookies,” they usually mean that pages are or are not cached based on whether a user has certain cookies stored. The cookies themselves are not cached.
Cookies are generally ignored unless you specify otherwise. They become important when they affect the user experience.
Cookies set or read by WordPress
If a cookie must be set or read by WordPress, the page must be excluded from cache. If the cookie is set on your site (that is, it is not set somewhere before arriving at your site), you must also exclude the page that sets the cookie’s value.
Example
Suppose your site is part of an affiliate network. When a user arrives at example.com/affiliate_home, an aff-example cookie is set. As the user navigates the site, the cookie is updated with tracking information.
In this case, add the aff-example cookie to the Do Not Cache Cookies list under LiteSpeed Cache > Cache > Excludes. Also add ^/affiliate_home to the Do Not Cache URIs list on the same page. For more information about the Excludes page, see the screen-by-screen documentation.
If the cookie is set at example.com/affiliate_home but never referenced again, you do not need to exclude it from cache.
Alternatively, if the cookie is set offsite but used for tracking as the visitor browses your site, exclude the cookie from cache, but you do not need to exclude the ^/affiliate_home URI.
Cookies that indicate variations
Sometimes cookies provide important information about a user to WordPress to help determine what content to show. In these cases, you can use cookies to create cache varies. When LSCache varies on a cookie, it caches separate public versions of pages based on the cookie’s value.
Example
Suppose your WordPress site is a shop with special pricing for friends, activated when they visit example.com/friends_home. That page sets a myfriend cookie. From then on, every page they visit in your shop shows prices that are 20% lower than usual. Visitors without the myfriend cookie see regular prices.
Because the cookie is set on the example.com/friends_home page, exclude that URI from cache as described above.
There are two ways to handle the cookie:
- Exclude it from cache, as in the previous example. This is the easiest option, but it means your friends will always receive uncached content.
- Create a cache vary based on the
myfriendcookie.
Configuring a cookie cache vary
Example
Suppose you have a WooCommerce site with a woocommerce_products_per_page cookie. Some users have a value of 10, others have 100, and still others have 200. These scenarios require three different views.
There are two ways to handle different views based on a cookie value:
JavaScript
The more efficient option is to find a JavaScript-based solution. A JavaScript plugin would need to store only one copy of the page and would build the display based on whether the cookie exists.
Rewrite rules
If you prefer a rewrite rule-based solution, configure the site to vary on the cookie by adding the following rule to your site’s .htaccess file:
<IfModule LiteSpeed>
    CacheLookup on
    RewriteRule .* - [E=Cache-Vary:woocommerce_products_per_page]
</IfModule>
When a user visits your WooCommerce site, the woocommerce_products_per_page=xxxxxx cookie is created. The rewrite rule makes the cache vary on that cookie, so the cache stores multiple copies: one for every value of the cookie that requests the page.
Warning
woocommerce_products_per_page is an example. Replace it with the appropriate cookie name.
Further reading
Learn more about cookies and cache varies in the Developer’s Guide to Cache Vary.
Memcached, LSMCD, and Redis (object cache) support in LSCWP
LiteSpeed Cache for WordPress supports object caching.
What is an object cache?
An object cache stores the results of expensive or frequent database queries so they can be retrieved easily without repeatedly accessing the database. Object caching greatly reduces the time it takes to retrieve query results.
For example, your WordPress site’s options, such as its name and URL, are stored in the database. Every time WordPress assembles a page for a visitor, it must access the database to read those options. These repeated queries use resources. With an object cache, WordPress can query the database once and save the results for a set period. While the results remain cached, WordPress can retrieve them from the cache when assembling a page. Accessing the object cache uses fewer resources than accessing a database.
Object caching can improve performance for both time-consuming and frequently repeated queries.
Note
If LSCWP fully caches a site, object caching may not be used often. Object caching is needed when WordPress builds a page through PHP. If PHP is not invoked, there are no queries to process or retrieve from the object cache.
How to set up object cache support
LSCWP does not provide object caching directly. Instead, it supports external object caches such as Memcached, LSMCD, and Redis.
Install Memcached, LSMCD, or Redis and the PHP extension
You need a working, tested installation of Redis, Memcached, or LSMCD, as well as the related PHP extension (such as php-memcached or php-redis) for object caching to work with WordPress.
See the following for additional instructions:
- Installing Memcached or LSMCD and php-memcached
- Integrate Redis with WordPress through LSCWP
- Using Memcached in a UNIX socket
- Using Redis in a UNIX socket
Configure object cache in LSCWP
If you use LSMCD, Memcached, or Redis, you can configure LSCWP support in the Cache Settings tab. Navigate to LiteSpeed Cache > Cache > Object. Enter the required parameters, including where your Memcached or LSMCD service is located, which objects you want to cache, and how long you want to cache them.
Default values are provided before you enable object caching.
After you enable object caching, the LSCache plugin automatically tests the connection and detects the Memcached or Redis extension.
Find detailed instructions for these settings here.
Set a custom prefix (optional)
The LiteSpeed Cache plugin supports object cache prefixes, which prevent users on a server from reading keys belonging to other sites on the same server. By default, we generate keys based on the MD5 sum of the site’s path. You can define a custom prefix for a site by setting the LSOC_PREFIX variable.
Example
To give a site an object cache prefix of ABC, add the following line to the site’s wp-config.php file:
define('LSOC_PREFIX', 'ABC');
How to verify
To check the object cache log, set LiteSpeed Cache > Toolbox > Debug Settings > Debug Log to ON or Admin IP, then view your page source. You should see something like this at the bottom of the code:
<!-- Object Cache [total] 5190 [hit_incall] 5056 [hit] 6 [miss_incall] 21 [miss] 107 [set] 171 -->
totalis the total number of objects requested by the page.hit_incallis the number of objects that missed Memcached but hit the runtime data from above.hitis the number of objects retrieved from Memcached.miss_incallis the number of objects not set in runtime when PHP reached the current line.missis the number of objects not found in Memcached.setis the number of objects set in Memcached.
How to debug
If your connection test shows Failed, try the following:
- Run
service memcached statusto make sure the service is active. - Run
ss -lptun | grep 11211to make sure the Memcached port is listening. - Run
telnet localhost 11211to make sure you can connect to localhost successfully.
Test files
You can create PHP test files to test the connection.
For Memcached:
<?php

$conn = new Memcached();
$address = '/path/to/memcached.sock'; // Set the address here.
$port = 0; // Set the port.
$conn->addServer($address, $port);
var_dump($address);
var_dump($port);
var_dump($conn->getStats());
echo '<hr>';
var_dump($conn->getServerList());
?>
For Redis:
<?php

$cfg_host = 'redis address';
$cfg_port = '6379'; // Use 0 for a socket.
$cfg_pswd = ''; // Set a password if required.
$cfg_db = 0;

$conn = new Redis();
$conn->connect($cfg_host, $cfg_port);
if ($cfg_pswd) {
    $conn->auth($cfg_pswd);
}
if ($cfg_db) {
    $conn->select($cfg_db);
}

var_dump($conn->ping()); // Should return `+PONG`.
?>
Integrate Redis with WordPress
Redis is an open-source, in-memory data structure store used as a database, cache, and message broker. LSCache provides full-page caching, so it can be useful to run Redis alongside it. This guide applies with or without a control panel.
Install the Redis daemon
CentOS 7
-
Add the EPEL repository:
yum install epel-release -
Install Redis:
yum install redis -
Start Redis:
systemctl start redis
Ubuntu
-
Install Redis:
apt install redis -
Start Redis:
systemctl start redis-server
Install the Redis PHP extension
The phpredis extension provides an API for communicating with the Redis key-value store.
cPanel EasyApache 4 and CentOS
The following commands work for CentOS 8 and 7:
/opt/cpanel/ea-php72/root/usr/bin/pecl install redis
echo 'extension=redis.so' > /opt/cpanel/ea-php72/root/etc/php.d/redis.ini
Alternatively, navigate to WHM > Module Installer, choose PHP Pecl, select the appropriate PHP version, and install the extension there.
Tip
Replace ea-php72 with the PHP version you want to install the extension for.
To install the extension for all available PHP versions with a single block of code, see these instructions from BigScoots.
Plesk
Plesk generally supports the php-redis extension. If your Plesk version does not support php-redis by default, see the following instructions at Plesk.
DirectAdmin
-
DirectAdmin CustomBuild 2 will install
phpxxin/usr/local/phpxx. Go to the version you want, such asphp73, to buildphp-redisthroughpecl:cd /usr/local/php73/bin ./pecl install igbinary igbinary-devel ./pecl install redis -
Check the extension path:
ll /usr/local/php73/lib/php/extensions/Example output:
drwxr-xr-x 2 root root 76 Mar 3 14:05 no-debug-non-zts-20180731 -
Add both
igbinary.soandredis.soto a newly created10-directadmin.inifile:vi /usr/local/php73/lib/php.conf.d/10-directadmin.iniAdd these lines to the file:
extension=/usr/local/php73/lib/php/extensions/no-debug-non-zts-20180731/redis.so extension=/usr/local/php73/lib/php/extensions/no-debug-non-zts-20180731/igbinary.so -
Restart LSPHP to apply the change:
killall -9 lsphp
Without a control panel
-
Add the LiteSpeed repository.
For CentOS 7:
rpm -ivh https://rpms.litespeedtech.com/centos/litespeed-repo-1.3-1.el7.noarch.rpmFor CentOS 8:
rpm -ivh https://rpms.litespeedtech.com/centos/litespeed-repo-1.3-1.el8.noarch.rpm -
List the LiteSpeed Redis PHP extensions:
yum list | awk '/lsphp/&&/redis/' -
Install PHP, substituting your LSPHP version if it differs:
yum -y install lsphp71-pecl-redis
Verify the installation
-
Verify that Redis is running with
redis-cli. If it is running, the command returnsPONG:redis-cli ping -
Verify the installation using the LiteSpeed default PHP info page,
http://192.0.2.1:8088/phpinfo.php. Look for the Redis Support section.
Try the redis-benchmark utility
A typical example would be:
redis-benchmark -q -n 100000
Example output:
PING_INLINE: 31826.86 requests per second
PING_BULK: 31595.58 requests per second
SET: 33568.31 requests per second
GET: 31908.10 requests per second
INCR: 32647.73 requests per second
LPUSH: 31220.73 requests per second
RPUSH: 31565.66 requests per second
LPOP: 31555.70 requests per second
To run one million SET operations, using a random key for every operation from 100,000 possible keys, use:
redis-cli flushall
redis-benchmark -t set -r 100000 -n 1000000
Warning: redis-cli flushall deletes all keys from all databases. Do not run it on a Redis server containing data you need to keep.
Example output:
====== SET ======
  1000000 requests completed in 32.43 seconds
  50 parallel clients
  3 bytes payload
  keep alive: 1
99.98% <= 10 milliseconds
99.99% <= 11 milliseconds
99.99% <= 12 milliseconds
100.00% <= 17 milliseconds
30833.75 requests per second
Tip
For more information about Redis benchmarks, see the Redis benchmark documentation.
Integrate WordPress with Redis
Other settings
-
If you want to set up master-slave replication, you may need to enable the firewall for port
6379:firewall-cmd --permanent --zone=public --add-port=6379/tcp firewall-cmd --reload -
To start Redis automatically at boot:
systemctl enable redis -
To enable disk persistence, edit
/etc/redis.confand set:appendonly yes appendfsync everysec -
For more information about Redis security, see the Redis security documentation.
Using Memcached in a UNIX socket
Memcached can run in a UNIX socket, which may provide better performance than a TCP connection.
Note
If Memcached fails to start, it is usually due to permission or user issues. Run the following instructions as root, and verify that the socket path is writable by the designated user.
CentOS 7.x
-
Stop Memcached:
systemctl stop memcached -
Copy the service file:
cp /usr/lib/systemd/system/memcached.service /etc/systemd/system/memcached.service -
Add the following content to
/etc/systemd/system/memcached.service. After[Service], change the username to the same user that runs PHP. The contents of the file should look like this:User=<username> Group=<username>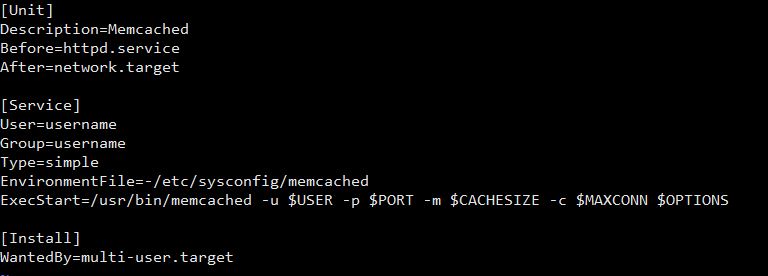
-
Edit
/etc/sysconfig/memcached, changing the path to your desired location and the username to the same one used in step 3. ChangeOPTIONS="" USER="memcached"to:OPTIONS="-s /path/to/memcached.sock -a 0770" USER="<username>" -
Start Memcached again:
systemctl start memcached -
Verify that it started successfully:
systemctl status memcached -
Check that it is working:
nc -U /path/to/memcached.sock stats -
If you still have permission issues, check the SELinux status:
getenforce -
If the status is
Enforcing, temporarily set SELinux to permissive mode:setenforce 0A reboot will re-enable SELinux.
-
To permanently change SELinux mode, edit
/etc/selinux/config, changeenforcingtopermissiveordisabled, and reboot.
CentOS 6.x
-
Stop Memcached:
systemctl stop memcached -
Edit
/etc/sysconfig/memcachedand changeOPTIONS="" USER=""toOPTIONS="-s /path/to/memcached.sock -a 0770" USER="<username>", where<username>is the user that runs PHP. -
Start Memcached:
service memcached start -
Check that it is working:
nc -U /path/to/memcached.sock stats -
If you still have permission issues, check the SELinux status:
getenforce -
If the status is
Enforcing, temporarily set SELinux to permissive mode:setenforce 0A reboot will re-enable SELinux.
-
To permanently change SELinux mode, edit
/etc/selinux/config, changeenforcingtopermissiveordisabled, and reboot.
Ubuntu 17.10, Ubuntu 16.04, Debian 8, and Debian 9
-
Stop Memcached:
systemctl stop memcached -
Edit
/etc/memcached.conf, comment out the host and port, add the socket path and permission-s /path/to/memcached.sock -a 0770, and change-u memcacheto-u <username>, where<username>is the user that runs PHP. -
Start Memcached again:
systemctl start memcached -
Check that it is working:
nc -U /path/to/memcached.sock stats
Ubuntu 14.04 and Debian 7
-
Stop Memcached:
service memcached stop -
Edit
/etc/memcached.conf, comment out the host and port, add the socket path and permission-s /path/to/memcached.sock -a 0770, and change-u memcacheto-u <username>, where<username>is the user that runs PHP. -
Start Memcached again:
service memcached start -
Check that it is working:
nc -U /path/to/memcached.sock stats
Using Redis in a UNIX socket
Run the following instructions as root. If Redis fails to start, verify that SELinux is disabled and that all mentioned directories and files have the correct permissions for the designated user.
CentOS 7.x
-
Stop Redis:
systemctl stop redis -
Copy the service file:
cp /usr/lib/systemd/system/redis.service /etc/systemd/system/redis.service -
Edit
/etc/systemd/system/redis.serviceand setUserandGroupto the same user that runs PHP. Replaceusernamewith that user:User=username Group=username -
Edit
/etc/redis.confand make the following changes. Changeportto0if a TCP socket is no longer needed:unixsocket /path/to/redis.sock unixsocketperm 770 logfile /path/to/redis.log dir /path/to/redis -
Change the owner of
redis.confto the same username used in step 3:chown username:group /etc/redis.confIf
/path/to/redisdoes not exist, create it manually. Make sure the designated user can write to the socket path, log path, and data directory. -
Start Redis:
systemctl start redis -
Verify that it started successfully:
systemctl status redis -
Check that it is working:
nc -U /path/to/redis.sock info