CDN
QUIC.cloud Tab
LiteSpeed provides a simple process for getting started with QUIC.cloud CDN
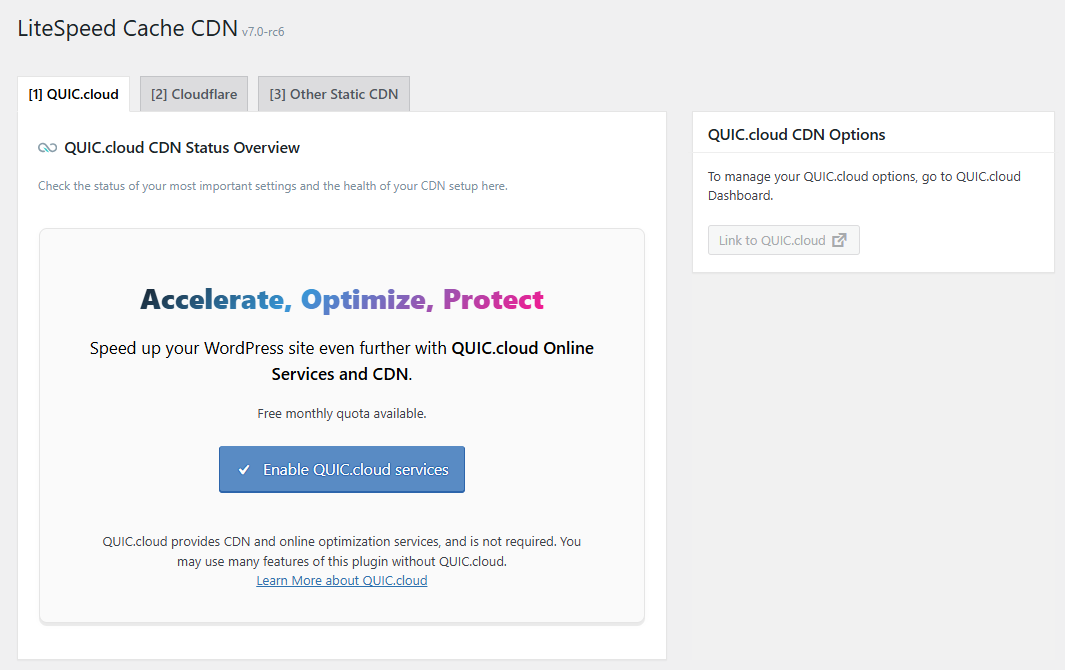
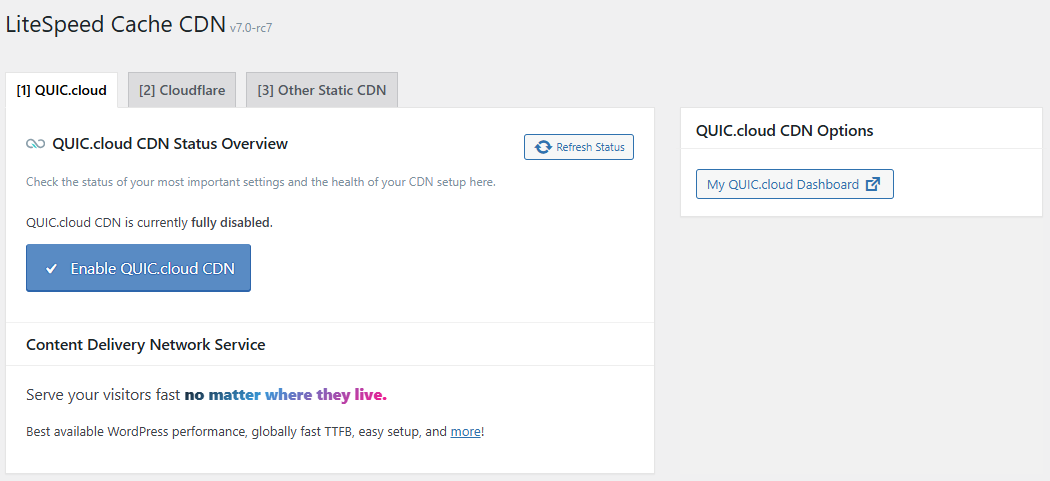
Depending on whether you have previously enabled QUIC.cloud services or not, this tab will either have a Enable QUIC.cloud services button or an Enable QUIC.cloud CDN button. Follow the appropriate instructions below.
Enable QUIC.cloud services
If you haven't connected your domain to QUIC.cloud yet, you'll see the screen above and a button that says Enable QUIC.cloud services. Press the button and create a QUIC.cloud account, or link to an existing one. (The process should be straightforward, but if you want detailed directions, please see the QUIC.cloud Onboarding Documentation.)
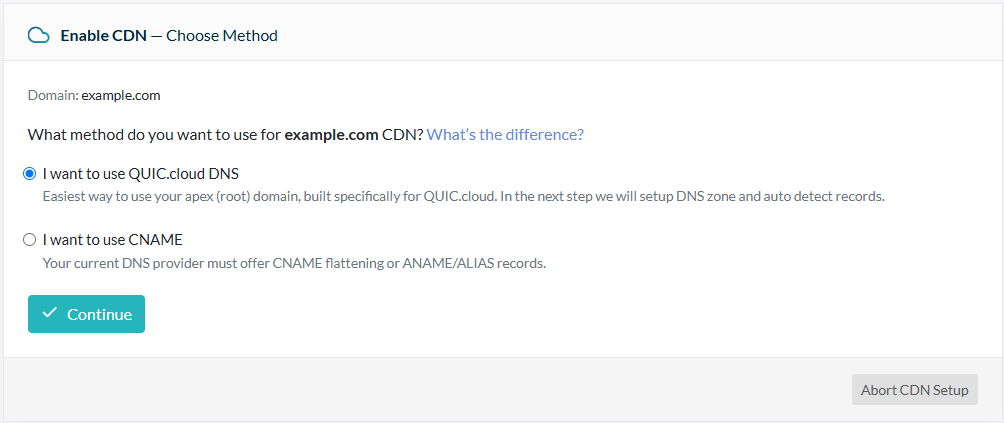
Choose whether you want to use QUIC.cloud's built-in free DNS option, or whether you want to use the CNAME method. In this example, we chose I want to use QUIC.cloud DNS. To get more detailed instructions for the CNAME method, or if you want to sign up using Cloudflare Integration, please see the QUIC.cloud DNS Options Overview.
Press Continue.
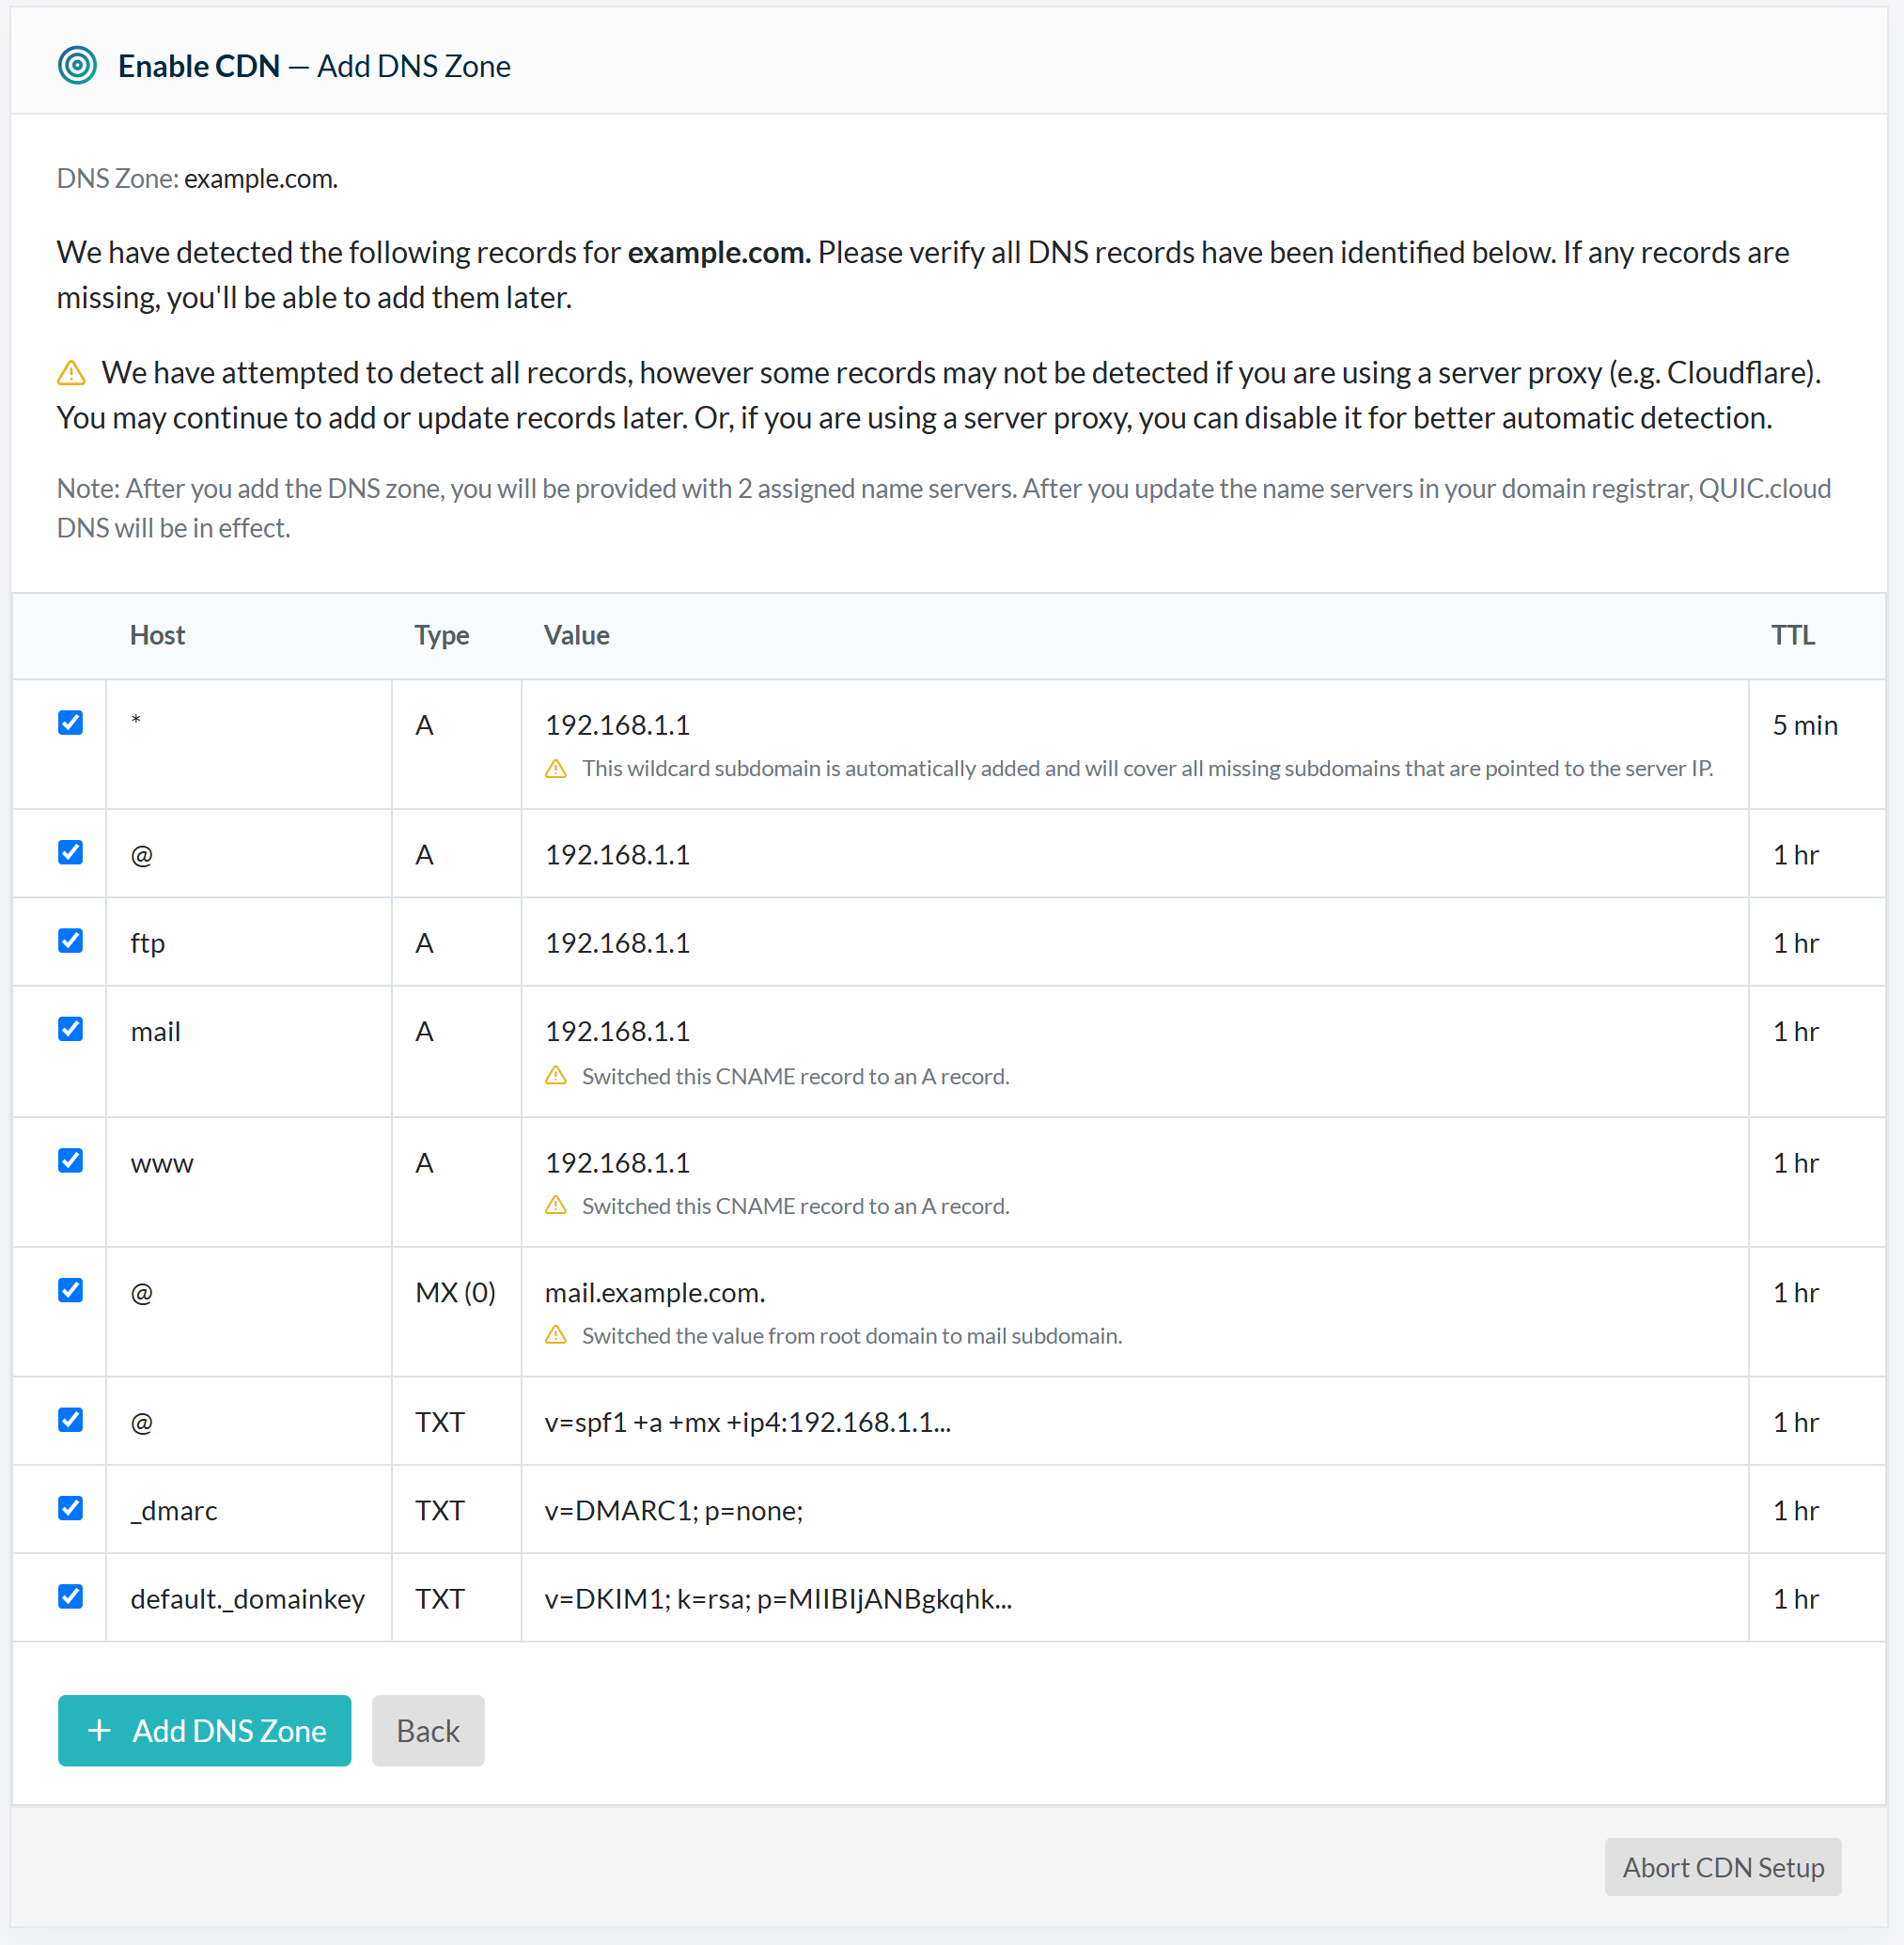
QUIC.cloud will attempt to detect your domain's DNS records and import them. Please be patient while it works, and don't close the window during this time.
Once complete, QUIC.cloud will display a list of the DNS records it found. If any were missed, you can add them later. Press the Add DNS Zone button to accept these DNS records and continue.
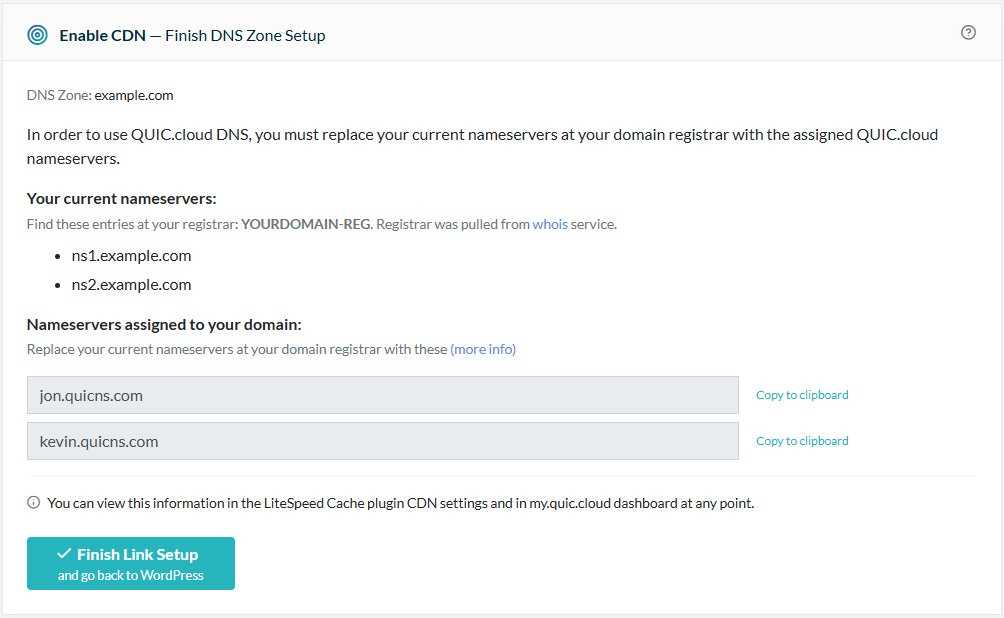
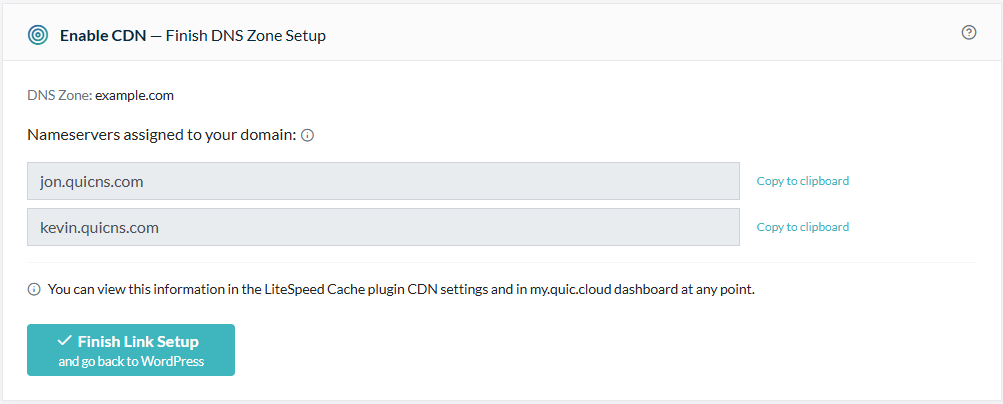
QUIC.cloud will attempt to verify that your nameservers are correctly set up at your domain registrar. This is the one step in the Setup process that you must complete manually.
Tip
Nameservers are a domain-level configuration. If you are setting up a subdomain like blog.example.com, the namerservers are located at the domain registrar for the example.com root domain. If you've already set up QUIC.cloud DNS for example.com or some other subdomain of example.com (like www.example.com), then the nameservers should already be set to QUIC.cloud nameservers. You won't need to do anything for this step. Simply wait for QUIC.cloud to detect them.
Log into your domain registrar. Your previous DNS provider’s nameservers should still be on file. You’ll see them listed under NS1, NS2, and possibly NS3 and NS4 as well.
Warning
Your domain registrar is the the provider you purchased your domain name from. Sometimes this is the same as your hosting provider, but that is not always the case. Make sure that you are in the right place before you change anything!
Warning
QUIC.cloud DNS does not support DNSSEC. If you have DNSSEC enabled at your current DNS provider, please disable it before attempting to update nameservers and switch to QUIC.cloud DNS.
Change the NS1 and NS2 records, to match those displayed in the Nameservers assigned to your domain section. If your domain registrar has additional records (NS3, NS4, etc.) erase those values. You should now only have QUIC.cloud-provided NS records at your domain registrar.
Click the Finish Link Setup and go back to WordPress button.
Enable QUIC.cloud CDN
If you've already connected your domain to QUIC.cloud, but you haven't set up the CDN, you'll see the screen above and a button that says Enable QUIC.cloud CDN. Press the button.
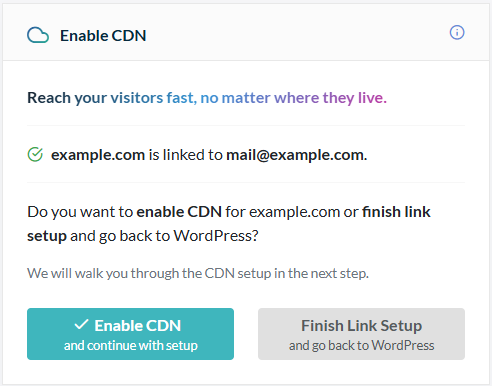
Press the Enable CDN and continue with setup button when prompted.
Click the Finish Link Setup and go back to WordPress button.
Finish CDN Setup
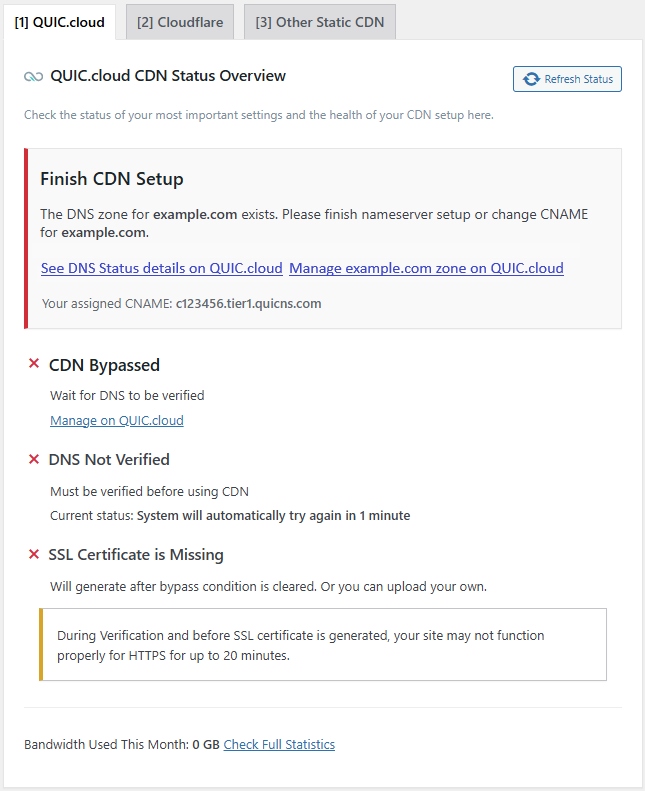
The QUIC.cloud Tab should now be showing you information related to the CDN setup. Chances are, there are still things to be done. You may need to address some DNS issues. If so, you'll be notified with a Finish CDN Setup box.
One the setup is complete, it will take a few moments to verify your DNS and generate an SSL certificate. You can press the Refresh Status button to see how it's going.
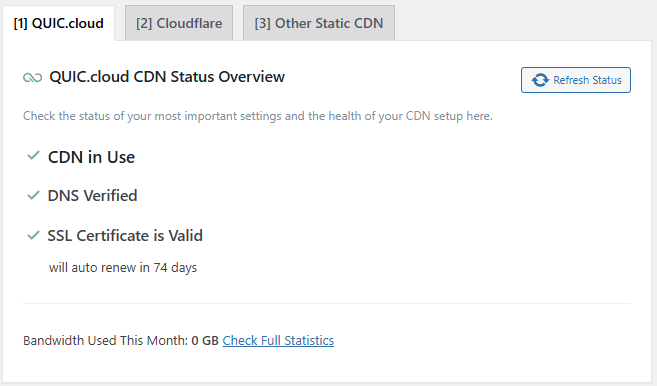
When setup is complete, and the CDN is in use, you'll see a screen like the one above, that says CDN in Use, DNS Verified, SSL Certificate is Valid.
Cloudflare Tab
LSCache for WordPress provides a mechanism for managing your Cloudflare account, eliminating the need for an extra plugin.
Cloudflare Settings
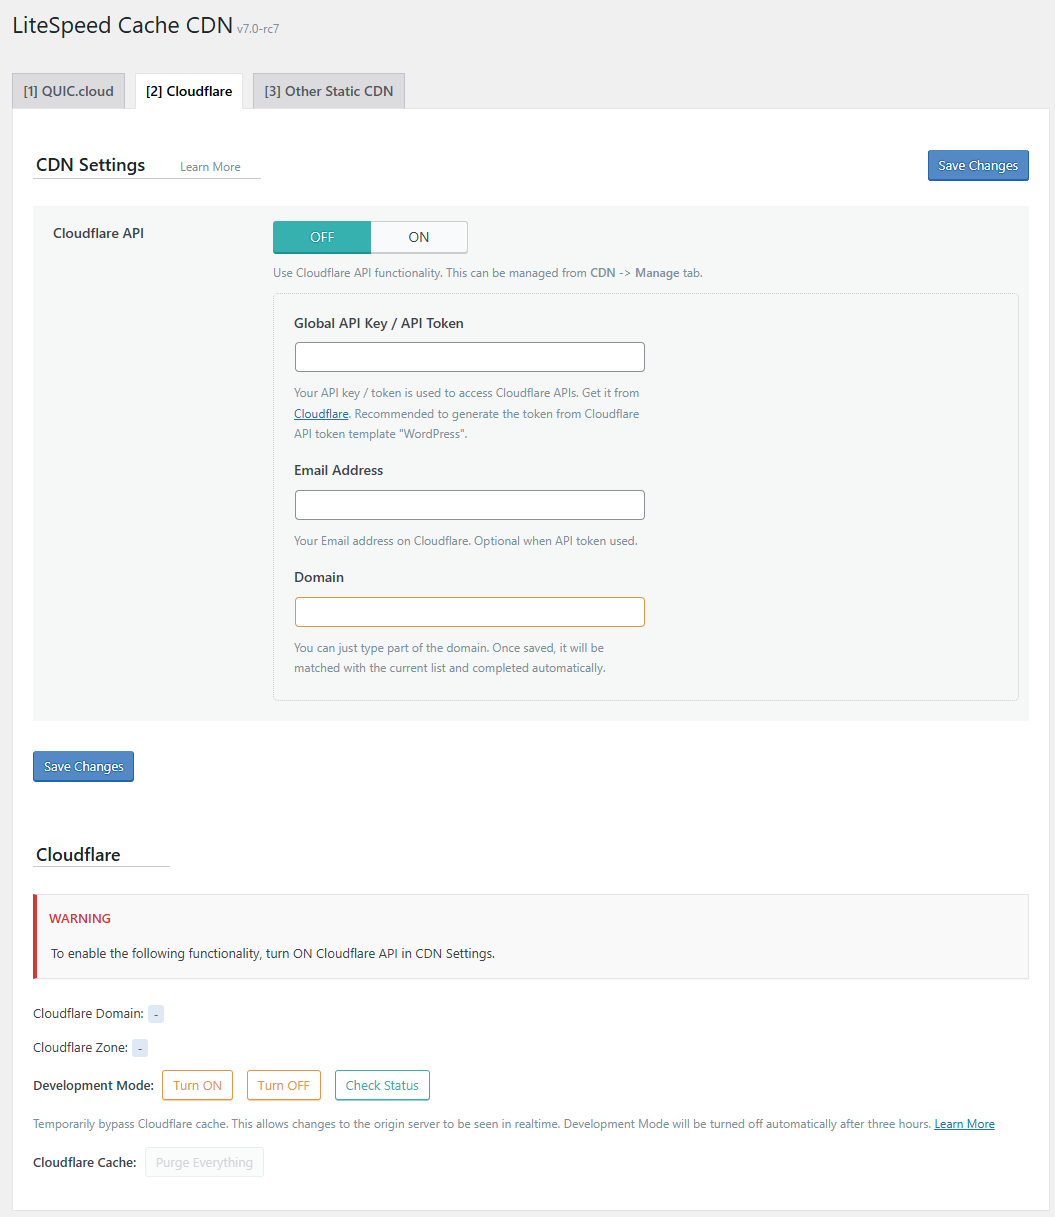
Cloudflare API
OFF
You can manage your Cloudflare cache through this plugin, if you wish. Simply set Cloudflare API to ON and then fill in the three fields below.
- Global API Key / API Token: Log in to Cloudflare and generate this token using the "WordPress" template.
- Email Address: The email address used for your Cloudflare account
- Domain: Your site's domain name
Once the settings are saved, you will be able to manage your Cloudflare cache on this page.
Clear Cloudflare cache
OFF
Enable this setting to have Cloudflare's cache purged automatically any time a LiteSpeed Purge All runs. This allows you to keep Cloudflare' cache current. This setting requires the Cloudflare API settings above to be configured.
Cloudflare
Before you can use the functions in this section, you will need to set up the Cloudflare API above.
Once the API settings are saved, the elements of this area will be populated.
Cloudflare Domain
This is the domain that you have configured to be served by Cloudflare. It is informational only and cannot be changed here. If it is in error, you will need to fix it in your Cloudflare account.
Cloudflare Zone
This is the unique id that was assigned to your domain by Cloudflare. It is informational only and cannot be changed here. You can see it on your Cloudflare profile.
Development Mode
These buttons allow you to turn on Development Mode, turn it off, and check to see whether it is running. If you are making updates to your site, and want to verify that they are working as planned, Development Mode allows you to temporarily disable Cloudflare so that you may see your updates in realtime.
After three hours, Development Mode will turn itself off, or you can turn it off manually via the button provided.
Cloudflare Cache
Press the Purge Everything button to purge your Cloudflare cache on demand. This is helpful if you have made changes that result in an LSCache purge, and you want to make sure Cloudflare is up-to-date.
Other Static CDN Tab
If you currently use a content delivery network, you can configure LSCWP so that it works together with your CDN. This section is not for QUIC.cloud or Cloudflare CDNs. Please see QUIC.cloud or Cloudflare as appropriate.
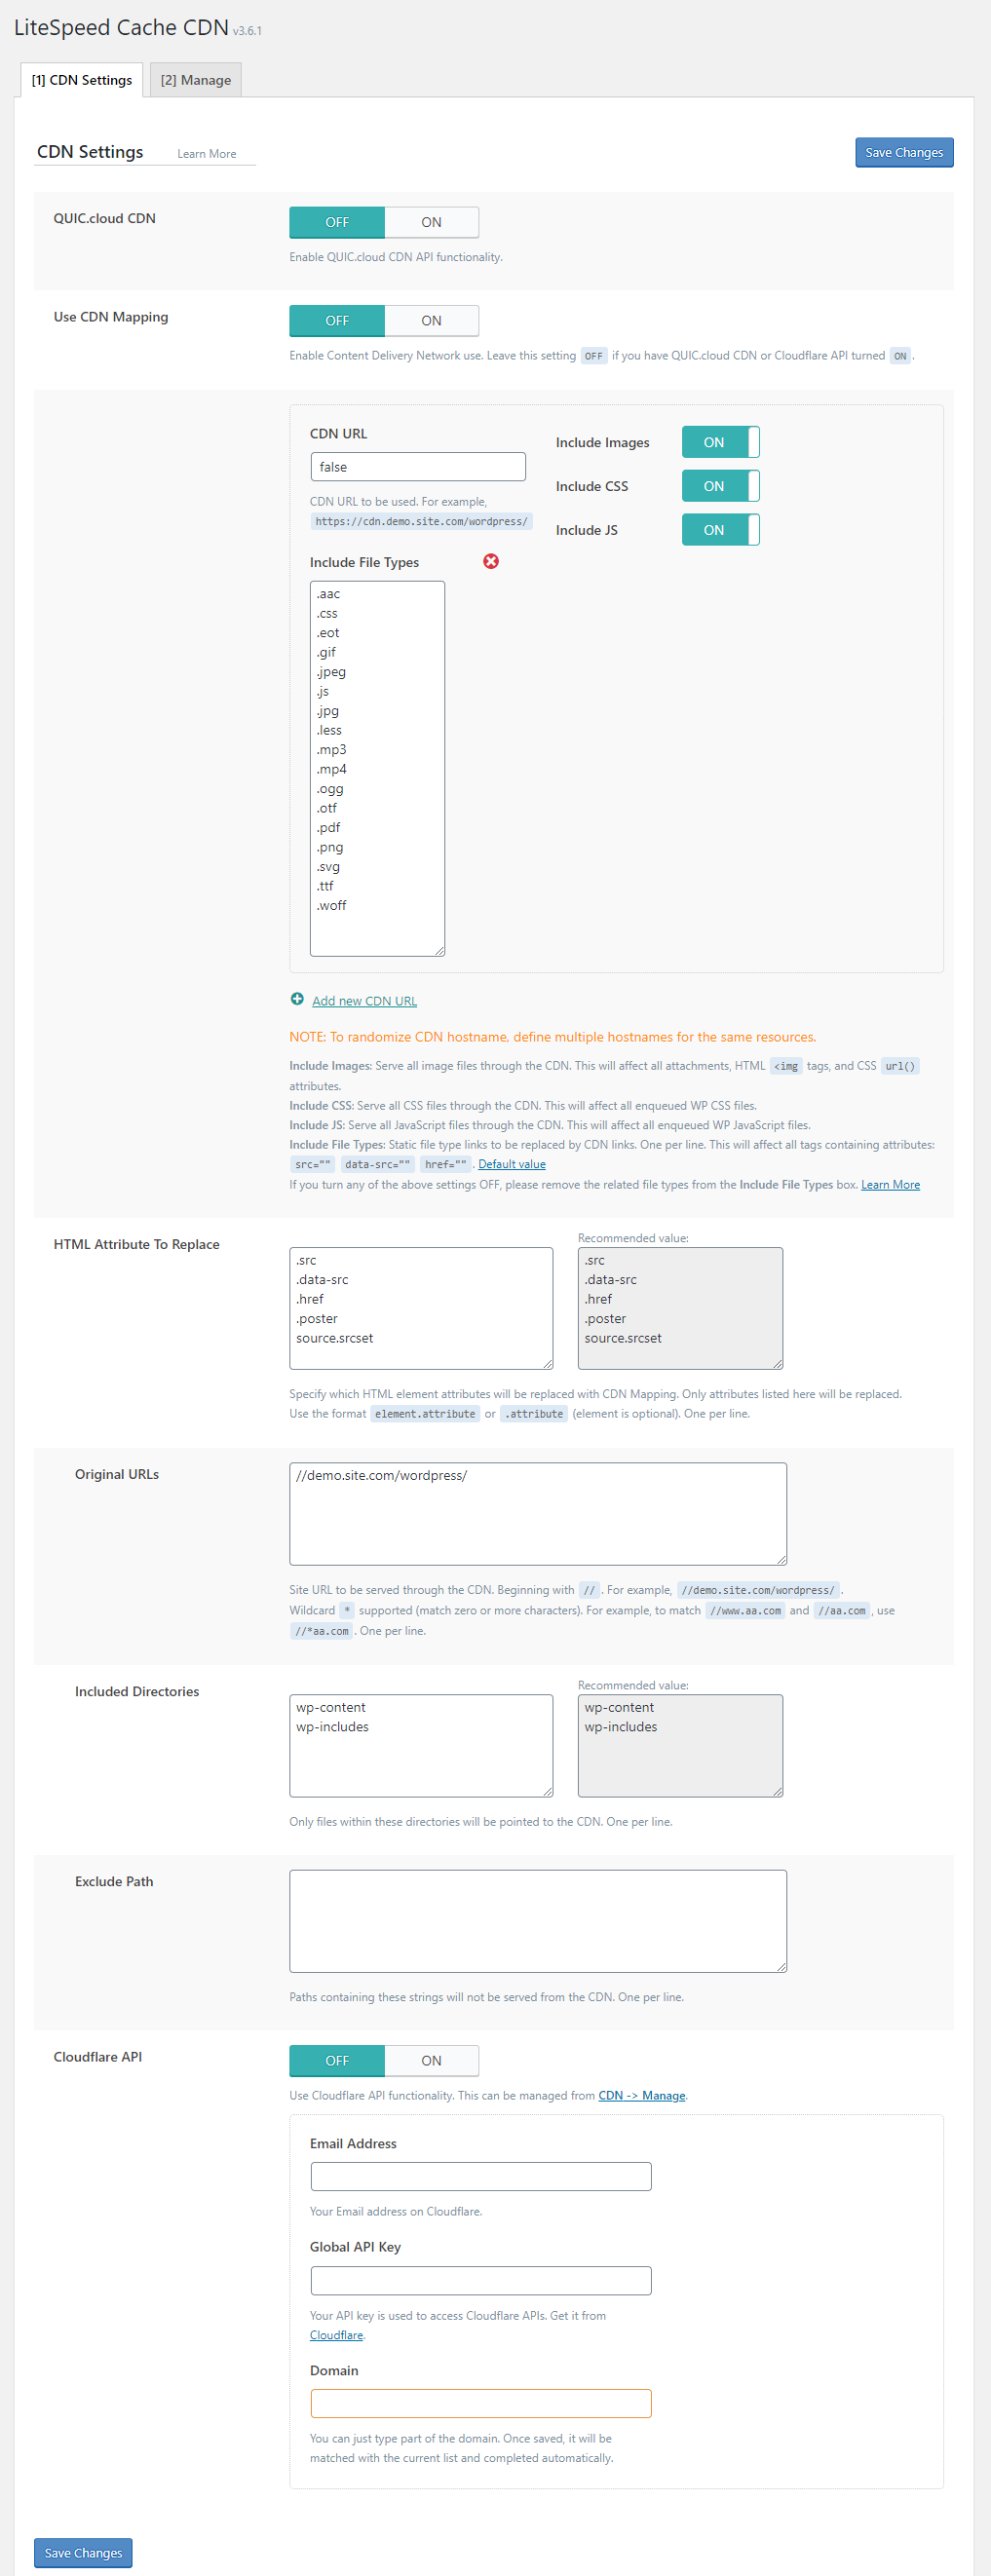
Use CDN Mapping
OFF
This section allows you to specify multiple CDN paths for your content. If you only use one CDN, then only fill out the first box. If you have more than one path (for example, images served from one CDN, and JavaScript/CSS served from another), then you would fill out a box for each path.
Note
If you set up multiple CDN paths with the same settings, the last one will overwrite the others.
Warning
This setup is not necessary for Cloudflare or other distributed proxy networks. Only use CDN mapping for reverse proxy content delivery networks! If you wish to manage your Cloudflare cache from within LSCache, skip most of this page and jump to the Cloudflare API setting.
Video
Cloudflare may also be set up as a static content CDN (as opposed to its default use as a distributed proxy network). Setup is different in that case. See our blog post about Serving Static Content Through a Subdomain here.
CDN URL
empty string
This is the base URL for content that is served from this CDN. It should be a full URL beginning with http.
Include Images
OFF
Turn this on to serve all images through this CDN. This includes image attachments, HTML <img> tags, and CSS url() attributes.
Include CSS
OFF
Turn this on to serve all CSS files through this CDN.
Include JS
OFF
Turn this on to serve all JavaScript files through this CDN.
Include File Types
default file types
Use this spot to list, one per line, the file types that are to be served from this CDN. These should be static files. This setting affects all of the following HTML tags: src, date-src, and href. The default file types included in this setting are:
    .aac
    .css
    .eot
    .gif
    .jpeg
    .js
    .jpg
    .less
    .mp3
    .mp4
    .ogg
    .otf
    .pdf
    .png
    .svg
    .ttf
    .woff
Important
If you have turned off any of the previous three settings, you will need to remove the corresponding file extensions from this Include File Types box.
For example, if Include CSS is set to OFF, then remove .css and .less from the list.
HTML Attribute to Replace
_list of attributes
Specify which HTML element attributes will be replaced with CDN Mapping. Only attributes listed here will be replaced. Use the format element.attribute or .attribute (element is optional). One per line.
We've provided a default list, but you can add or remove other attributes as desired.
Original URLs
your site URL(s)
This setting defaults to your site's base URL. It shouldn't be necessary to change this. If you do change it, be sure that the URL begins with // as in //example.com. You may use a wildcard (*) here to specify 0 or more characters.
If your site spans multiple base URLs, you may enter them all here, separated by commas. For example:
//a.example.com, //b.example.com, //c.example.com
Included Directories
wp-content wp-includes
These are the directories that will be served by CDN. You shouldn't need to change this unless you have a non-standard configuration.
Exclude Path
list of paths to exclude from CDN
Use this spot to list file paths that you explicitly do not want to have served from the CDN. List them one per line. You can list a path in its entirety, or use a partial path that will be matched. Do not use wildcards.
