Crawler
The crawler travels through your site, refreshing pages that have expired in the cache. This makes it less likely that your visitors will encounter uncached pages.
The crawler must be enabled at the server-level or the virtual host level by a site admin. Please see: Enabling the Crawler at the Server or Virtual Host Level
Learn more about crawling on our blog.
Summary Tab
Crawler Cron
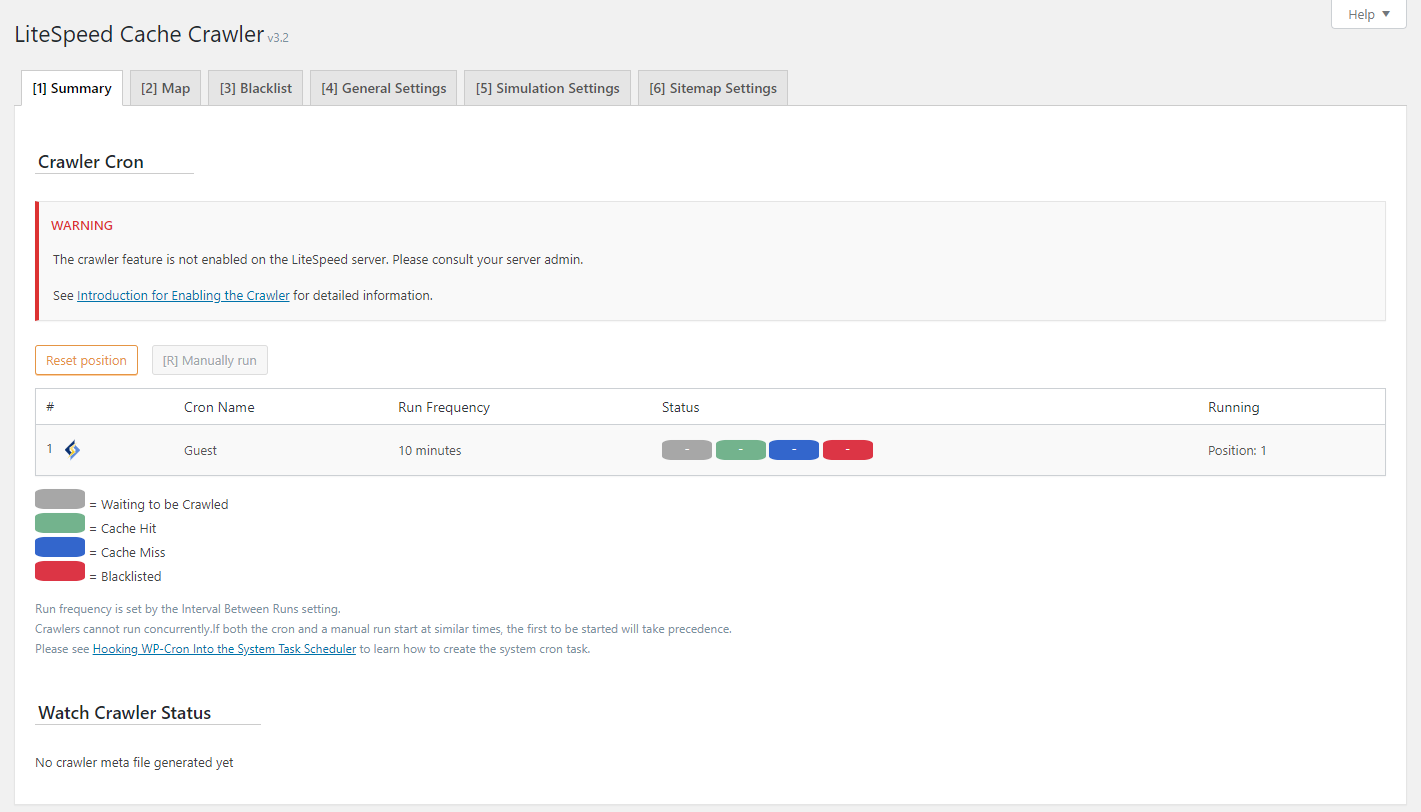
See the progress of the various crawlers enabled for your site. You can monitor the progress of each crawler via the color-coded rectangles in the Status column.
Note
Crawlers cannot run concurrently. If you have multiple crawlers defined, they will run one at a time.
Use the Reset Position button to start the crawler at the beginning again.
Use the Manually run button to start the crawler without waiting for the cron job.
Status Key
- Gray, Waiting to be Crawled: the page is in the queue to be crawled
- Green, Cache Hit: the page is already cached, so the crawler skipped it
- Blue, Cache Miss: the page was not already cached, so the crawler has cached it
- Red, Blocklisted: the page cannot be crawled (See the Blocklist section for more information.)
Watch Crawler Status
If you've opted to watch the crawler status, your screen will look something like the image below. The messages in the status window will vary from site to site.
Here is an explanation of some of the terms:
Size: The number of URLs in the sitemap. This example has 181.Crawler: Indicates which crawler number you are watching. It's number 1 in this example. There could be multiple crawlers working, depending on your settings.Position: The URL number currently being fetched from the sitemap list.Threads: Indicates the number of threads currently being used to fetch URLs. There may be multiple threads fetching. It is smart and will adjust based on your load settings.Status: Indicates the current crawler status. In this example,Stopped due to reset meta positionmeans that the site purged or the sitemap changed while it was crawling, and as such, the crawler will restart from the top.
Map Tab
Sitemap List
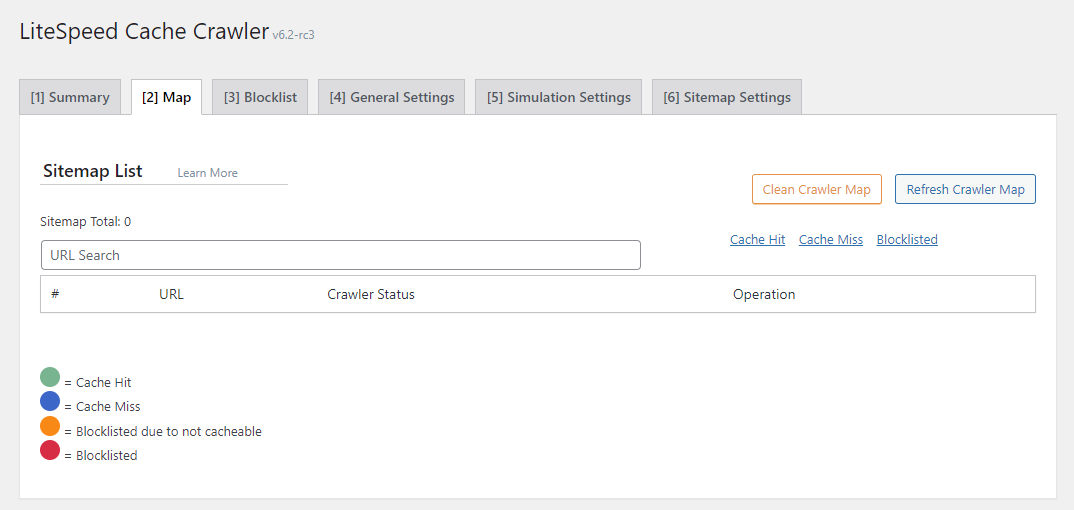
This page displays the URIs currently in the crawler map. If you don't see any listed, try pressing the Refresh Crawler Map button.
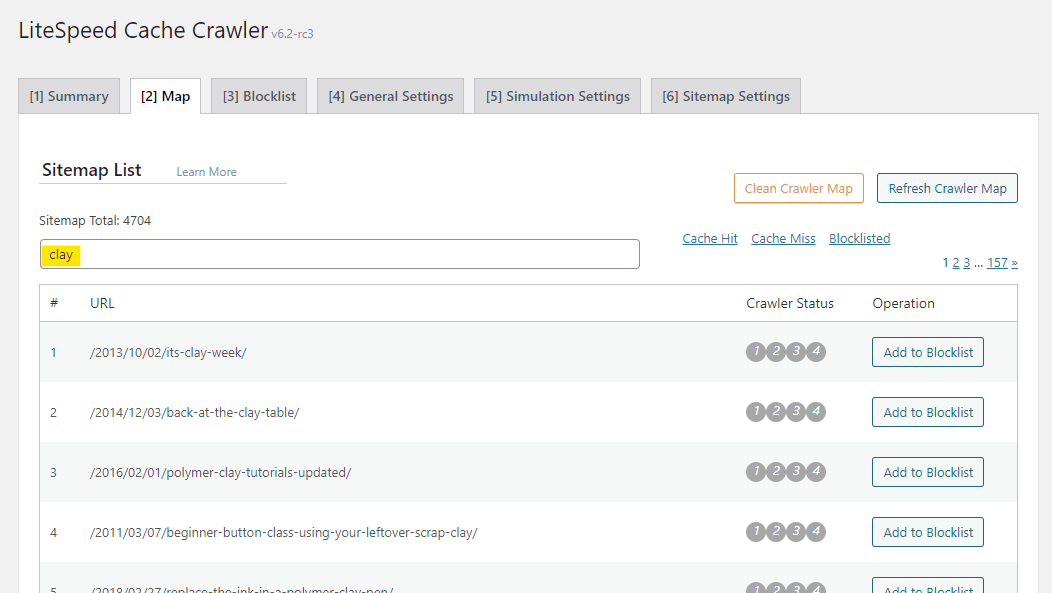
You can search for a particular URL, which is helpful if your sitemap is large.
You can filter your URL list to only display those with a particular cache status (Cache Hit or Cache Miss) or those that have been added to the blocklist (Blocklisted). Click the corresponding link to do so.
You can manually add URIs to the blocklist via the button next to each entry.
The Crawler Status column uses colored dots to give you the status of each URI. See below the table for the key.
To start from scratch with the crawler map, press the Clean Crawler Map button.
Blocklist Tab
Blocklist
This page displays the URIs currently in the blocklist.
From here you can manually remove URIs from the blocklist via the button next to each entry.
The Status column uses colored dots to give you the status of each URI. See below the table for the key.
To start from scratch and clear out the blocklist, press the Empty Blocklist button.
Settings Tab
Crawler
OFF
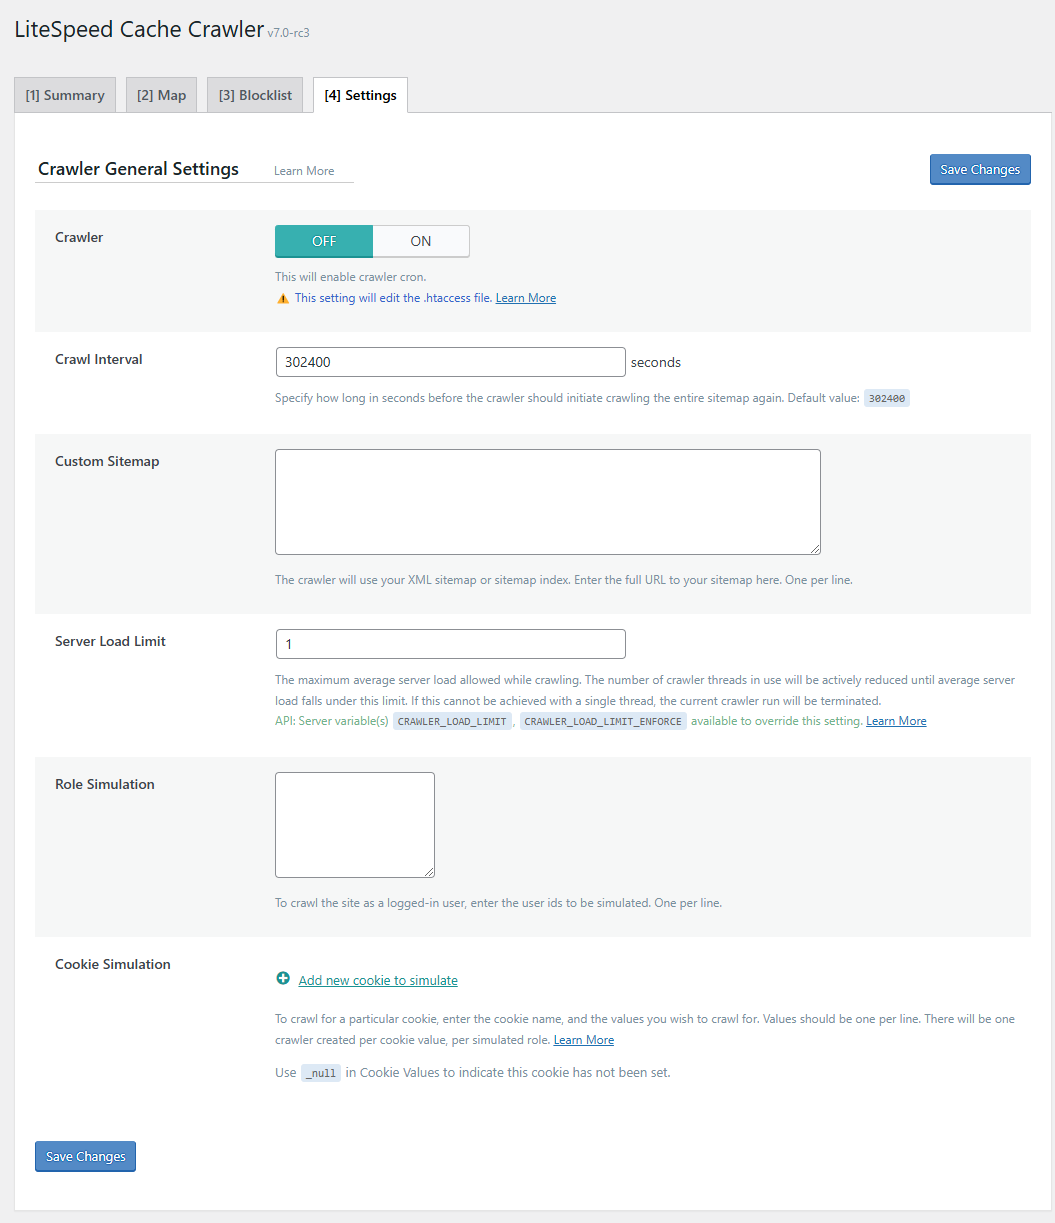
Set the to ON to enable crawling for this site.
Delay
The crawler sends requests to the backend, one page after another, as it traverses your site. This can put a heavy load on your server if there is no pause between requests. The Delay (in microseconds) lets LSCache know how often to send a new request to the server.
This setting may be limited at the server level. Learn more about limiting the crawler's impact on the server.
Info
This setting has been deprecated in LSCWP v7. Delay is now set to 500 microseconds by default. If you wish to adjust this value, please add a line similar to this to your wp-config.php file, where $delay is the number of microseconds you wish to set Delay to:
define('LITESPEED_CRAWLER_USLEEP', $delay);
Run Duration
In order to keep your server from getting bogged-down with behind-the-scenes crawling, we put limits on the crawling duration. This setting has been deprecated in LSCWP v7. Run Duration is now set to a maximum of 900 seconds and is not editable.
Interval Between Runs
This setting determines the length of the break mentioned above. By default, the crawler rests for 600 seconds in between every 400-second run.
Info
This setting has been deprecated in LSCWP v7. Interval Between Runs is now set to 600 seconds by default. If you wish to adjust this value, please add a line similar to this to your wp-config.php file, where $interval is the number of seconds you wish to set Interval Between Runs to:
define('LITESPEED_CRAWLER_RUN_INTERVAL', $interval);
Crawl Interval
302400
How often do you want to re-initiate the crawling process? This depends on how long it takes to crawl your site. The best way to figure this out is to run the crawler a couple of times and keep track of the elapsed time. Once you’ve got that amount, set Crawl Interval to slightly more than that. For example, if your crawler routinely takes 4 hours to complete a run, you could set the interval to 5 hours (or 18000 seconds).
Threads
When Threads is set to the default of 3, then there are three separate crawling processes happening concurrently. The higher the number, the faster your site is crawled, but also the more load that is put on your server.
Info
This setting has been deprecated in LSCWP v7. Threads is now set to 3 by default. If you wish to adjust this value, please add a line similar to this to your wp-config.php file, where $threads is the number you wish to set Threads to:
define('LITESPEED_CRAWLER_THREADS', $threads);
Timeout
The crawler has this many seconds to crawl a page before moving on to the next page. Value defaults to 30 seconds.
Info
This setting has been deprecated in LSCWP v7. Timeout is now set to 30 seconds by default. If you wish to adjust this value, please add a line similar to this to your wp-config.php file, where $timeout is the number of seconds you wish to set Timeout to:
define('LITESPEED_CRAWLER_TIMEOUT', $timeout);
Server Load Limit
1
This setting is a way to keep the crawler from monopolizing system resources. Once the server's load average reaches this limit, the crawler will be terminated, rather than allowing it to compromise server performance. Set Server Load LImit to 0 to prevent the crawler from running.
Example
To limit the crawler so that it stops running when half of your server resources are being consumed, set Server Load Limit to 0.5 for a one-core server, 1 for a two-core server, 2 for a four-core server, and so on.
Note
This setting may be overridden at the server level. Learn more about limiting the crawler's impact on the server.
Role Simulation
Empty list
By default, the crawler runs as a non-logged-in "guest" on your site. As such, the pages that are cached by the crawler are all for non-logged-in users. If you would like to also pre-cache logged-in views, you may do so here.
The crawler simulates a user account when it runs, so you need to specify user id numbers that correspond to the roles you'd like to cache.
For security purposes, some restrictions have been enacted for Role Simulation as of version 7:
- It may not be run for any userid that has
Editorprivileges or higher - It is limited to the Server IP
Note
If the server doesn't support port 443 you can set the LITESPEED_CRAWLER_LOCAL_PORT constant to 80.
Example
To cache pages for users with the "Subscriber" role, choose one user that has the "Subscriber" role, and enter that user's ID in the box.
You may crawl multiple points-of-view by entering multiple user ids in the box, one per line.
Note
Only one crawler may run at a time, so if you have specified one or more user ids in the Role Simulation box, first the "Guest" crawler will run, and then the role-based crawlers will run, one after the other.
Cookie Simulation
To crawl for a particular cookie, enter the cookie name, and the values you wish to crawl for. Values should be one per line, and can include a blank line. There will be one crawler created per cookie value, per simulated role. Press the + button to add additional cookies, but be aware the number of crawlers grows quickly with each new cookie, and can be a drain on system resources.
Example
If you crawl for Guest and Administrator roles, and you add testcookie1 with the values A and B, you have 4 crawlers:
- Guest, testcookie1=A
- Guest, testcookie1=B
- Administrator, testcookie1=A
- Administrator, testcookie1=B
Add testcookie2 with the values C, D, and
- Guest, testcookie1=A, testcookie2=C
- Guest, testcookie1=B, testcookie2=C
- Administrator, testcookie1=A, testcookie2=C
- Administrator, testcookie1=B, testcookie2=C
- Guest, testcookie1=A, testcookie2=D
- Guest, testcookie1=B, testcookie2=D
- Administrator, testcookie1=A, testcookie2=D
- Administrator, testcookie1=B, testcookie2=D
- Guest, testcookie1=A, testcookie2=
- Guest, testcookie1=B, testcookie2=
- Administrator, testcookie1=A, testcookie2=
- Administrator, testcookie1=B, testcookie2=
There aren't many situations where you would need to simulate a cookie crawler, but it can be useful for sites that use a cookie to control multiple languages or currencies.
Example
WPML uses the _icl_current_language= cookie to differentiate between visitor languages. An English speaker's cookie would look like _icl_current_language=EN, while a Thai speaker's cookie would look like _icl_current_language=TH. To crawl your site for a particular language, use a Guest user, and the appropriate cookie value.
Drop Domain from Sitemap
The crawler will parse the sitemap and save it into the database before crawling. When parsing the sitemap, dropping the domain can save DB storage. This setting is enabled by default.
Warning
If you are using multiple domains for one site, and you have multiple domains in the sitemap, please keep this option OFF. Otherwise, the crawler will only crawl one of the domains.
Info
This setting has been deprecated in LSCWP v7. Drop Domain from Sitemap is now enabled by default. If you wish to disable it, please add the following line to your wp-config.php file:
define('LITESPEED_CRAWLER_DROP_DOMAIN', false);
Sitemap Timeout
This setting specifies the number of seconds before timing out, while parsing the sitemap. It is set to 120 seconds by default
Info
This setting has been deprecated in LSCWP v7. Sitemap Timeout is now set to 120 seconds by default. If you wish to adjust this value, please add a line similar to this to your wp-config.php file, where $timeout is the number of seconds you wish to set Sitemap Timeout to:
define('LITESPEED_CRAWLER_MAP_TIMEOUT', $timeout);


