Image Optimization
Image Optimization Summary Tab
Tip
Check out the Media Troubleshooting page for help with some common issues.
LiteSpeed Cache for WordPress has the ability to optimize your images, making them smaller, and faster to transmit. You may choose to manually press a button to optimize each new batch of images, or configure it to be an automatic process.
Important
Please do NOT use other image optimization plugins at the same time as LSCWP's image optimization. This can cause undesirable behavior, including processing errors that require LiteSpeed staff to manually clear. Choose one image optimizer and stick with that one!
Before You Begin
About QUIC.cloud
All of LiteSpeed's online services, including Image Optimization, are hosted at our QUIC.cloud site. You don't need to have a QUIC.cloud account if you don't want one, but you do need to enable QUIC.cloud services in the plugin's General section.
Image Optimization happens via one of two queues:
- Standard Queue, which is free for everyone, and usage is unlimited.
- Advanced Queue, which comes with a free monthly quota. If you want to continue to use the Advanced Queue after your free quota runs out, you may purchase more quota. A QUIC.cloud account is required to purchase quota. More details about that can be found at QUIC.cloud.
Media Settings
There are a few settings you may want to adjust before you request image optimization. For instance, by default we only optimize your JPG/PNG images. We do not create next-generation image formats (like WebP and AVIF) for each image, unless you enable that behavior. You may also choose to only create next-gen images and forgo the JPG optimization.
See the Image Optimization Settings tab for more information.
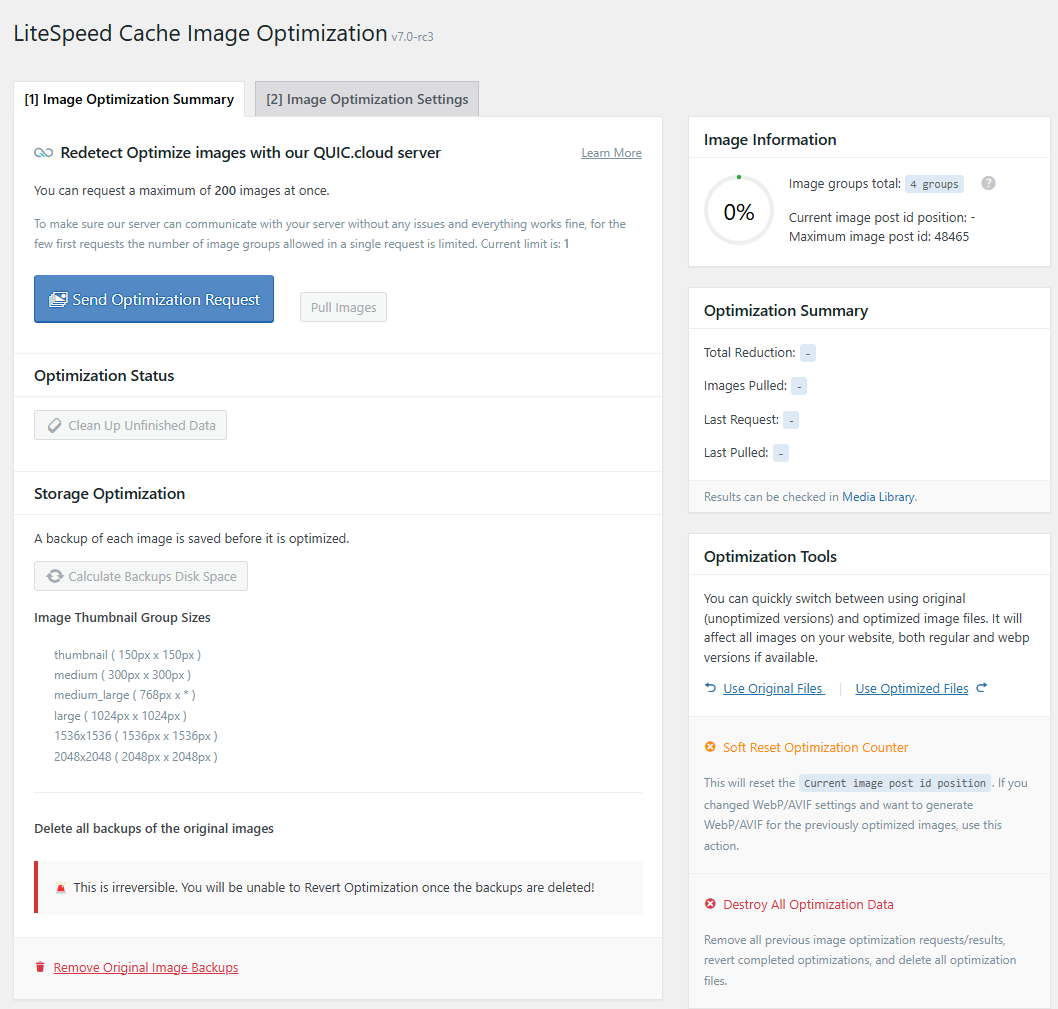
Optimization Summary
Submitting Your First Request
Press the Send Optimization Request button to start your first round of Image Optimization. Only one group of images is sent this first time. We want to make sure everything is working well between your server and ours, and so we start small. You don't need to wait on this page. You can go away and do something else if you like.
Once your first group of images has finished optimizing and has been pulled back to your system (automatically through the cron, or manually by pressing the Pull Images button), LiteSpeed will slowly start sending larger groups of images. Press Send Optimization Request again to send the second batch.
You'll see some changes in the status messages below, letting you know how many images were requested, how many were pulled, and if there were any errors, you'll see that there, too.
When images are ready to pull, press the Pull Images button to initiate the process manually.
After a few batches, you will see the batch sizes have reached 200 images.
If you would like to automate the process, make sure your system cron is working. Then, switch to the Image Optimization Settings tab and set Auto Request Cron to ON and set Auto Pull Cron to ON. Save your settings, and then let your site's images optimize and pull in the background.
Tip
You may have noticed the small QUIC.cloud logo in this area. If you're having a problem with your QUIC.cloud services, try clicking the symbol to redetect your closest available service node(s). If your previously available node has gone down, a new node will be selected, and services can continue.
Optimization Status
Clean Up Unfinished Data
If you are getting errors during your optimization and have reached a point where you cannot continue, you can press this button. All data related to optimization requests that did not complete will be wiped from the database so that you may continue optimizing. Any images that were in progress will be treated as new the next time you request optimization.
Tip
If you do not find and address the underlying cause of any errors you were receiving, there's a good chance that they will continue to occur and clog up your optimization feed again.
Storage Optimization
After you've optimized your images, there are potentially three copies of each image stored on disk: the newly-optimized version, a next-generation format, and a backup of the original unoptimized version.
Calculate Backup Disk Space
This button will calculate the total amount of disk space used by the original unoptimized images.
Remove Original Image Backups
Click this link to delete all of the backups of the original images.
Danger
This is irreversible! You will be unable to revert optimization once the backups are deleted, so please be certain!
Optimization Tools
Use Original Files
You may have decided that you no longer want optimized images on your site for whatever reason. As long as you have not previously used the Remove Original Image Backups function, you may use the Use Original Files link to put everything back the way it was.
Use Optimized Files
If you change your mind again and decide you really do want the optimized images, no need to send a new request. Simply click the Use Optimized Files link, and the optimized versions will be restored.
There is no limit to the number of times you can press the above two links. As long as both versions live on your server, they may be switched in and out at will.
Soft Reset Optimization Counter
If you have already optimized some of your images, but something changes in your settings–say, you switch your next-gen image format from WebP to AVIF–you can use this button to reset the counter.
Resetting the counter means that Image Optimization will start again at the beginning of your media library, but it won't regenerate optimized original images or next-gen formats if these already exist.
Destroy All Optimization Data
Sometimes you just want to start over from scratch. This link gives you a clean slate. It deletes the image optimization information from the database, and reverts all completed optimizations.
Danger
There is no way to undo this process, so please only press Destroy All Optimization Data if you are absolutely sure.
How Image Optimization Works
You may wonder what is actually going on behind the scenes when images are optimized. There are two levels to this: the process that is followed when you submit a request, and the actual optimization steps that are being taken on your images.
What is an Image Group?
In Image Optimization, we refer both to "images" and to "image groups." So, what do we mean by that?
When you upload an image to your Media Library, a collection of differently-sized versions of that image is created. These versions make up an image group.
Example

You upload an image called 770.jpg.
WordPress creates a collection of new images from that one:
770-1024x701.jpg
770-150x150.jpg
770-300x205.jpg
770-348x445.jpg
770-568x725.jpg
770-768x525.jpg
770-78x99.jpg
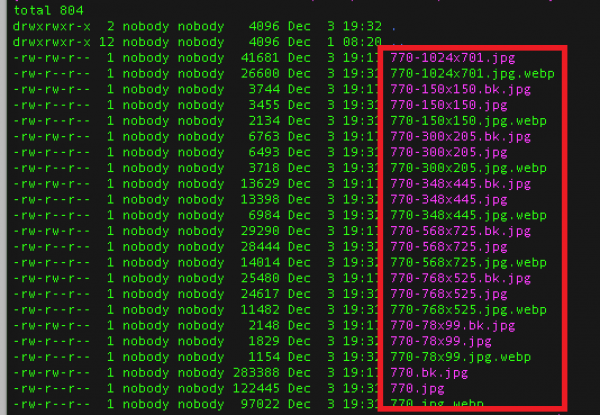
When you run Image Optimization, all of the images within the image group are processed together, adding .webp, .avif, and .bk images to the group, wherever appropriate.
Changing Your Mind Image by Image
If you want to revert all of your images back to the originals, use the Revert Optimization buttons described above. If you decide you prefer just a single image un-optimized, you may revert it to its pre-optimization version from within the Media Library.

From the WordPress Dashboard, navigate to Media > Library. If optimized versions of the image exist, you will see notes in the LiteSpeed Optimization column, telling you how much space was saved by optimization. If the optimized files are in use, there will be an optm link. If the original files are in use, the link will say non-optm. Click the link to toggle between optimized and unoptimized versions.
Note
The WebP or AVIF indicator next to a Media Library image indicates that next-gen images were generated for at least one of the image sizes in that group. It is possible, however, that some image sizes do not have corresponding WebP/AVIF versions. When this happens it is usually because the next-gen image was not smaller than the JPG or the PNG. If a next-gen image doesn't provide any savings for a particular image size, it is discarded.
Troubleshooting
There are a number of different warning/error messages you may see after you've sent an image optimization request. Take a look at our Media Troubleshooting Guide to learn what you can do about them.
Server List
You may need to allowlist our QUIC.cloud servers so that they may communicate with your server to transfer images back and forth. See the QUIC.cloud docs for more information.
Image Optimization Settings Tab
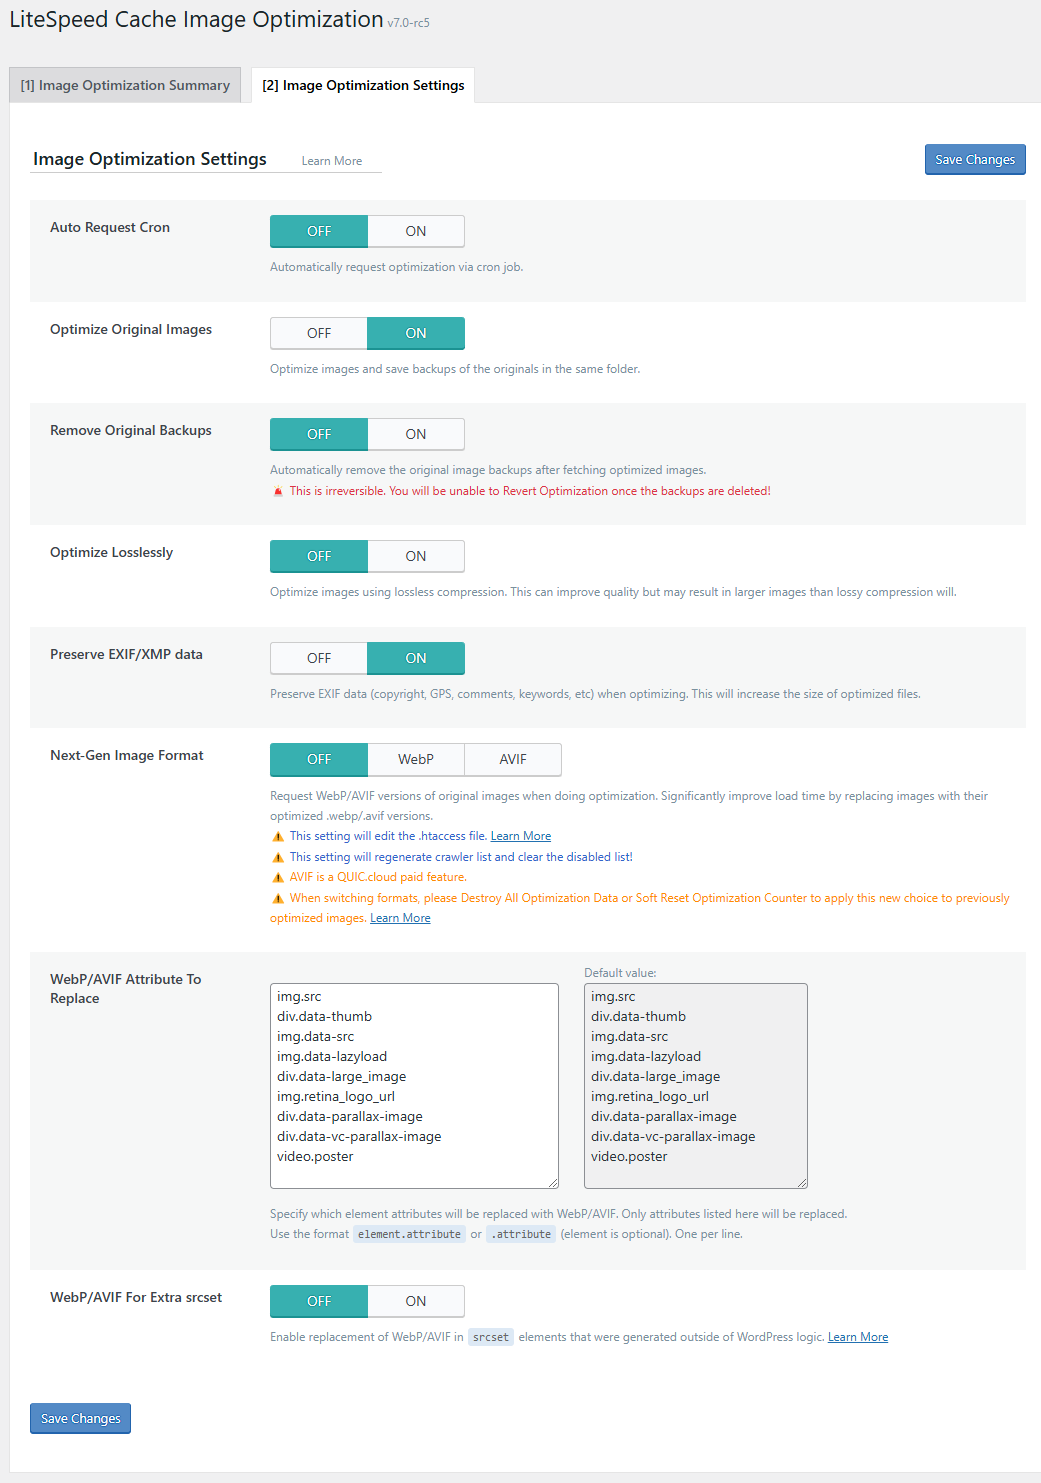
Auto Request Cron
OFF
When this option is ON, image optimization requests will be sent automatically via cron job for new media library uploads.
Auto Pull Cron
This setting has been deprecated in LSCWP v7. Auto Pull Cron is now enabled by default. If you wish to disable it, please add the following line to your wp-config.php file:
```
define('LITESPEED_IMG_OPTM_PULL_CRON', false);
```
If you disable this setting, you will always need to fetch newly optimized images manually with the Pull Images button in the Image Optimization Summary tab.
Optimize Original Images
ON
When Image Optimization is run, JPG and PNG images will be optimized, and backups saved. For example, if the image image.jpg can be optimized a copy of it is saved in image.bk.jpg. Then, the newly-optimized version is saved back into image.jpg. Turn this option OFF, if you do not want optimized JPG and PNG files.
Remove Original Backups
OFF
Danger
Be careful with this! It is irreversible.
When this option is ON, Image Optimization automatically deletes your original images after it has fetched the optimized versions. You will be unable to Revert Optimization if the backups are deleted!
Optimize Losslessly
OFF
When JPG and PNG images are optimized, lossy compression is used by default. Turn this option ON to optimize using lossless compression. This can improve quality but may result in larger images than lossy compression will.
Optimize Image Sizes
All Sizes Selected
By default, the Image Optimization service processes all of your site’s image sizes. If there are some sizes you prefer not to optimize, you can deselect them here, and those sizes will no longer be sent to QUIC.cloud for optimization or for converting to next-generation image formats (WebP/AVIF).
The uploaded image and all other sizes that are selected will be optimized and/or have next-gen image formats created as usual.
Note
This setting does not affect any previously optimized image sizes. It only applies to future image optimization requests.
Preserve EXIF/XMP data
OFF
An image's EXIF or XMP data may contain information about the camera equipment used to take the photo, copyright date and photographer, GPS coordinates, comments, keywords, etc. Because this information takes up space, the optimization process strips EXIF data by default. You can enable this option to preserve the data, but be aware that this will increase the optimized file size.
Image WebP Replacement
As of v7.0, this option has been replaced by Next-Gen Image Format.
Next-Gen Image Format
OFF
Set this option to WebP or AVIF, and two things will happen:
- For all future requests, Image Optimization will generate images in the WebP format or the AVIF format, in addition to optimizing the original images.
- LiteSpeed will serve
.webpimages or.avifimages, in place of.jpgor.pngto browsers where it is supported. (If an unsupported browser requests a page with WebP or AVIF images on it, LSCache will serve a version with the original image file format to that browser.)
This is a master switch. To control the use of next-gen formats on an image-by-image basis, from the WordPress Dashboard, navigate to Media > Library, and you will see a optm/non-optm toggle link for the appropriate format.
Note
If you change this setting after you have already optimized some of your images, those images will not be revisited by default. Next-gen image formats will only be generated for future optimization requests. If you wish to have next-gen images for your entire media library, then you need to soft reset the optimization counter.
Warning
Enabling this option will create additional cache varies. If you have crawling enabled, cache varies cause multiple crawlers to be created. Please be sure you have adequate server resources for multiple crawlers before enabling this option. Learn more about multiple crawlers on our blog.
Warning
While image optimization and WebP generation are free via the Standard Queue, AVIF files are processed only through the Advanced Queue, which requires quota.
Info
This setting is moved to the Network Admin screen when used with a multisite network
Verifying it Works
We set up the WooCommerce plugin with its built-in Storefront theme as our test scenario and chose WebP as our Next-Gen Image Format. This setup includes a default collection of JPG images.
Using Chrome's developer tool, we can verify that the JPGs have been replaced by WebPs.
Before WebP replacement: 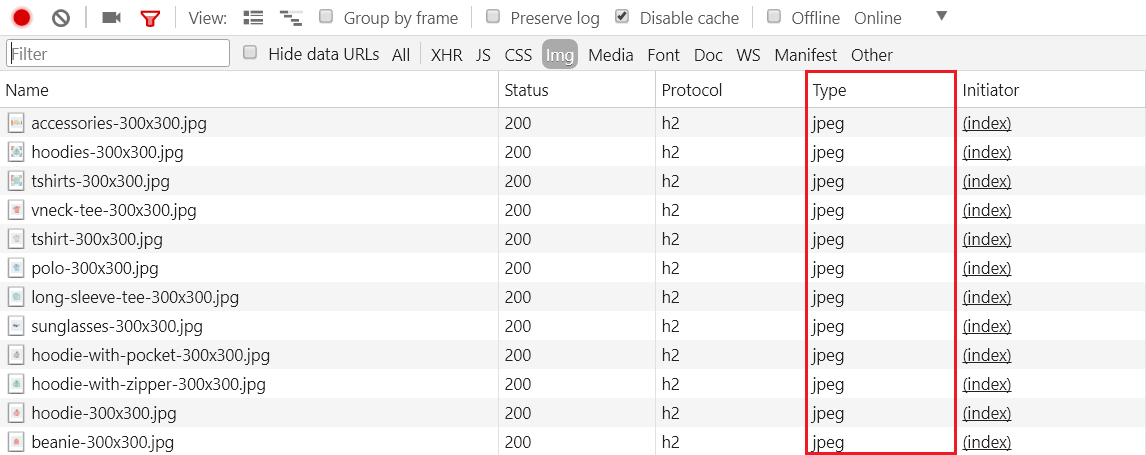
After WebP replacement: 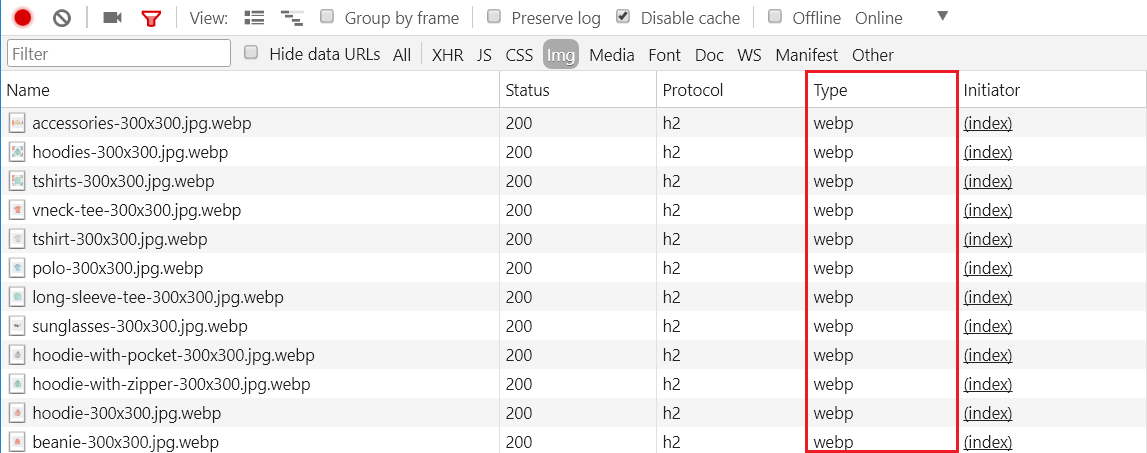
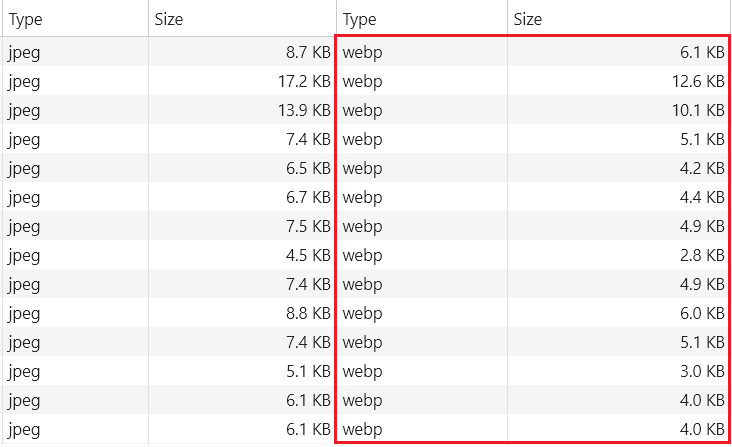
Checking the Impact
You can evaluate the impact of serving images in a next-gen format in a few ways.
From the Developer Tool
Optimized JPG versus WebP image size:
From the Console
Change directory to PATH_TO_WORDPRESS/wp-content/uploads/YEAR/MONTH
    ls -alh | grep accessories-300
    >>>
    9.1K accessories-300x300.bk.jpg
    8.6K accessories-300x300.jpg
    6.0K accessories-300x300.jpg.webp
We can see that the original JPG image is 9.1K, the optimized JPG file is 8.6k and the WebP is only 6.0k. All image sizes are comparable to those which we observed via the developer tool (which needs to subtract the header size). It appears that the WebP images are around 30% reduced from JPG. This is reasonable, according to Google's documentation.
Debugging
If it's not working, here are a few things you can check. Don't forget, some browsers don't support WebP or AVIF images yet, and for those browsers, the default JPGs will be served.
Checking .htaccess
    ### marker WEBP start ###
    RewriteCond %{HTTP_ACCEPT} "image/webp"
    RewriteRule .* - [E=Cache-Control:vary=%{ENV:LSCACHE_VARY_VALUE}+webp]
    ### marker WEBP end ###
Checking the Debug Log
Enable debug logging at the Advanced level. If the WebP or AVIF image doesn't exist, you may see Media: no file, bypassed.
WebP/AVIF Attribute To Replace
- img.src
- div.data-thumb
- img.data-src
- img.data-lazyload
- div.data-large_image
- img.retina_logo_url
- div.data-parallax-image
- div.data-vc-parallax-image
- video.poster
This setting gives you the power to alter WebP or AVIF Replacement behavior. The default values show where LiteSpeed automatically replaces JPG with your preferred next-gen format. The attributes are listed one per line using the format element.attribute or .attribute (element is optional).
Remove an attribute from the list if you do not want next-gen images replaced there. Add a new one to the list, if your site has an attribute we don't replace by default.
WebP/AVIF For Extra srcset
OFF
If you have custom code on your site, and it adds srcset elements but it bypasses WordPress logic to do so, you'll need this setting turned ON. LiteSpeed knows to look for srcset elements that are generated through WordPress, but it won't replace WebP or AVIF images in other srcset elements unless you tell it to.
WordPress Image Quality Control
This option was moved to Page Optimization > Media Settings in v6.4
Uninstalling the LSCache Plugin
When you attempt to disable and uninstall LSCWP, you see the following:
If you have used Image Optimization, please Destroy All Optimization Data first. NOTE: this does not remove your optimized images.
If you are temporarily uninstalling the plugin, and you may need the configuration data in the future, you can skip this step. However, if you are permanently uninstalling the plugin, we recommend that you Destroy All Optimization Data.
It's important for a plugin to clean up after itself upon uninstallation. Destroying your image optimization data is an important part of properly cleaning up the database, and removing every trace of LiteSpeed Cache.
Despite the violent implications of the word destroy, this is a harmless process, and beneficial to your database. The actual images that you have optimized will not be touched. Your site will continue to serve optimized JPG and PNG images without the deleted optimization data, and even without the LiteSpeed plugin itself.