Toolbox
Purge Tab
Once you have LiteSpeed Cache for WordPress configured and customized to your liking, you can turn your attention to managing the cache itself. Ideally, there should be very little actual cache management required. If you set your configuration correctly, the cache should function like a well-oiled machine.
Still, there are times when you might want to take matters into your own hands for whatever reason. This section will help you to successfully manage your cache manually.
Tip
These instructions apply to your whole site. If you wish to only purge a particular page, please see Purge a Single Page From Cache.
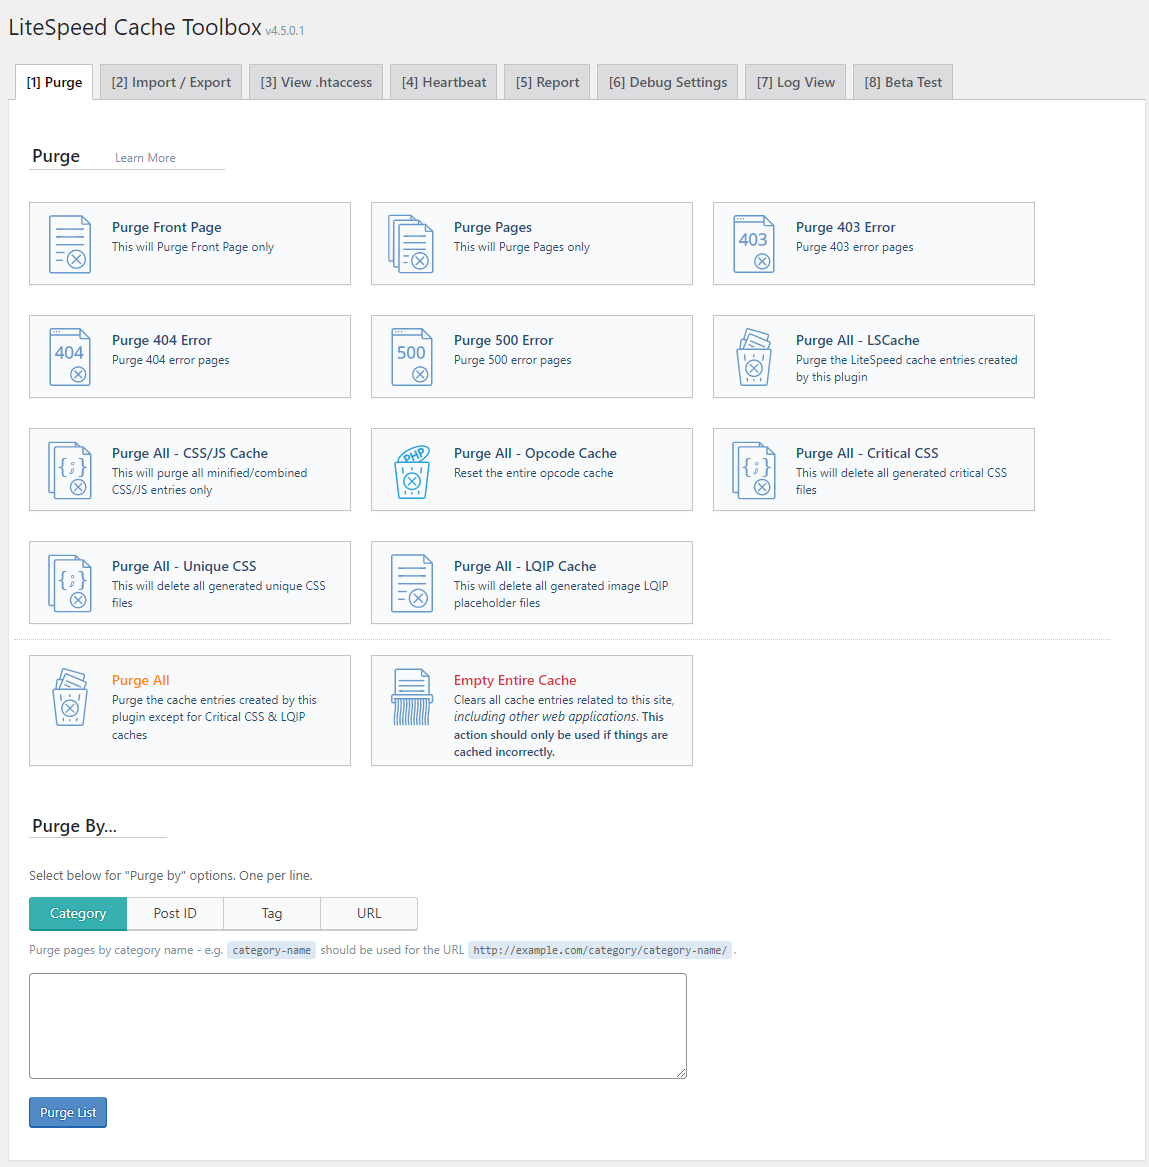
Purge Front Page
Press this button to purge only the front page of your site.
Info
In multi-site, pressing this button in the Network Admin will result in only the main site’s front page being purged.
Purge Pages
This button will purge all cache entries that belong to pages. Don’t let the use of the word “page” confuse you here. For this button (and this button only) “page” refers to the WordPress Page post type. Everywhere else, “page” is used in the context of individual entries in a “full-page cache.”
Purge Error Pages
These buttons allow you to purge 403, 404, and 500 error pages.
Info
In multi-site, if one of these buttons is pressed in the Network Admin, the main site's error pages will be purged.
Purge All - LSCache
This button will purge all cache entries related to the current WordPress installation. This means that if a page is cached on the site using a different web application (for instance, a separate WordPress blog or a XenForo forum), it will not purge those cache entries.
If you have the crawler running, the Purge All button will also purge any crawled pages and reset the sitemap.
Info
In multi-site, pressing this button in the Network Admin will trigger the "Purge All - LSCache" functionality on all of the network’s sites.
Purge All - CSS/JS
This button will purge all of the minified and combined JavaScript and CSS files that were cached as a result of the settings in the Page Optimization section.
Purge All - Opcode Cache
This button clears the opcode cache, not to be confused with LSCache, which is a separate thing. Opcode cache stores compiled PHP code, not complete pages.
Purge All - Critical CSS
Use this button to clear any Critical CSS generated through the QUIC.cloud CCSS service.
Purge All - Unique CSS
Use this button to clear any Unique CSS generated through the QUIC.cloud CCSS service.
Purge All - LQIP Cache
Use this button to clear any Low Quality Image Placeholders generated through the QUIC.cloud LQIP service.
Purge All - VPI
This button will clear all of the generated Viewport Images.
Purge All - Gravatar
This button allows you to clear your Gravatar cache, if you enabled it in Page Optimization > Localization > Gravatar Cache.
Purge All
This button combines most other "Purge All" buttons. It purges everything except Critical CSS, Unique CSS, and LQIP. In a nutshell, it purges everything that may be freely regenerated, but does not purge anything that would require you to pay QUIC.cloud credit to regenerate.
Empty Entire Cache
This is one of those buttons that should only be used when you have a problem that can’t be solved any other way. Press it to purge all of the cache entries for the entire site, including those entries from other web applications.
Info
In multi-site, this option is only made available in the Network Admin. Individual site admins do not have the ability to clear the entire cache.
Admin Bar Menu
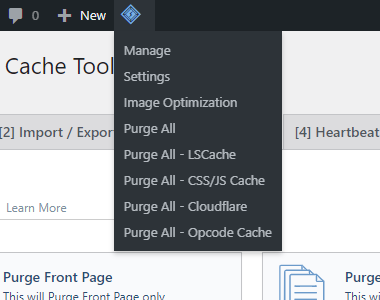
Many of the Purge buttons explained above also appear in the LiteSpeed menu on the Admin Bar, if they are relevant for your installation. Consider it a simpler way to access the same functionality.
In addition to the buttons above, the Admin Bar also includes a Purge All - Cloudflare button that appears if you have Cloudflare API enabled. It allows you to purge your Cloudflare cache right from the same handy menu as all of the other purge functionality.
Purge By...
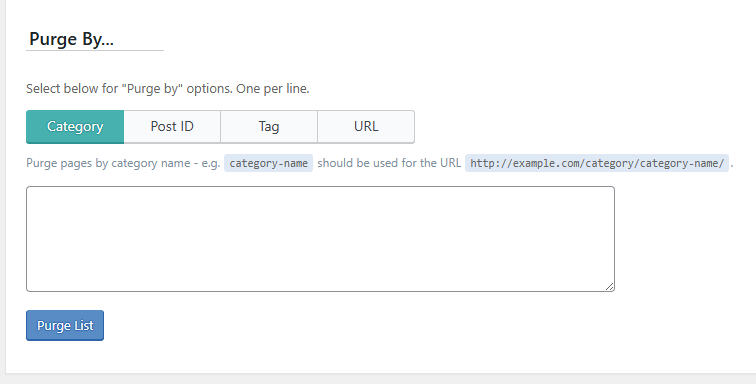
This area allows you to purge a list of pages. The available list types are: Category, Post ID, Tag, and URL. The list of the selected type should be input one-per-line in the text area above the Purge List button.
Note
This function purges "cache tags," which means it only affects pages in the cache. It does not purge any CSS or JavaScript.
Import/Export Tab
Use these functions to back up your LiteSpeed Cache for WordPress configuration to a local file, or restore it from one.
Situations where this would come in handy:
- You are making an experimental change. Save your original configuration so that you may restore it if your experiment doesn't go well.
- You are moving from a development server to a live one.
- You are migrating your installation to a new host.
- You manage several WP sites and you'd like to cache them all with the same settings.
- You would like to apply a preconfigured profile.
Note
If you export from one server and import into another, you will need to manually update any server-specific settings. For example, Crawler > General Settings > Server IP, and CDN > Original URLs. There may be other settings that vary from server to server, so have a quick look at all of the settings after you import!
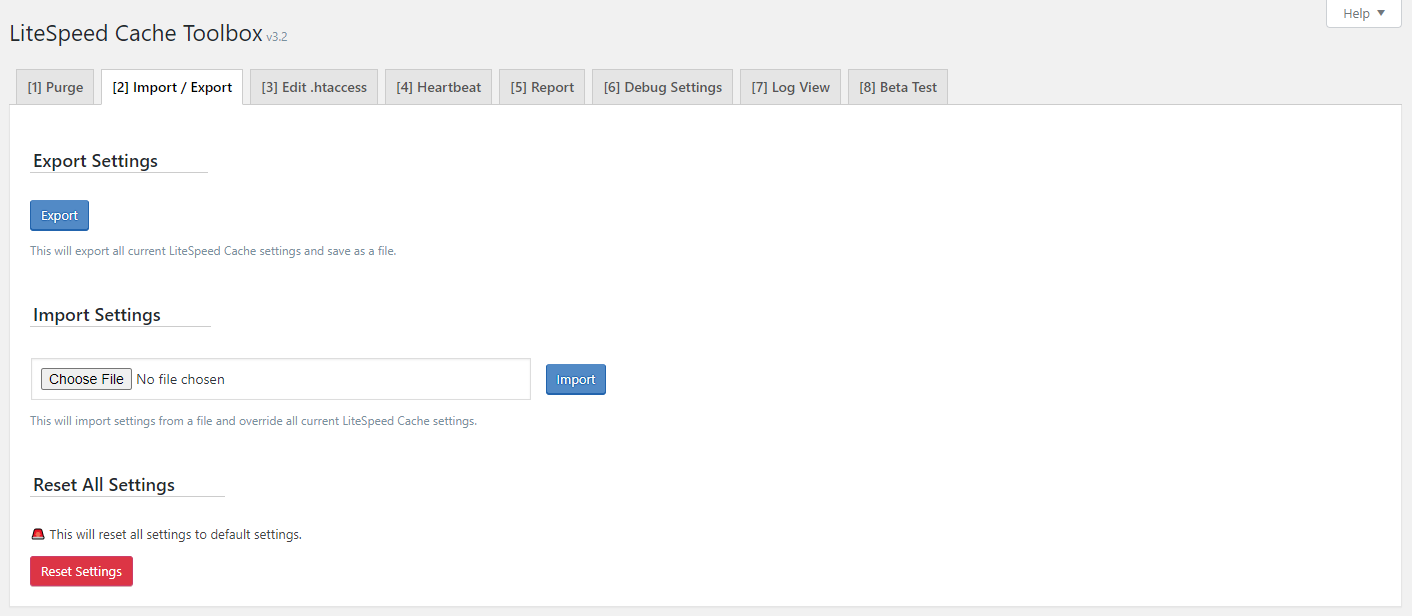
Export Settings
Simply press the Export button. A data file will be created and saved on your local device. The next time you visit the Import/Export page, you will see a Last exported section that reminds you of the name of the most recently exported file and how long ago it was saved.
Import Settings
Press the Choose File button to select a previously exported data file, and press Import. LSCWP will read the data file and replace all of your existing settings with the settings in the file.
Danger
Please be careful with this! If you accidentally overwrite settings you meant to keep, there is no way to restore them, unless you have a sufficient backup system in place.
Reset All Settings
If you'd like to start over with the default LSCache settings, press the Reset button.
Danger
Be careful. Resetting your settings is permanent. We suggest you Export your settings first, before you Reset.
Using LSCache Profiles
LSCache Profiles are now Presets and can be found in their own section. See the Presets documentation for more information.
View .htaccess Tab
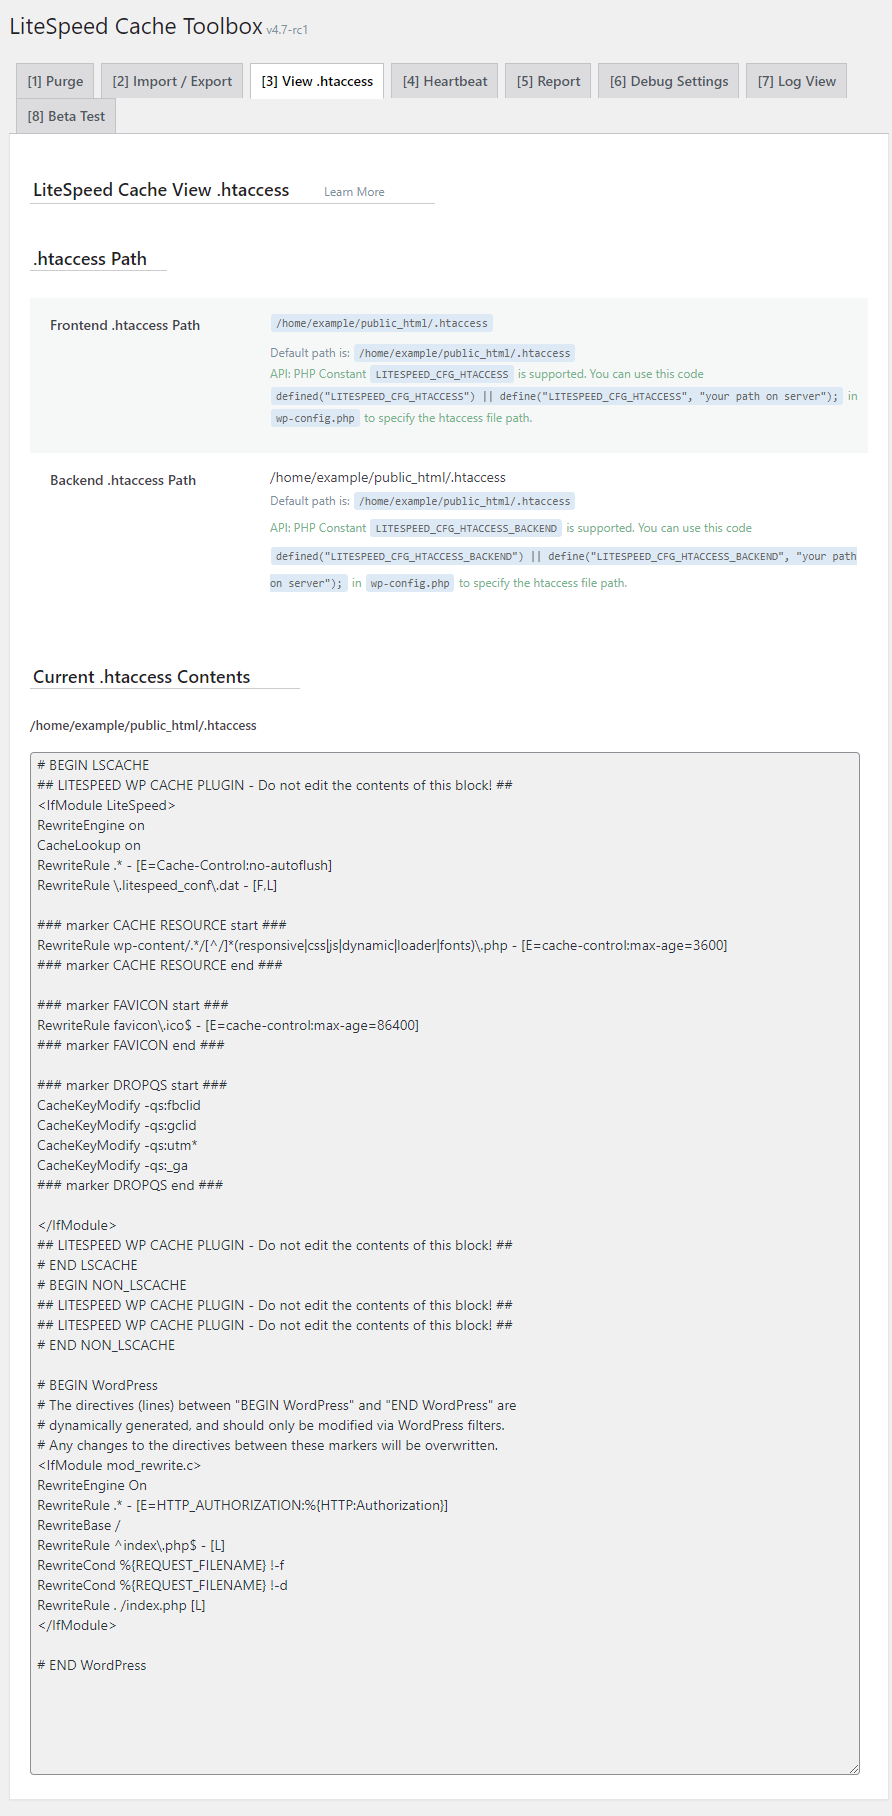
Both LiteSpeed & Apache Web Servers can use a .htaccess configuration file that is unique for each domain.
Info
This tab is moved to the Network Admin screen when used with a multisite network
.htaccess Path Settings
LSCWP can autodetect the location of your .htaccess file for both the frontend and backend of your site. If autodetection is not working for you, you can specify the file locations here.
Current .htaccess Contents
If you are an advanced user with experience modifying Apache configuration files, you may wish to make changes directly to your .htaccess file. This section allows you to view the file, but for your site's protection, editing is not allowed via this interface.
LSCWP modifies .htaccess for you when you adjust certain settings within the LSCWP configuration. You can also view those entries here to confirm that other plugins haven't modified them. If you need to regenerate LiteSpeed's changes, we recommend that you visit the Cache Settings page and re-save your settings.
Heartbeat Tab
You may disable or adjust WordPress' interval heartbeats to reduce server load, but be careful. Messing with these settings may cause WP tasks triggered by AJAX to stop working.

Frontend Heartbeat Control
OFF
Turn this option ON to use heartbeat control on the WordPress frontend.
Frontend Heartbeat TTL
60
You can adjust the heartbeat interval to suit your needs. Frontend Heartbeat Control must be set to ON for this TTL to take effect. Choose any number of seconds between 15 and 120. Set to 0 to disable this heartbeat.
Backend Heartbeat Control
OFF
Turn this option ON to use the heartbeat control in WP-Admin.
Backend Heartbeat TTL
60
You can adjust the heartbeat interval to suit your needs. Backend Heartbeat Control must be set to ON for this TTL to take effect. Choose any number of seconds between 15 and 120. Set to 0 to disable this heartbeat.
Editor Heartbeat
OFF
Turn this option ON to use the heartbeat control in the WordPress editor.
Editor Heartbeat TTL
15
You can adjust the heartbeat interval to suit your needs. Editor Heartbeat Control must be set to ON for this TTL to take effect. Choose any number of seconds between 15 and 120. Set to 0 to disable this heartbeat.
Report Tab
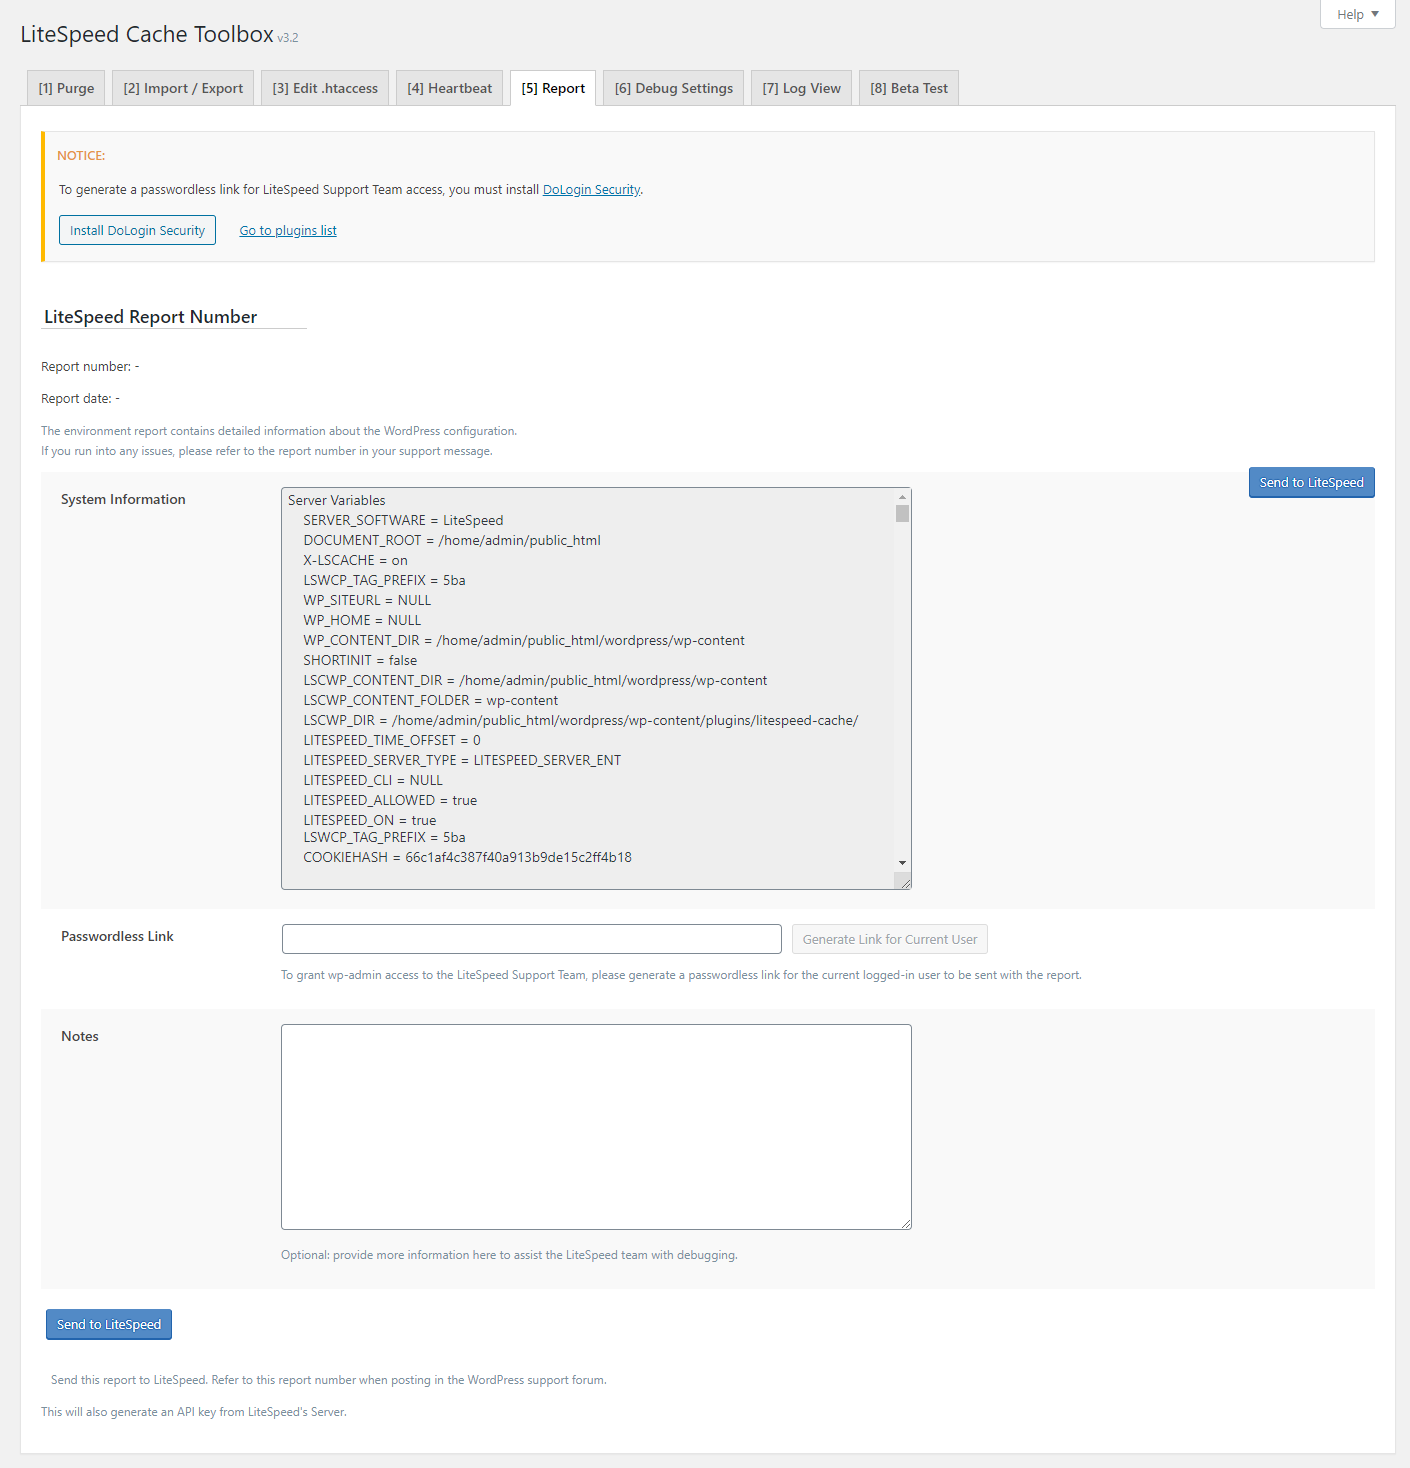
If someday you encounter a problem that requires support, we may ask to see your Environment Report. The Report tells us what settings you have enabled, what other plugins you have installed, and the contents of your .htaccess file, among other useful things.
You can see all of this information displayed in the System Information section.
You can simply press the Send to LiteSpeed button now, or you can add some optional details.
With Optional PHP Info or Additional Notes
If you would like to include information about your site's PHP configuration via phpinfo(), check the box next to Attach PHP info to report.
Fill in any additional details you'd like to provide in the Notes section.
With Optional Support Team Login
If you would like a LiteSpeed support team member to log into your WordPress Admin for more personalized support, you can generate a secure passwordless link.
First install the DoLogin Security plugin via the Install DoLogin Security button at the top of the page.
Then, you can use the Generate Link for Current User button to generate a Passwordless Link.
Send to LiteSpeed
Press the Send to LiteSpeed button.
A copy of the report will be sent to us, and if you post in a public forum, you can refer to the report simply by the Report Number shown. We'll be able to look it up from that.
You needn't wait for us to request this report, either. If you'd like to be proactive, you may send the report, and include the generated Report Number any time you ask a support question.
Debug Settings Tab
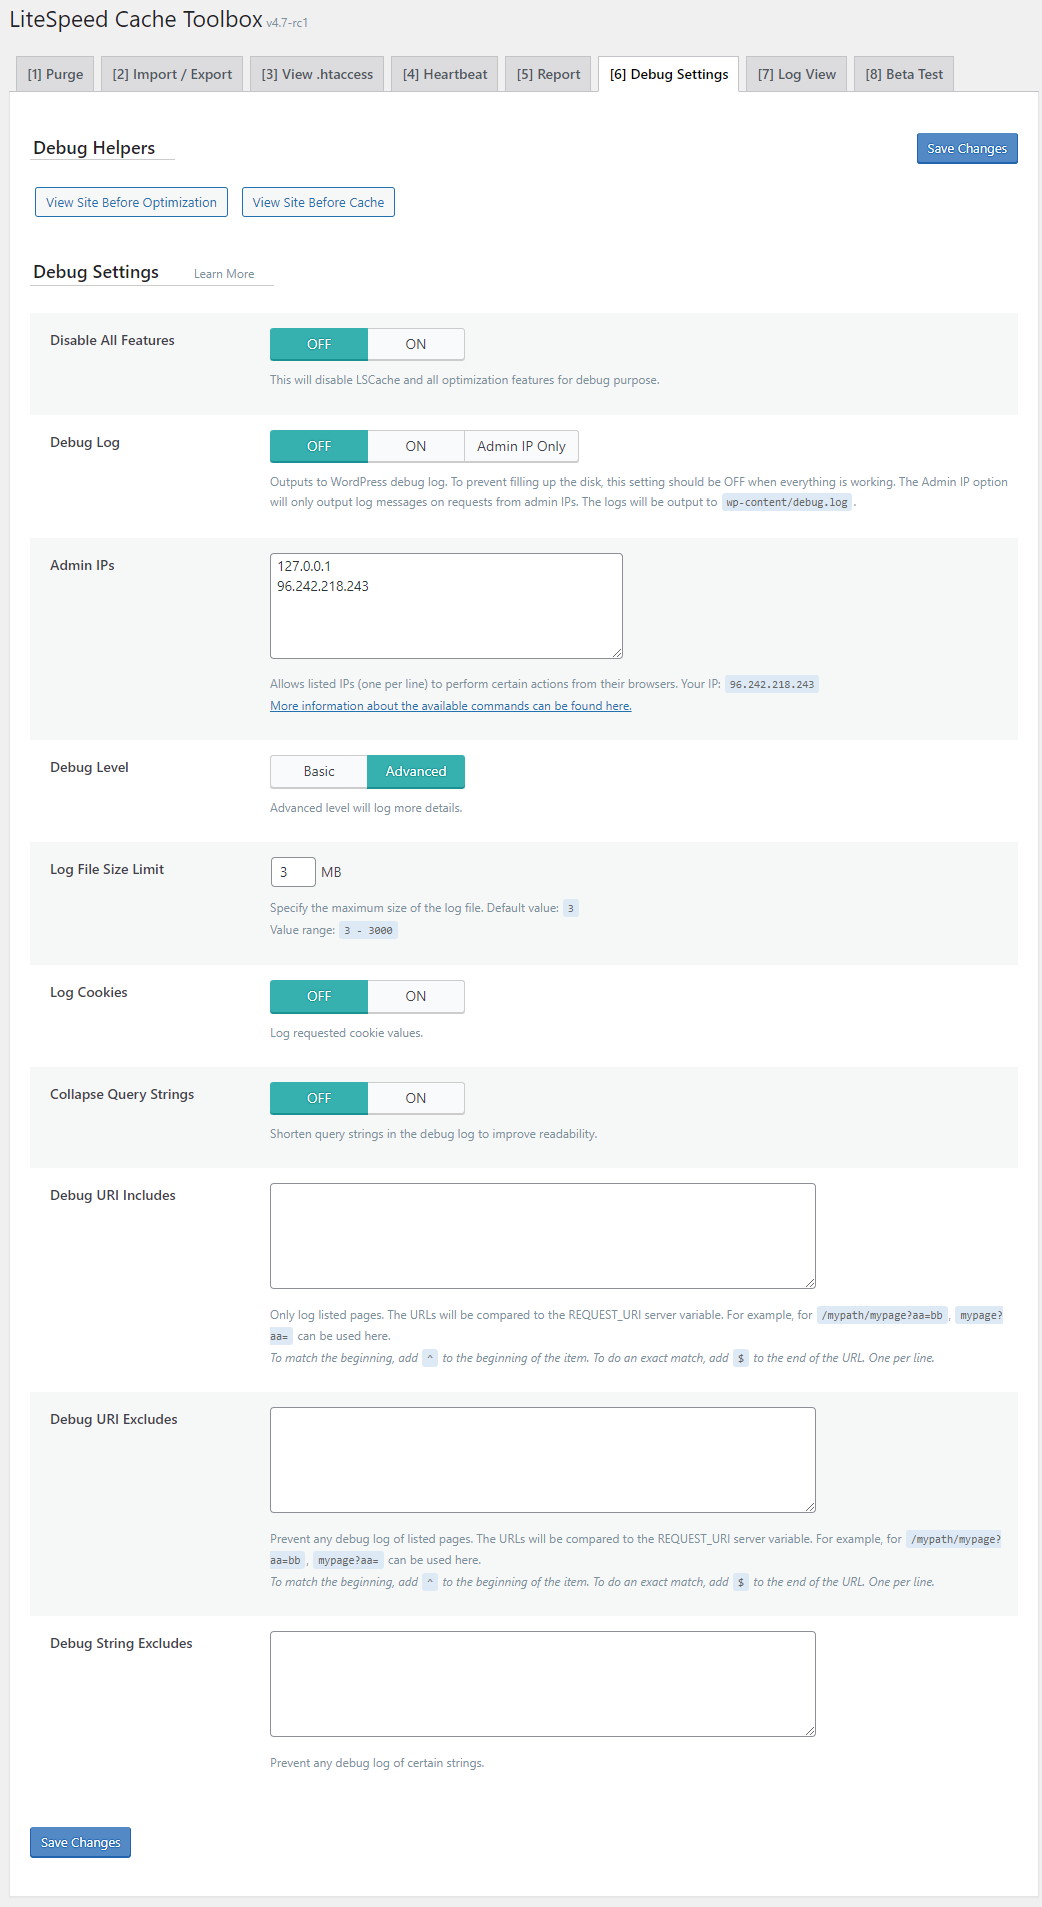
Info
This tab is moved to the Network Admin screen when used with a multisite network
Debug Helpers
These buttons give you a simple way to view your site as it would appear if it were not cached or optimized. This can be useful when diagnosing issues with a frontend that is not displaying or behaving as expected.
- View Site Before Optimization: opens a new tab that contains your website with the
?LSCWP_CTRL=before_optmquery string appended; effectively turns off all optimizations for this one viewing - View Site Before Cache: opens a new tab that contains your website with the
?LSCWP_CTRL=NOCACHEquery string appended; generates your page anew and does not fetch a copy from cache - Disable All Features for 24 Hours: behaves as if you have enabled the Disable All Features option below, but then reverts back to normal operation in 24 hours
Disable All Features
OFF
Turn this option ON if you need to debug your site without any caching or optimization features getting in the way. When your testing is finished, be sure to turn Disable All Features back OFF, or your site will not be cached or optimized.
While this feature is enabled, all those with Admin-level access will see a notification in WP-Admin pages to remind them that LiteSpeed features are currently turned off.
Debug Log
OFF
This enables/disables the debug log. The log will be written to the wp-content/litespeed/debug directory. Debug log file names include random strings for security purposes and will look something like debug123456789.log, crawler123456789.log, and purge123456789.log, for example. These logs can be viewed in the LiteSpeed Cache > Toolbox > Log View tab.
Set Debug Log to ON to log all requests from all visitors. Set Debug Log to Admin IP Only to log just the requests from IP addresses listed in the Admin IP setting below.
These logs can consume disk space fast, so be sure to turn off logging when you have finished troubleshooting.
Admin IPs
127.0.0.1
This should be a list of admin IPs, one per line. Admin IPs are used for debugging and admin purging purposes. When a request comes in with the admin IP, it is possible to purge front end pages using just a LSCWP_CTRL query string. More information can be found here. The IP from your current browser session is shown.
Note
All requests from Admin IPs are logged in the wp-content/litespeed/debug/ directory and stored as described above.
Debug Level
Basic
This setting determines how detailed of a log to keep.
Log File Size Limit
3
Specify the maximum size of the log file. Minimum is 3MB. Maximum is 3000MB.
Log Cookies
OFF
Log request cookie values.
Collapse Query Strings
OFF
Shorten query strings in the debug log to improve readability.
Debug URI Includes
empty string
URIs listed here, one per line, will be compared to the REQUEST_URI server variable and only those that match will be logged. To indicate the beginning of a URI, add ^ to the beginning of the string. To do an exact match, add $ to the end of the string.
String Matching Examples
Assume you have the following URIs:
/recipes/baking//recipes/baking/cakes/recipes/baking/brownies/popular/recipes/baking/
The string /recipes/baking/ will match all four URIs.
The string /recipes/baking/$ will match #1 (because $ indicates exact match).
The string ^/recipes/baking will match #1, #2, and #3 (because ^ indicates the beginning of the URI).
Debug URI Excludes
empty string
URIs listed here, one per line, will be compared to th REQUEST_URI server variable and only those that do not match will be logged. To indicate the beginning of a URI, add ^ to the beginning of the string. To do an exact match, add $ to the end of the string.
Debug String Excludes
empty string
Before an entry is output to the debug log, it will be compared to the list of strings here. If there is a match, the log entry will be discarded. If there is no match, the entry will be output to the log.
Log View Tab
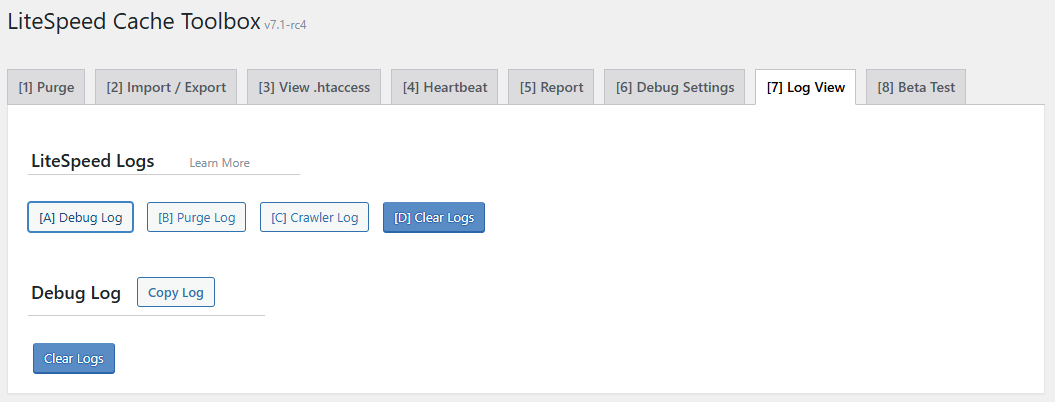
Some of the most useful tools in your arsenal, when it comes to troubleshooting, are the logs. You can enable logging in the LiteSpeed Cache > Toolbox > Debug Settings tab.
Once logging is enabled, you can view three different logs in this tab with the press of a button.
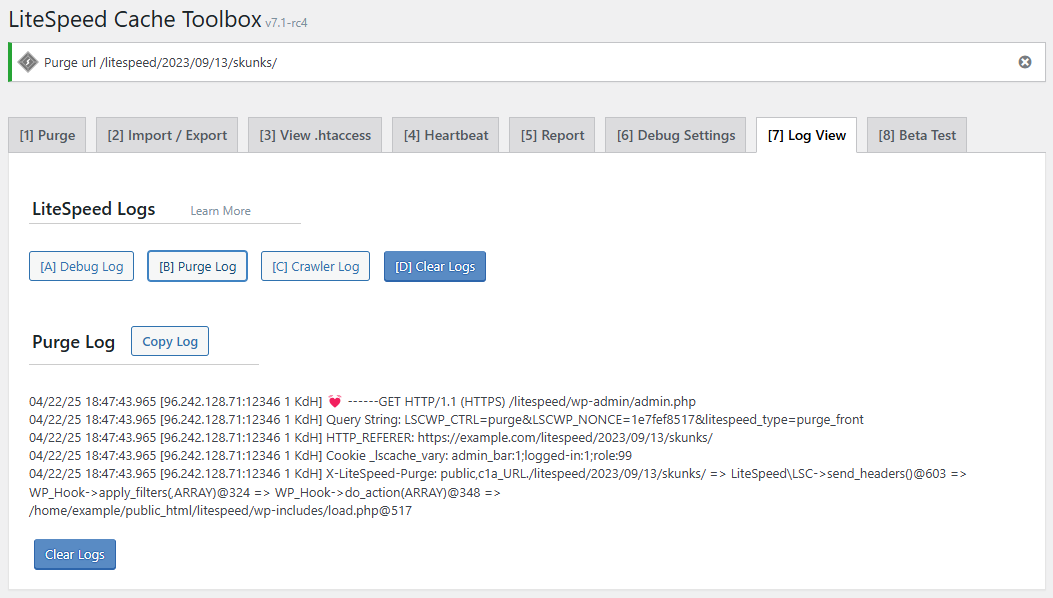
For example, the image above shows the Purge Log, accessed by pressing the [B] Purge Log button.
If the log contains too many older entries, press the Clear Logs button to erase them and start with empty logs.
Tip
The shortcut D key will also clear the log.
With debugging enabled, you can attempt to reproduce the issue you are experiencing. Then, reload this page and view the logs to see if you can spot the cause of your issue. If you need help deciphering the logs, you can share them with the LiteSpeed support team.
Use the Copy Log button to copy the log entries into your system clipboard. Use the Download button to download the complete log locally.
Be sure to disable logging, if you no longer need it, as debug logs can grow quickly.
Info
This tab is moved to the Network Admin screen when used with a multisite network
Beta Test Tab
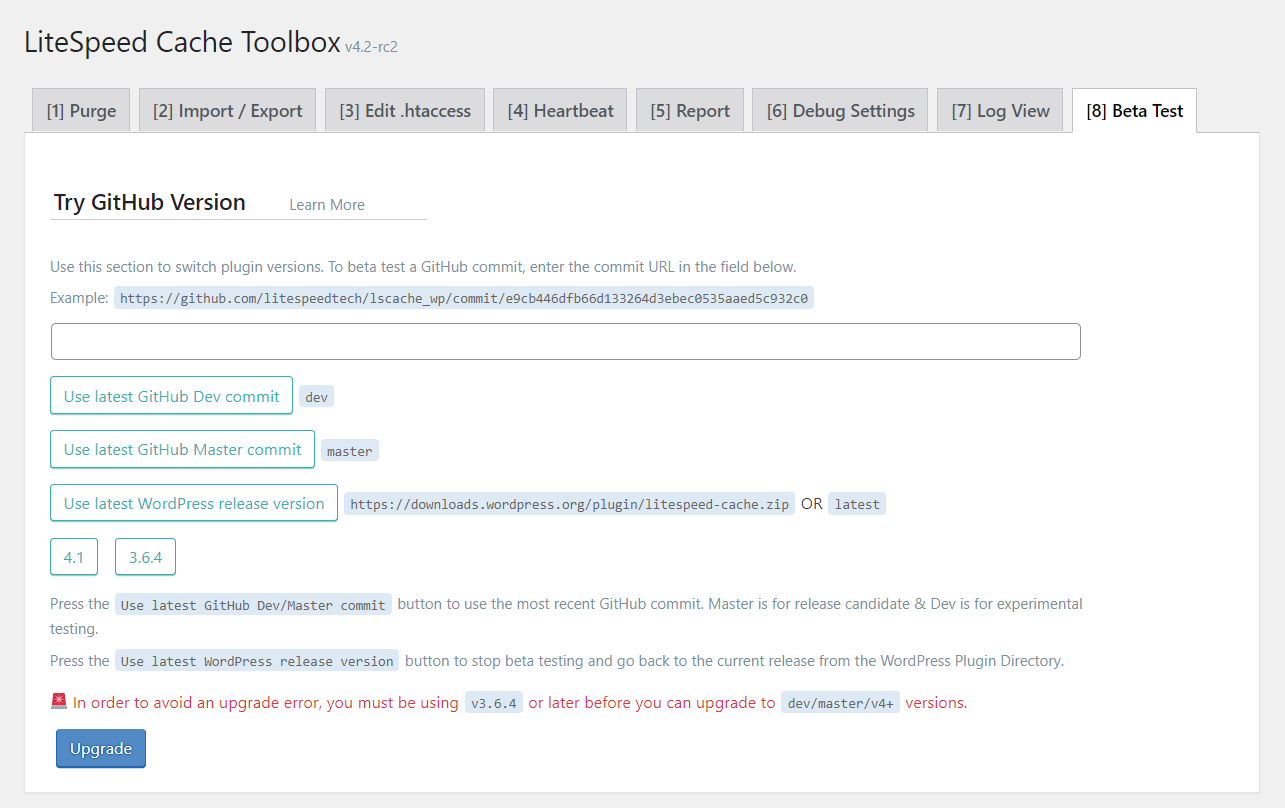
This area gives you the opportunity to try versions of LSCWP not yet released officially to the public. Simply enter the GitHub commit URL into the text field and press the Upgrade button. If you don't know the commit URL, you can use one of the buttons below instead.
The Use latest GitHub Dev commit button uses the most recent commit in the development branch of our GitHub repo. This may be experimental, and is not recommended for production sites.
The Use latest GitHub Master commit button uses the most recent commit in the master branch of our GitHub repo. This version is usually a candidate for official release, and will be published to the WordPress Plugin Directory after a period of beta testing.
The Use latest WordPress release version button uses the official current release. Use this button to stop beta testing and go back to the latest version from the Plugin Directory.
The buttons with version numbers on them may be used to revert to a previous LSCWP version.
Info
This tab is moved to the Network Admin screen when used with a multisite network. You may need to manually enter the /wp-admin/ address and/or network activate LSCWP again after upgrading.