Troubleshooting CSS/JS Issues
If your site no longer displays correctly after enabling optimization features, it may not be a plugin problem. It may be an issue with a single CSS or JavaScript file in your theme or other plugins, conflicting with one or more optimizations.
Finding Conflicts
Verify it's a Page Optimization Issue
Before we go to too much trouble, let's make sure that it really is an optimization issue.
In a private/incognito browser window (or separate browser not logged in to WordPress), view your site without any of the CSS, JS, and other page optimizations enabled by appending /?LSCWP_CTRL=before_optm to the end of the link.
Example
For www.example.com, use www.example.com/?LSCWP_CTRL=before_optm to see the page without optimizations.
How does the site look without optimizations?
It still looks bad
If your site is still not displaying correctly, then the problem is NOT with LSCache's optimization features.
What happens if you deactivate the LSCache plugin completely? Does the site look fine? If so, then some other feature of LSCache is interfering with your site. Visit our forum, and let us know what's happening.
If the site is still messed-up even after deactivating LSCache, then the issue is related to something else on your site. Try disabling your other plugins one-by-one, or contact your hosting provider for further assistance.
It looks good now
This confirms that the issue lies somewhere in the optimization features. Now you have two options:
- Turn off the CSS and JS optimization functions for good, and purge the cache. This is an easy solution, and if you choose to do this, your site can still benefit greatly from caching even without optimization enabled. Remember, you don't have to use the CSS or JS optimizations to use LSCache!
- Turn those options back on, do some troubleshooting to find the problematic file, and exclude that file from optimization. If you want to go this route, proceed to the next step.
Tip
If you really don't want to do the detective work yourself you can hire LiteSpeed to do it for you.
Verify it's a CSS/JS Optimization Issue
Try the following steps to pinpoint CSS and JavaScript errors:
- Turn off optimization: from the WordPress Dashboard, navigate to LiteSpeed Cache > Page Optimization. Click the CSS Settings tab, and set all of the CSS optimization features to
OFF. Click the JS Settings tab, and set all of the JS optimization features toOFF. - Purge the cache: navigate to LiteSpeed Cache > Toolbox > Purge and press the Purge All button.
- Check your site: reload the page. Does it still look bad?
If it still looks bad, then your problem is likely something else.
If it no longer looks bad, then there is JavaScript or CSS somewhere on your site that is incompatible with some LSCache optimization features. This guide will help you to find the problematic files and exclude them from optimization.
Identify Whether it's a CSS or JavaScript Issue
The first step in finding the problematic file is determining whether we are looking at a JavaScript issue or a CSS issue.
Let's check JavaScript first:
- Check that the JS-related optimization functions are enabled, and the CSS functions are disabled.
- Purge the cache, if you enabled/disabled anything in the first step.
- View the page. How does it look?
- If it's messy, then one of your JS files is problematic. Jump ahead to Find and Exclude.
- If it's fine, then your JS files are also fine and you can move on the check CSS.
If JavaScript wasn't the culprit, then it's probably CSS. Let's verify.
- Disable the JS-related optimization functions, and re-enable the CSS functions.
- Purge the cache again.
- View the page. How does it look?
- It should be messy, proving that one of your CSS files is problematic.
Now that you know whether it's CSS or JS, you'll need to find the specific file that is causing the problem.
Find and Exclude the Problematic File(s)
Tip
For the purposes of these instructions, we're going to assume you have a CSS file causing trouble. If, in fact, your issue is with JavaScript, you can still follow these same steps. Just imagine that the instructions say "JS" everywhere that they say "CSS."
In order to find the file that is at fault, first we need to get a list of all possible CSS (or JS) files. Once that is done, we will exclude the entire list of files from optimization, and then reintroduce them one-by-one until we've found our culprit.
Get a List
- Visit your site with optimizations disabled by appending
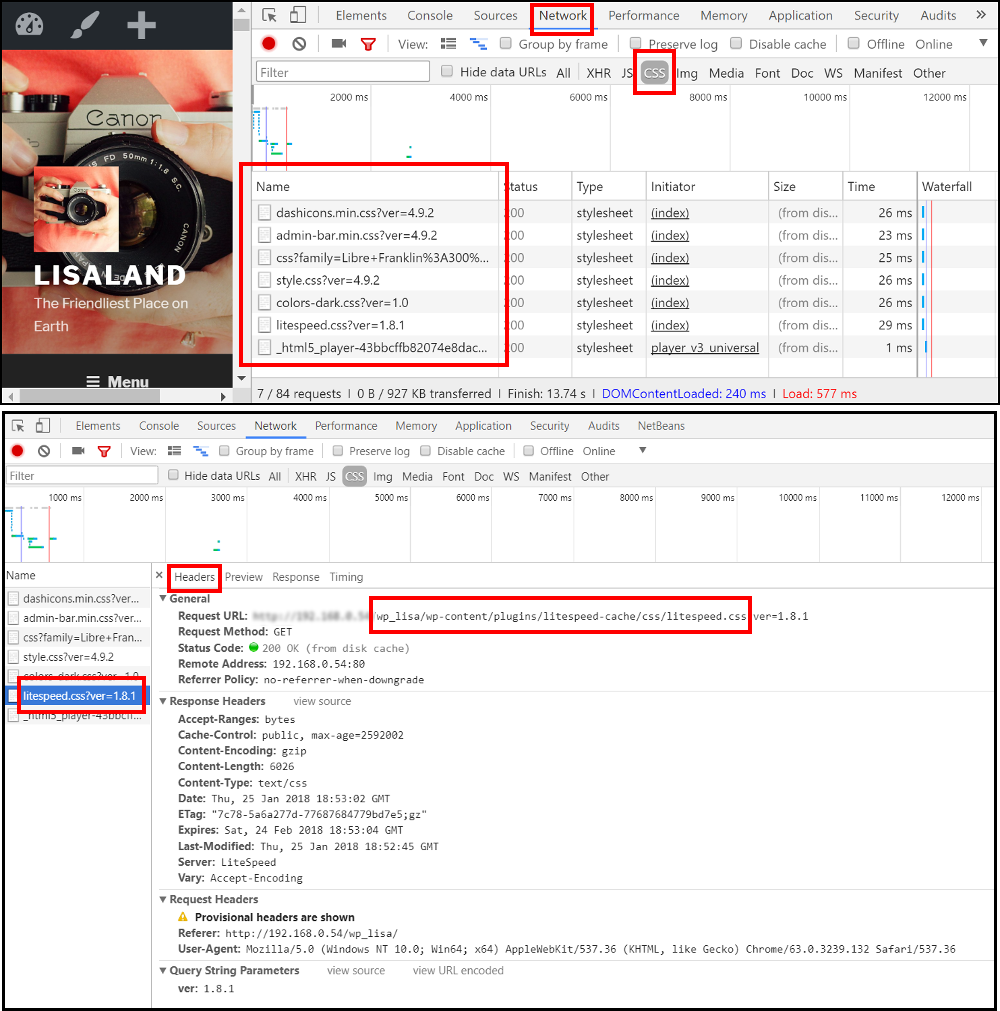
/?LSCWP_CTRL=before_optmto the end of your URL. This ensures that you are getting a list of the original CSS files, and not the LiteSpeed-generated versions. - Using the browser's Developer Tools, visit the Network tab, and click CSS to view only the CSS files.
- Reload the page. You should see a list of all of the CSS files in use by that page, listed in the Name column.
- Make a list of these files. You will have to exclude them all from optimization, as described in the next step.
If you need to see the full path of any one CSS file, click on the name of that file, and click Headers. You will find the full location of the selected file listed as Request URL.
Test the List
Tip
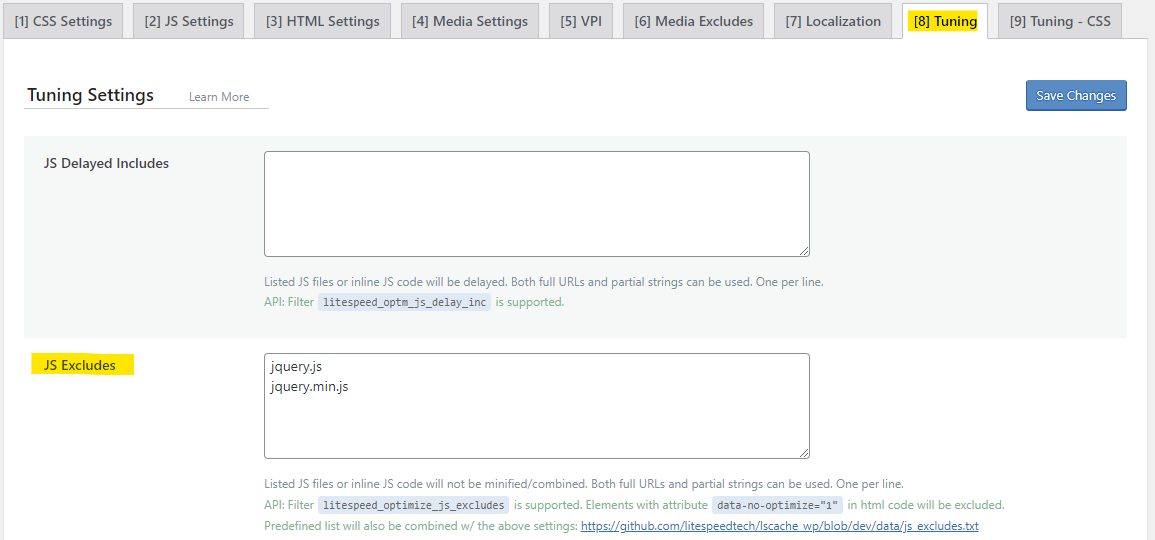
For the following steps, if you are working with CSS files, you'll add your exclusions in the Tuning - CSS tab as described. If you are working with JS files, you'll add your exclusions in the Tuning tab.

- Enable all of the optimization functions you wish to use.
- Exclude all of the CSS files from optimization: Navigate to LiteSpeed Cache > Page Optimization > Tuning - CSS and enter the files from your list, one-per-line, in the CSS Excludes box.
- Purge the cache and check the site. It should be displaying correctly.
- Remove one of the CSS files from the exclude list, and purge the cache.
- Check the site.
- If it still looks okay, then that file you just removed was not the problematic file.
- If the site looks broken, then you know you have found a problematic CSS file. Put it back in the box and leave it there.
- If there are more unchecked files, repeat from Step 4.
At the end of this process your site should look good, all of the optimization functions you wish to use should be enabled, and you should have one or more problematic CSS or JS files sitting the in the CSS Excludes or JS Excludes box and eliminated from future optimization.
Tip
Don't forget, if this feels like too much trouble, we can do it for you.
Advanced Tuning
You would probably like to try skipping some steps. If you are experienced with website optimization, or if you know you only changed one plugin before the issues started, then you may be able to save some time. Here are a few practical tips to help you know what to look for, to save you time, and to make sure you haven't missed anything:
Warning
If you're already logged into WordPress, then either open a private/incognito window or use another browser.
-
Inspect the problematic area
Right-click the problematic area and select Inspect. This will open your browser's Developer Tools and show you related sections of code. That should give you hints to help recognize which plugin/theme might need tuning either in the plugin/theme's own settings or by exclusion from LSCache optimization. If it's not obvious, try comparing this Inspect window to one for a non-optimized version of the page.
-
Check for browser errors
While you have Developer Tools open (you can toggle with F12 key), select the Console tab and see if any Errors are there since they could mention which file or inline code is affected.
-
Check the waterfall
Before and after changes, you should check the waterfall under the Network tab in your browser's Developer Tools to see:
- Which order things load
- Which files are taking noticeably longer to load than others
- Which files are loading longer than before changes were made
- If all resources from a domain are loading slowly then see some more page loading troubleshooting tips
-
Make sure your site is mobile-friendly
There's usually an icon that looks like a cell phone & tablet next to each other in the corner of Developer Tools that you can use to view your site as if you're using other types of devices. Click that icon to can make sure that your site looks and functions properly while optimized. It's best to do this from a computer, since you can't use Developer Tools very well on touchscreens if at all. You may also want to test with different Throttling options to simulate slower connection speeds.
Note
If you have Guest Mode enabled then you may want to test as if you're always a first time visitor by temporarily adding or removing the user agent or IP address that you're testing with. If not, the page will refresh so fast you won't be able to see any details on what it was like in "Guest Mode" before.
Other Issues
CSS/JS Changes Causing Frequent Cache Miss
If CSS or JS change frequently on your site, you may experience frequent cache misses due to the way that LSCWP handles cache management with the CSS/JS Combine option.
What May be Happening
Your site has CSS or JavaScript content that changes very frequently. This is likely because of random numbers or strings in the selectors, or something along those lines, and these random strings regenerate often (for example, with every new visitor, or every ten minutes, etc.).
- When the CSS or JS changes, the combined CSS or JS must be regenerated.
- And when the combined CSS or JS is regenerated, all cache entries for the pages which include that CSS/JS must be purged.
- And once the pages are purged, the next visitors will experience a cache miss.
So many cache misses affect site performance and user experience.
How to Confirm
Using your browser's Developer Tools, navigate to the Network tab and reload an affected page on your site.
In the list of loaded files, locate the combined CSS file and the combined JS file, and make note of the file names.
Reload the page. Click the first resource, which should be the page you just loaded. Look for the X-LiteSpeed-Cache: header. If it's a hit, reload the page until you see a miss. Now note those combined CSS and JS file names again. Have the names of the files changed?
If a cache miss on the page is always accompanied by a combined CSS filename change, or a combined JS filename change, then you can confirm that frequent cache misses are being caused by frequently changing CSS or JS.
How to Stop the Purge
There are two ways to deal with this problem:
- Disable CSS Combine and/or JS Combine. This is the easiest solution, but it is not ideal, as it turns off all combination.
- Find the problematic selector(s) that are frequently changing, and exclude only those selectors from combination.
Read on to learn how to find and exclude the problematic selector(s).
For these instructions, we'll assume that it was the combined CSS file that was changing frequently. The process is exactly the same for JavaScript; simply replace "CSS" with "JS" in every step.
- In the developer tools, double click the combined CSS file to open it in a new tab.
- Return to the browser tab with your site's page and reload until you see the combined CSS file name change again in developer tools.
- Double click the combined CSS file to open it in a new tab.
- Copy and paste each version of combined CSS into a diff checker site (such as https://www.diffchecker.com/) and compare.
- You should see a few lines of CSS highlighted. This is where the two combined files differ, and indicates where the problematic selectors are.
- Presumably the selectors will have a common string (for example, with
abc_12345andabc_67890, the common string isabc_). Figure out what that is for your combined CSS. - To find out where those selectors are coming from, turn off CSS Combine temporarily, reload the page, and note the individual CSS files that are included on the page.
- Search each of those files for the common string from the problematic selector.
- Once you find it, from your WordPress Dashboard, navigate to LiteSpeed Cache > Page Optimization > Tuning - CSS and enter the CSS filename in the CSS Excludes box. If there are multiple CSS files, add all of them, one per line.
- If the problematic selector is not in a file, but is inline with the page's HTML, then navigate to LiteSpeed Cache > Page Optimization > Tuning - CSS and enter the common string from the selectors in the CSS Excludes box. If there are multiple sets of problematic selectors, add all of them, one per line.
- Re-enable CSS Combine.
This should put a stop to the frequent changes to Combined CSS, which will in turn stop the frequent purging and cache misses.
You can use the developer tools like before to confirm this solution has been a success.
Tip
If you have CSS Minification enabled, chances are the problematic CSS string has been minimized as well and doesn't actually appear as-is in any of the original CSS files. If you want to exclude the problematic CSS string from optimization, you will need to do one of two things:
- Don't exclude the entire string; only exclude a partial string that will not be affected by minification
- Turn off minification, and repeat the process to find the problematic string in its original form
The same issue and solution also apply to minimized JavaScript.
Disk Space Filling Fast
Some plugins may generate CSS or JavaScript with random strings. If CSS Combine or JS Combine is enabled, the presence of such random strings will cause a new combined file to be created for each page in the site. If the site has a separate mobile view, then there will be two combined files created for each page in the site. For each additional cache vary, another set of combined files will be created. As you can imagine, this is not ideal, and has the potential to fill up your server space.
To stop this behavior, you must exclude the randomized CSS or JS from being combined. There are two ways to approach this, and depending on how big of a problem this is on your site, you might need to use both methods to get all of the random strings.
Inline CSS or JS
This method has you view the page source for an affected page in two different browsers, and compare the views to find any inline CSS or JS that differs between the two pages.
- Visit your site, appending
/?LSCWP_CTRL=before_optmto the end of the domain name (as inexample.com/?LSCWP_CTRL=before_optm), in two separate browsers or incognito windows. - View the page source in each window
- Copy and paste each source into a diff checker site (such as https://www.diffchecker.com/) and compare
- You should see a few lines of CSS or JS highlighted. This is where the two page loads differ, and indicates where the random strings are.
- Presumably the string will have a common part (for example, with
abc_12345andabc_67890, the common part isabc_). Figure out what that is for your page. - Enter the common part of the random string in CSS Excludes or JS Excludes as appropriate.
- Purge All CSS/JS
Example
In the image below, the highlighted areas all include a CSS id that begins with .tdi_ and ends with a random group of characters (2_35c in one window, and 2_5f5 in the other). 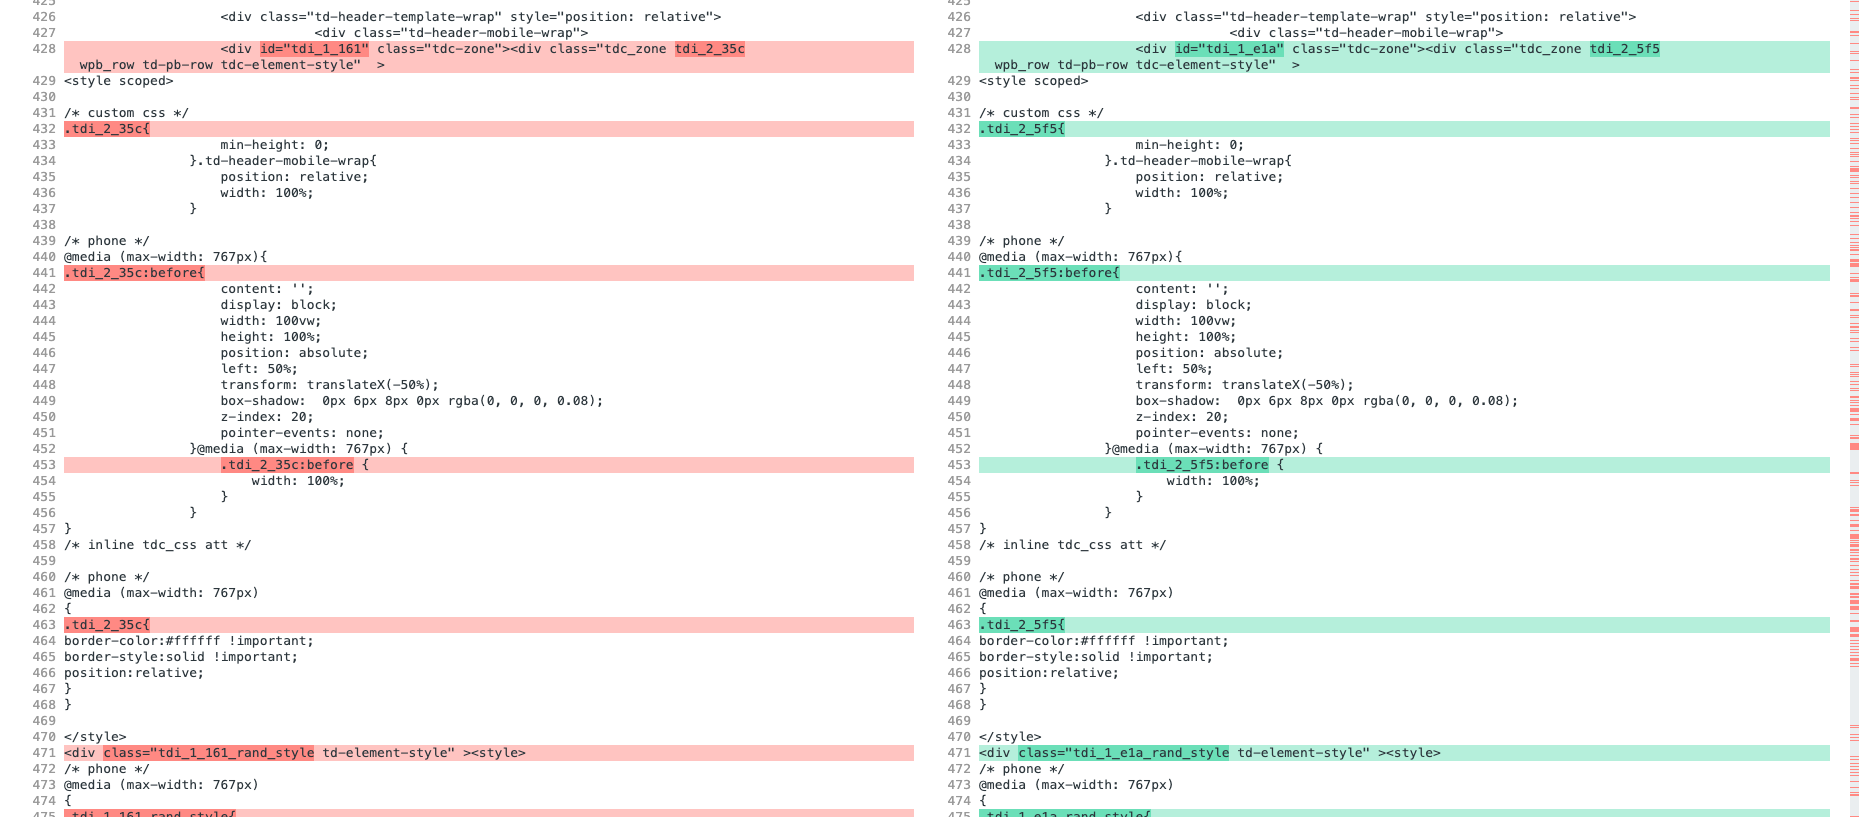
You would exclude the string .tdi_ from CSS optimization.
Combined CSS or JS Files
This method has you look in the combined CSS or combined JS directory and compare two of the generated files to find any differences. This is easiest if you have minification turned off.
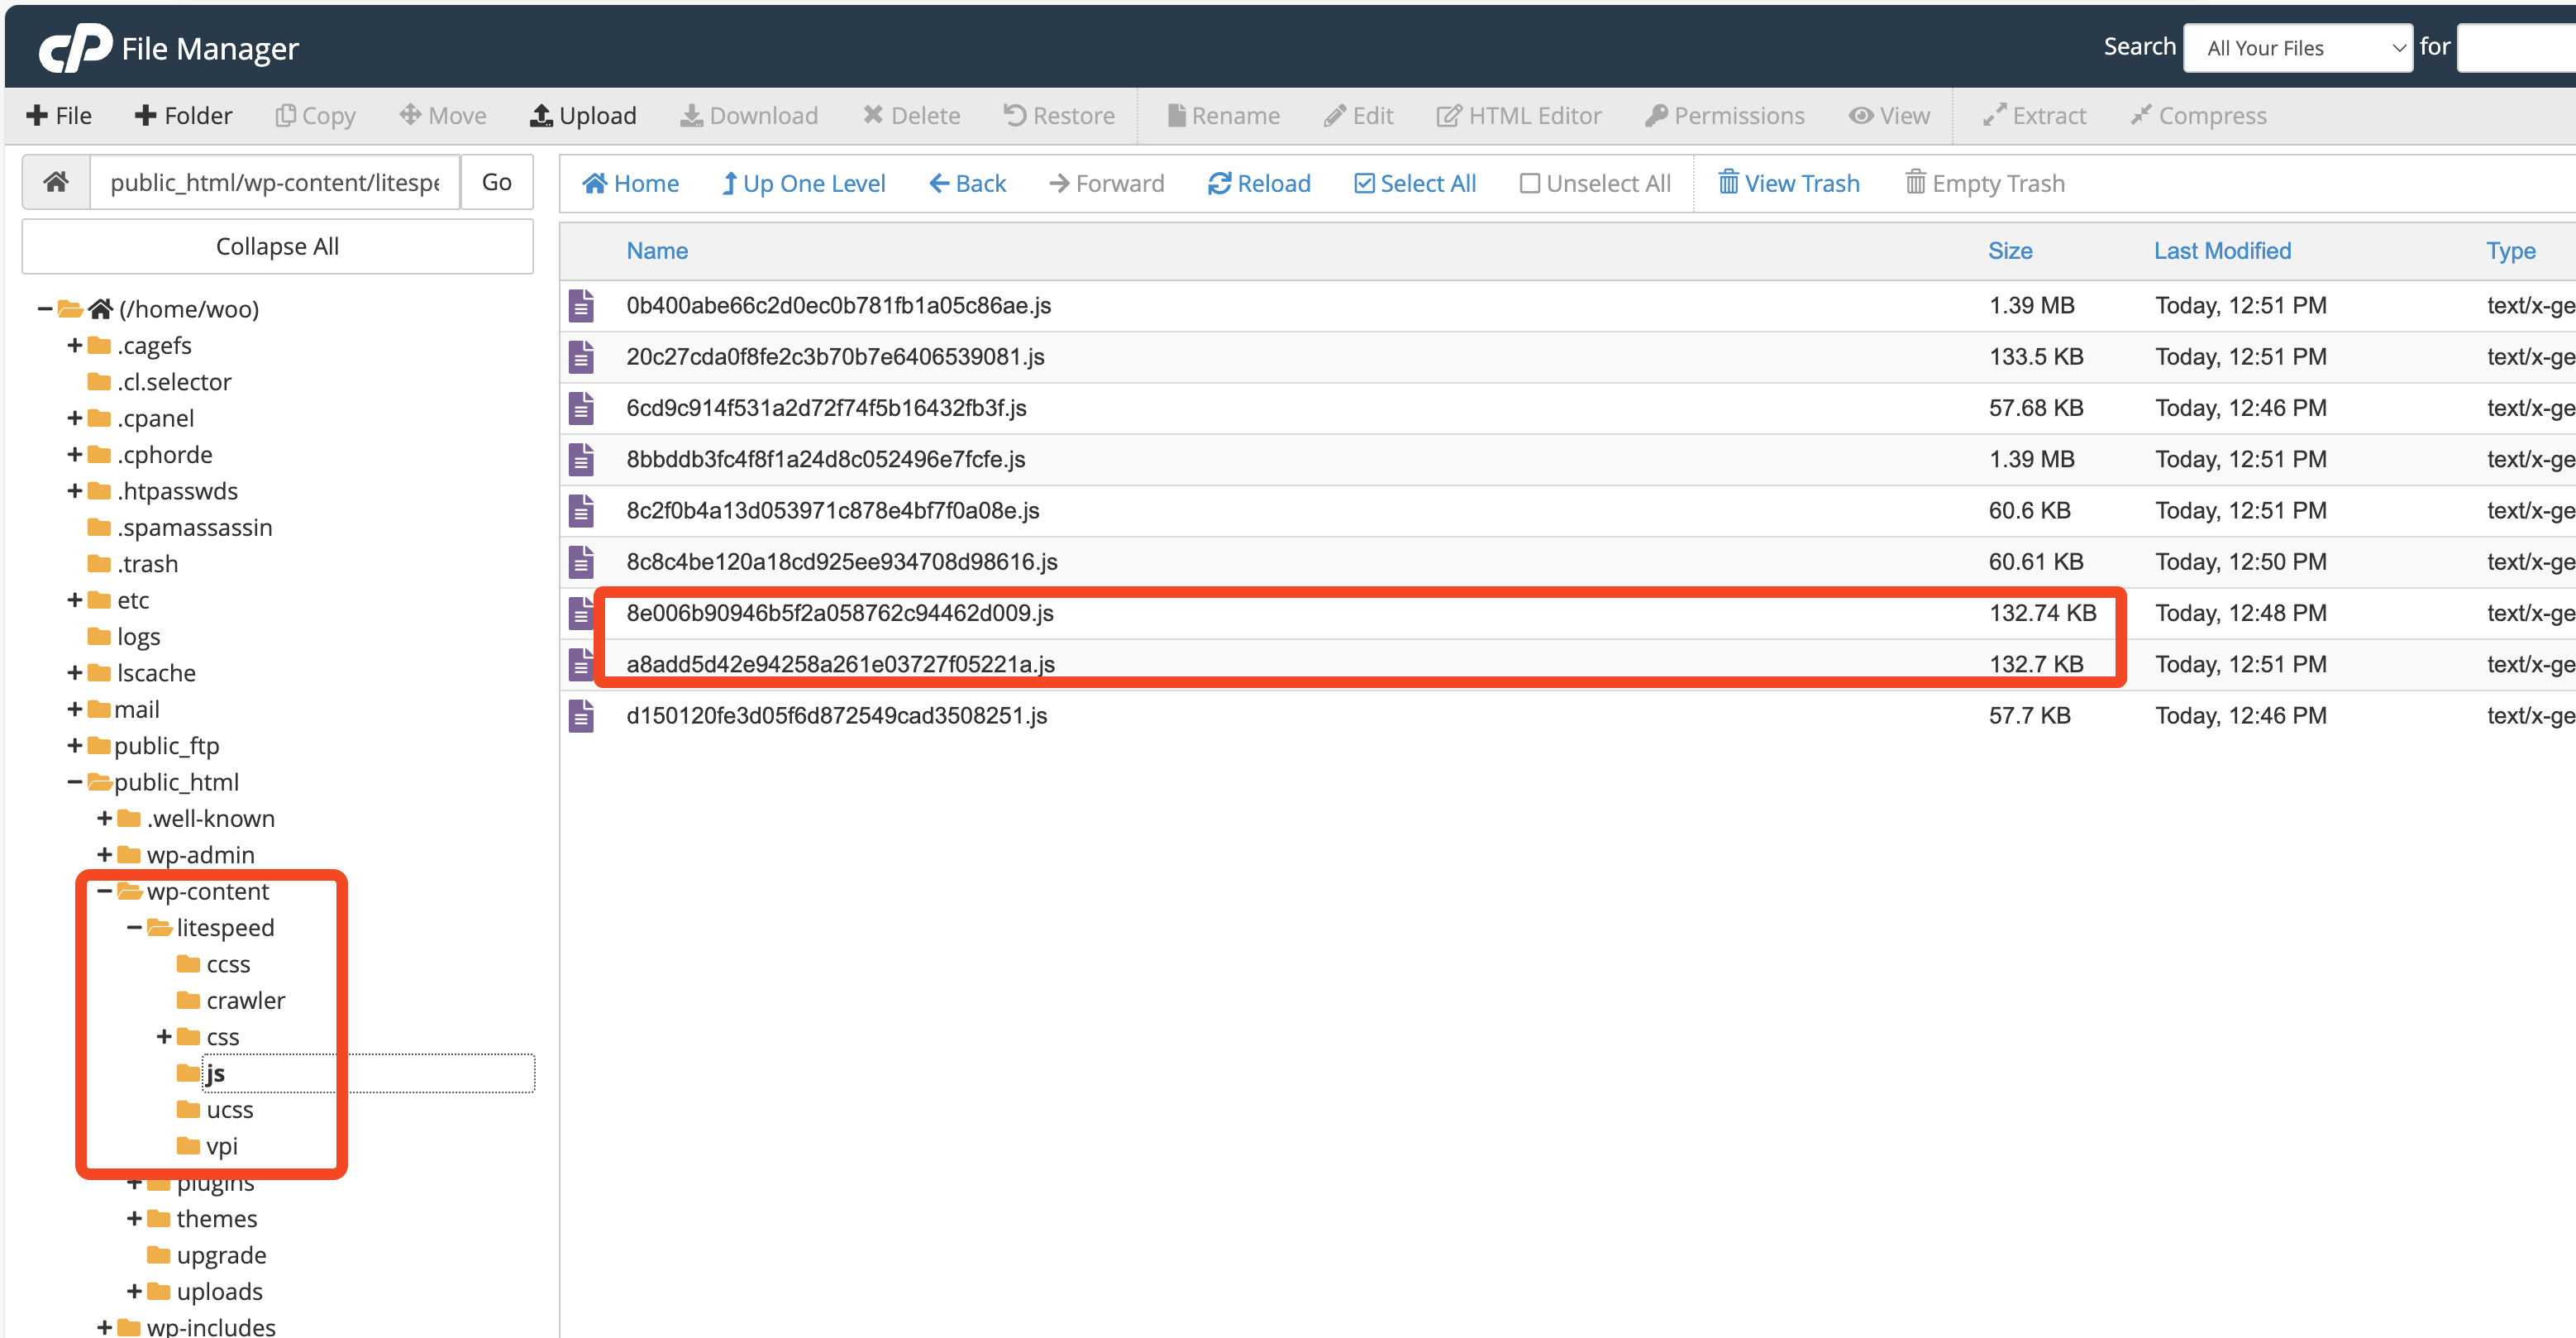
- Using your control panel file manager or FTP, navigate to the
wp-content/litespeed/cssorwp-content/litespeed/jsdirectory to check CSS or JavaScript, respectively - Look for two files that have a similar size. In the image above, we found two files in the
jsdirectory that were 132.74 KB and 132.7 KB - Copy and paste the contents of each file into a diff checker site (such as https://www.diffchecker.com/) and compare
- You should see at least one line highlighted. This is where the two combined files differ, and indicates where the random strings are.
- Presumably the strings will have a common part (for example, with
abc_12345andabc_67890, the common part isabc_). Figure out what that is for your page. - Enter the common part of the random string in CSS Excludes or JS Excludes as appropriate.
- Purge All CSS/JS
Example
The image below shows one difference between two combined CSS files: the strings tdi_49_013 and tdi_49_5d0. This means that we should add .tdi_ to CSS Excludes. 
Combined CSS or JS 404 Errors
If you find that requests for combined CSS or combined JavaScript files are returning 404 Not Found errors, it is likely due to a periodic directory cleanup by your hosting provider.
In our experience, reports of these 404 errors can be attributed to hosting providers deleting the CSS and JS files without the users' knowledge. (Occasionally, we've seen this caused by a third party plugin, but usually it's the hosting provider.)
To verify that this is happening, try the following:
- View Source for a page that routinely gives you issues, and make note of the name of the combined CSS or combined JS file.
- Gain SSH access to the server, and navigate to your site's WordPress root directory.
- Use the following command to monitor the file in
wp-content/litespeed/css(if it's a CSS file) orwp-content/litespeed/js(if it's a JS file) and write the output to a file. Be sure to replace thecss/filename.cssportion ofwp-content/litespeed/css/filename.csswith the actual file name you found in Step 1, and the appropriatecssorjsdirectory:Keep the command running and watch for file deletions.while true; do echo -n "$(date) : "; ls -l wp-content/litespeed/css/filename.css; echo; sleep 1; done | tee monitor_log - If a deletion happens, note the time, and then repeat the monitoring process. Doing this should allow you to discover a pattern in the timing, which you can pass along to your hosting provider for further assistance.
Note
This approach takes time and patience. Avoid making site updates while you are monitoring for file deletions. You don't want to trigger any purge actions that would interfere with your testing.
Info
So, why would a hosting provider delete your CSS and JS files, anyway? Usually these cleanup processes were put in place as a way to address a problem with the way previous versions of the LSCWP plugin would generate CSS/JS files. It was not uncommon for the CSS and JS directories to fill up quickly. This cleanup is no longer necessary, as the excessive CSS/JS generation issue has been solved in the plugin.
CSS Not Properly Reloaded After Update
Most likely, this is not an LSCache issue, since LSCWP doesn't cache static files.
If your theme's CSS is not properly loaded after an update, check your browser cache. Does the reload work? Do you have a CDN or a reverse proxy in front of your web server, such as Cloudflare? These caching mechanisms may need to be purged. See this forum post for more details.
Critical CSS Not Loading
First and foremost, please make sure that all of our service node IP's are allowlisted on your server, your WordPress security plugins (if any), or other security apparatus on your website such as a CDN/Application Layer Firewall.
If it still isn't working after that, take a look at the following:
- Check the
wp-content/litespeed/ccss/directory for any CSS files, and check if any CSS files are generated. Files should be generated inside that directory for each of the Post Types on your WordPress site. - If the CSS files do not exist or the CCSS folder does not exist, wait for the cron to execute. The cron will generate CCSS from our Cloud Servers.
- If the CSS files exist and are valid, do a Purge All - LScache option from the LSCache menu on the Admin Bar. The new CSS would not have been included in older cached pages.
- If the CSS files contain
ccss-timeout, it means communication with your server timed-out when we tried to generate Critical CSS. In this case, delete that CSS file manually and Purge ALL - LScache so that it can re-generate. - If the CSS files contain
Syntax Error, then one of your CSS files contains an error. You can narrow down the actual erroneous CSS file like so:- Turn off CSS Combine and Minify
- Purge All and Purge Critical CSS
- Try to re-generate CCSS. The next CSS file generated inside
wp-content/litespeed/ccss/should show the real CSS file which has the syntax error. - Fix the syntax error in the CSS file indicated, and Purge Critical CSS.
- Re-enable CSS Minify and CSS Combine again now.
Still Seeing FOUC with Critical CSS Enabled
The Critical CSS (CCSS) feature is supposed to eliminate Flash of Unstyled Content (FOUC), so why do you sometimes still see it?
When Load CSS Asynchronously is enabled, your site's CSS will be loaded at the same time as the HTML. So any content that is loaded before the relevant CSS will be rendered without style, as in this screenshot.
LiteSpeed automatically generates Critical CSS as part of the Load CSS Asynchronously setting, in order to stop this behavior. It inserts essential CSS style rules inline into the page HTML, so that those rules are executed before the content loads. (You can learn more about how this works, on our blog.)
Sometimes, though, you may notice unstyled content, even with Critical CSS generated.
Cause:
FOUC happens when CCSS has not been inserted inline into the HTML of the page.
When a page renders unstyled, check the source code. You will probably see something similar to this:
<style id="litespeed-optm-css-rules"></style>
In the image below, it's the area marked in red on line 4.

The <style> tags are there, but they are empty, which means CCSS is enabled, but the rule is not yet generated/inserted into the page.
Possible Explanations
So, why wouldn't the CCSS be inserted into the page yet?
It takes a few seconds to generate Critical CSS, and if you have set Generate Critical CSS in the Background to ON, LSCache adds the page to a cron-based queue so that the CCSS may be calculated later. As a result, there may be times when the page is loaded before the CCSS is available, and this leads to FOUC.
Please be aware that same types of pages share the same CCSS. For example, if you have post1, post2 and post3, when you access post1, CCSS will be generated. That CCSS will then be there and ready to use when post2 and post3 are accessed.
Solution
Try a Purge All - LSCache after the CCSS rules are generated. This will allow LSCache to insert CCSS into pages that had been already cached before the CCSS was generated.
Verify
When CCSS is properly inserted, you will see the rules inserted between the <style> tags, as shown by the red line in the image below:

Debug Critical CSS Generation
If you have verified that CCSS has failed to generate, this may be due to a syntax error. There are a few ways to look for such errors in your CSS.
Method 1: QUIC.cloud Dashboard
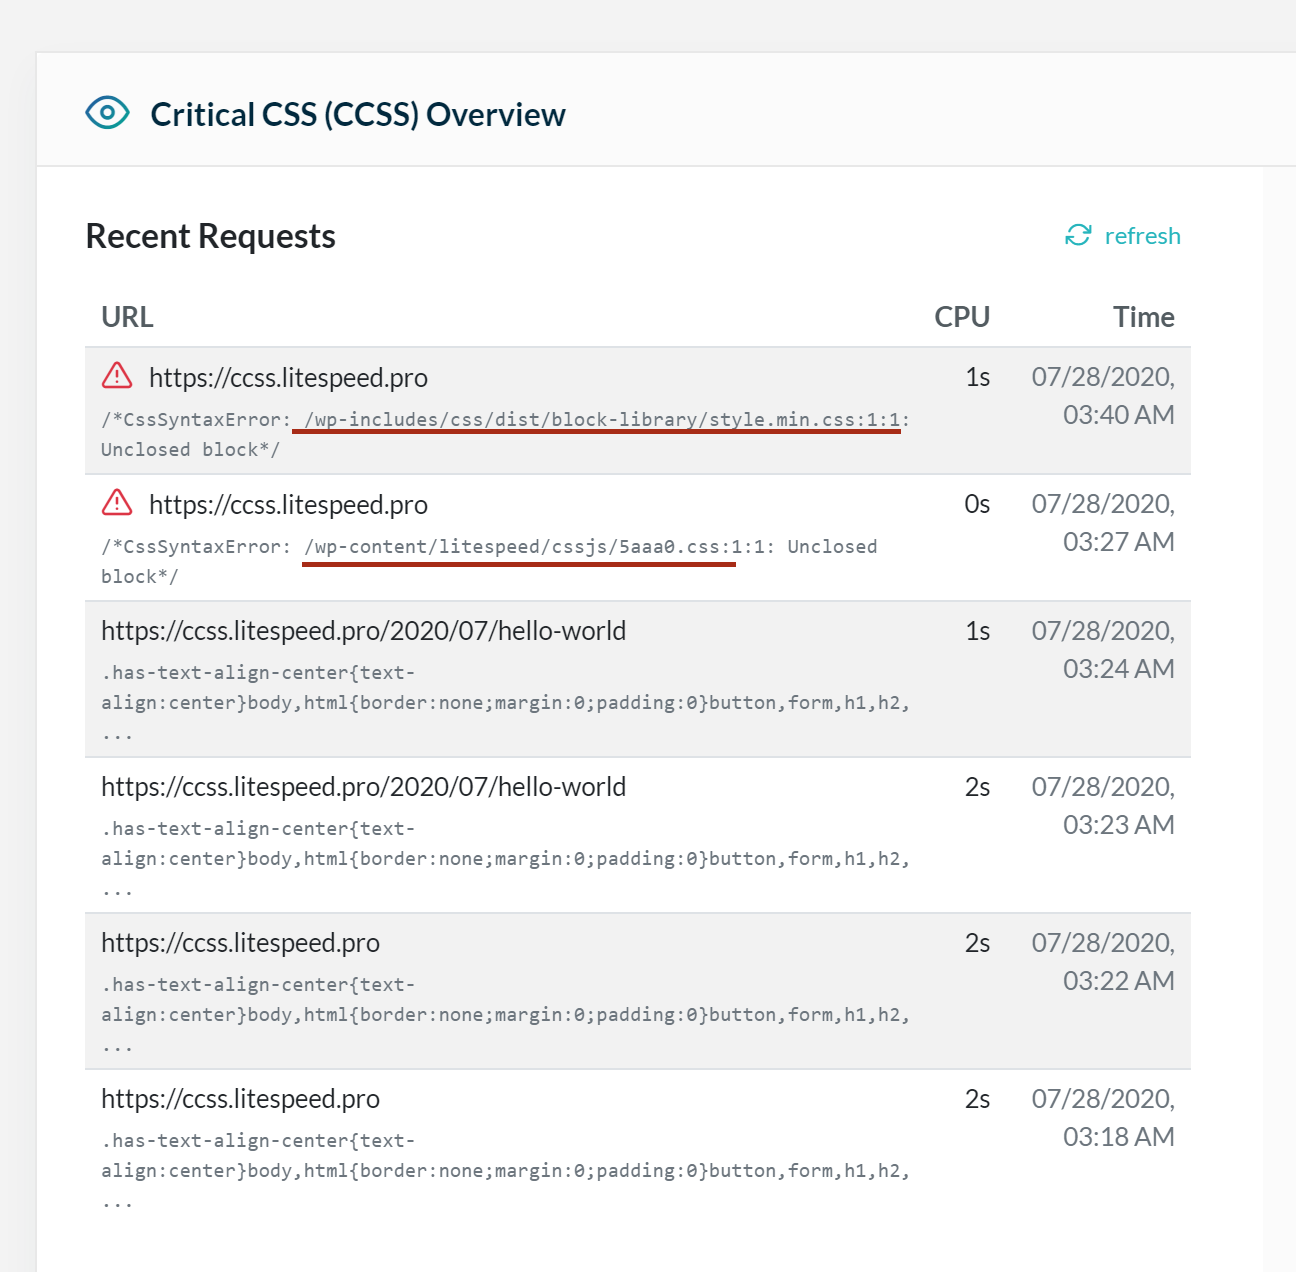
If you have linked your site to QUIC.cloud, you can check in the QUIC.cloud dashboard. Navigate to the Page Optimization tab, and look for any warnings in the Recent Requests area.
If these is a problem, a CSS Syntax Error would be clearly displayed, along with the path to the CSS file that has the error, and a description of the error. Fix the syntax error in the original file, and CCSS should begin working properly.
Method 2: Your File System
If you have not linked your site to QUIC.cloud, you can directly check your file system. Navigate to the /wp-content/litespeed/ccss directory by FTP or your control panel file manager. Look inside the CSS files in that directory. One of them should contain a syntax error.
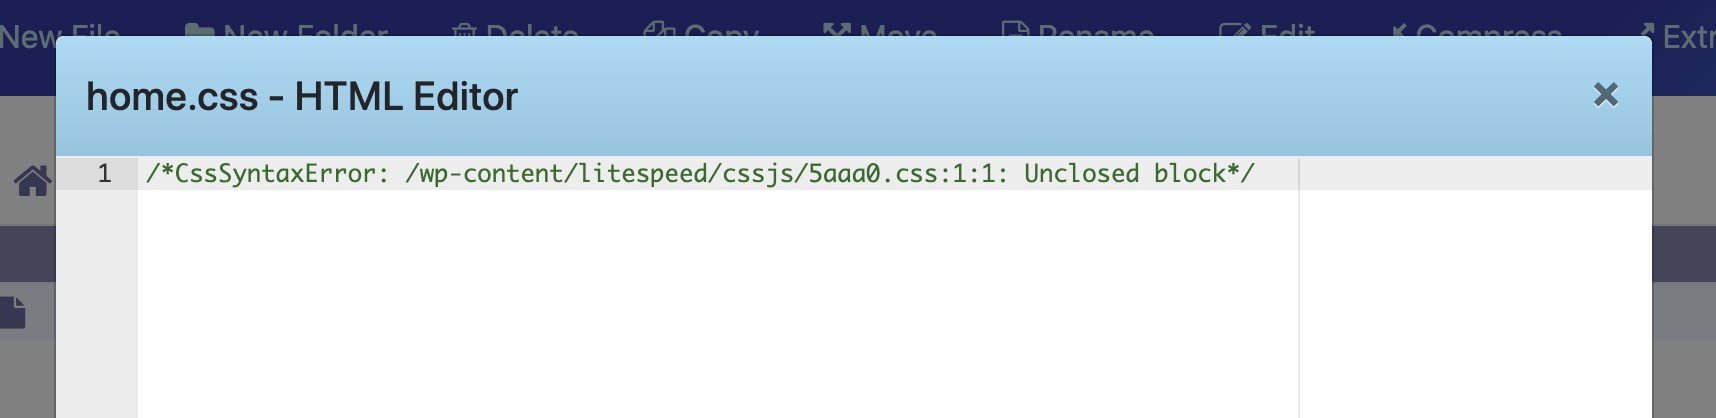
In this example, home.CSS gives us the Unclosed block syntax error and tells us where to find the file to fix.
Method 3: HTML Source Code
Lastly, you can check the HTML source code, though this method is not as reliable as the previous two and is less preferred.

In this example, you can see the Unclosed block error displayed in the spot where your Critical CSS should have been inserted.
Find the Original CSS File
Regardless of the method used, you probably discovered something like this:
/*CssSyntaxError: /wp-content/litespeed/cssjs/5aaa0.css:1:1: Unclosed block*/
/wp-content/litespeed/cssjs/5aaa0.css is the file that causes the problem, but this is not the original CSS file. Any file that you find inside of the /wp-content/litespeed/ directory is one that has been generated by the LiteSpeed Cache plugin.
In this case, it is an optimized CSS file generated through the CSS Combine and/or CSS Minify features. You cannot fix the syntax error in a generated file. You need to fix it at the source.
To find the original source CSS you will need to turn off optimization and check again.
- Navigate to Page Optimization > CSS and set CSS combine to
OFFand CSS Minify toOFF. Save your changes.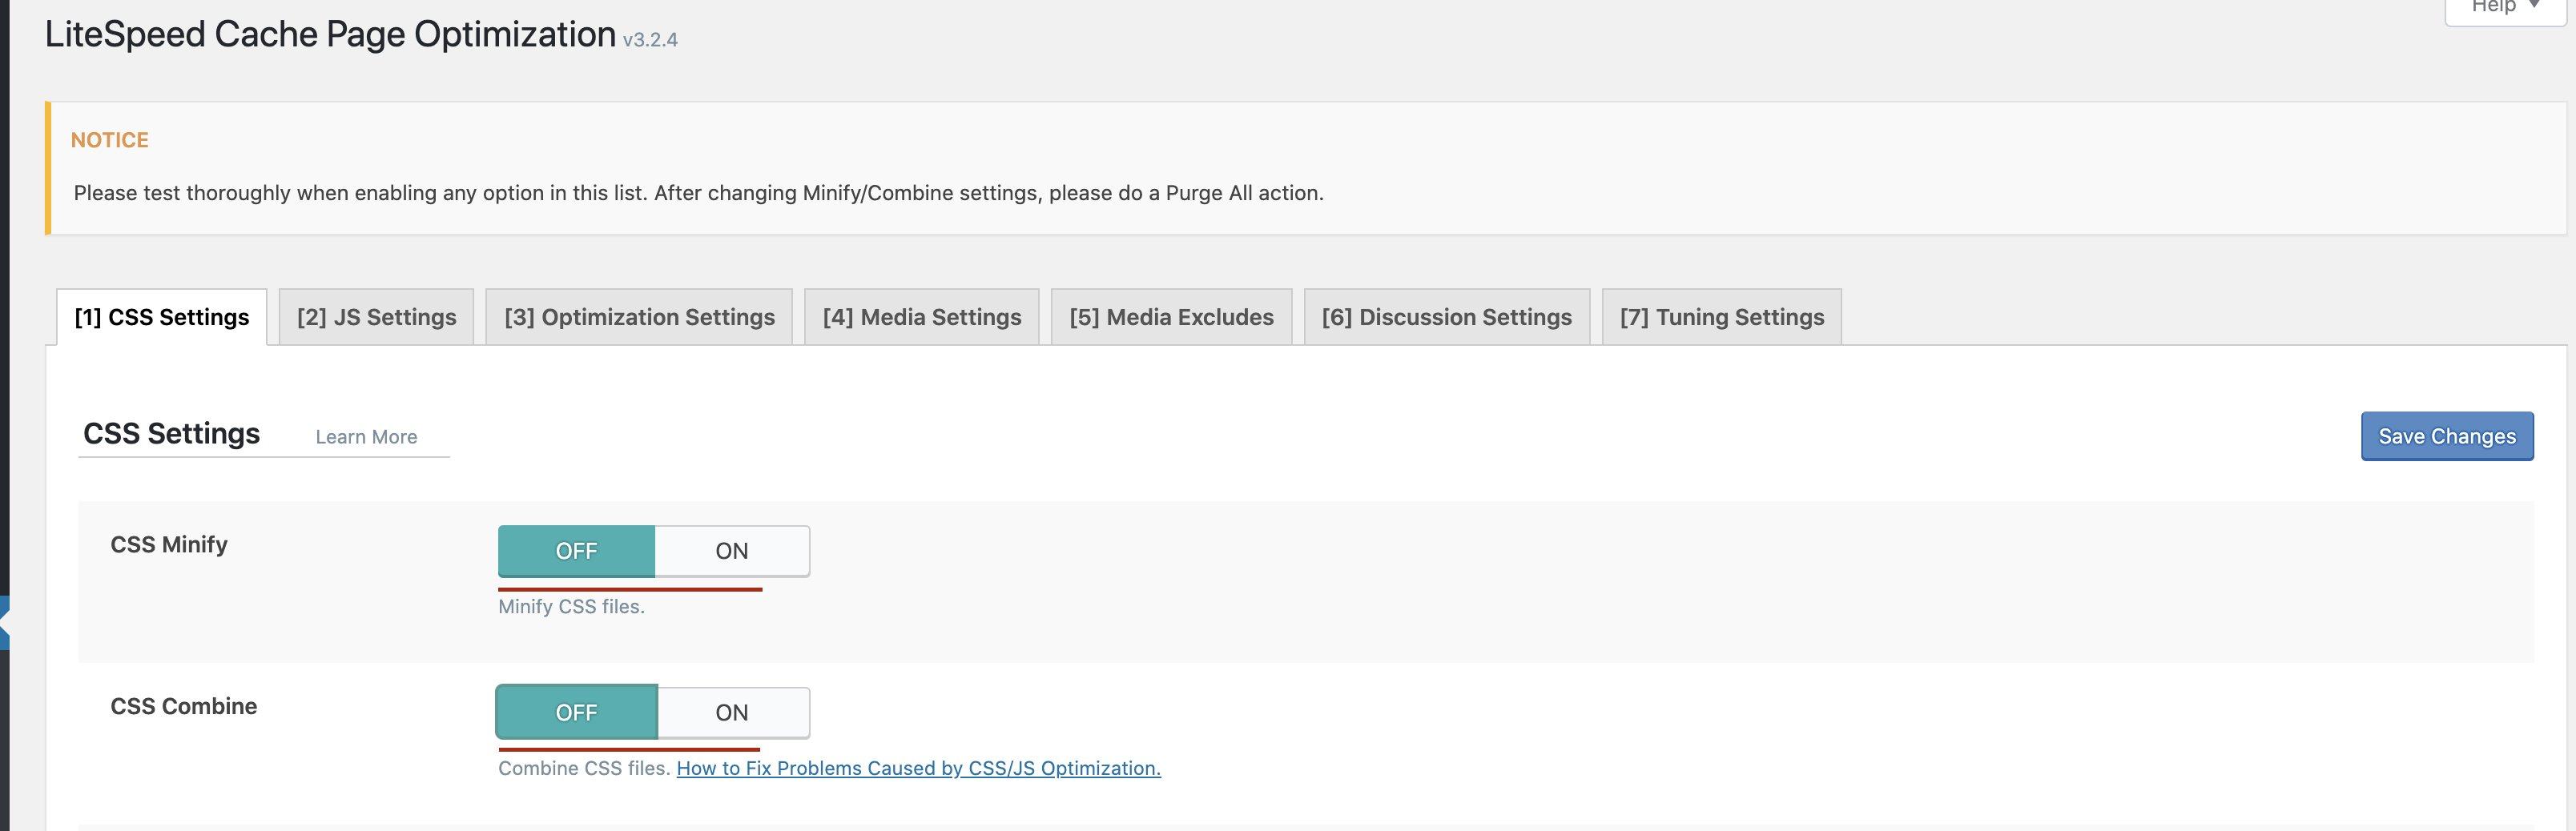
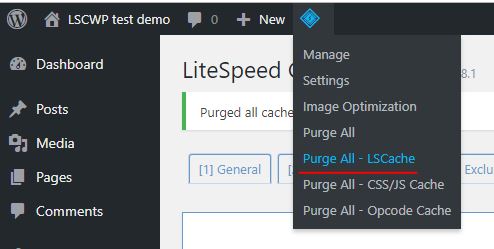
- Navigate to Toolbox > Purge and perform a Purge All and a Purge All - CCSS, or do it from the Admin Bar as shown.

- Visit the web page so that the CCSS is regenerated.
- Use whichever method you used the first time to re-check the CCSS and look for the syntax error.
Tip
CCSS generation has a time limit to avoid server overload. If you can't get your CCSS to regenerate right away, please wait for few minutes and then try again.
Once CCSS has regenerated, your error checking should reveal something like the following:
/*CssSyntaxError: /wp-includes/css/dist/block-library/style.min.css:1:1: Unclosed block*/
This is much more useful to you, as it is the original CSS file that you should be able to fix yourself. Or, at least, you should be able to contact the theme author or plugin author who provided the file to you.
If you're not sure where the CSS came from, the file name should give you a hint. If it was from a plugin, the path should look like /wp-content/plugins/plugin-name/path/file.css. A theme's CSS should look something like /wp-content/themes/theme-name/path/file.css.
Note
For the purpose of illustrating the issue, we deliberately sabotaged a WordPress default CSS file to trigger a syntax error. Normally, /wp-includes/css/dist/block-library/style.min.css would not be a problematic file.
UCSS Not Generating
Visit your Dashboard at my.quic.cloud to see the status of your online services, including Unique CSS. Click your domain name, then Page Optimization, and then the UCSS tab. If there is a UCSS generation error, you’ll see it here.
The error message usually indicates that UCSS has failed due to a syntax error in the source CSS code.
To fix an error like this, you will need to find the problematic source CSS file, fix the syntax error, and then generate UCSS again. Let’s walk through that process:
Find the problematic source CSS
Start by visiting the page in your browser, and then select View page source from the left-click menu.
Near the top of the page, there should be a link to the LiteSpeed-generated CSS file. This is the file that contains all of the page’s combined and minified CSS. It is the file that is sent to QUIC.cloud for processing. So if QUIC.cloud found an error, it would be in this file. Click the link to open the file.
You’ll know you are in the right place because the first line will say This file is auto-generated. Use CTRL-F or Command F to search for the code snippet mentioned in the error message.
Once you find it, look at the rest of the CSS code around it. The names of the CSS selectors should help you deduce what original CSS source file contains the error. At the very least, it should help you narrow it down to a particular plugin’s CSS files, and you can search through those for the error. Unfortunately, there is no easy way to demonstrate this. It’s going to be different for every site and for every error.
Fix or exclude the syntax error
Once you figure out where the original source came from, you will need to fix the CSS syntax error in that source file. If you can’t fix it yourself, you can exclude the source CSS file from optimization. To do so, navigate to Page Optimization > Tuning - CSS and add the file name to the UCSS File Excludes and Inline list.
Generate UCSS again
Once the source CSS file is either fixed or excluded, hover over the LiteSpeed icon in the WordPress Admin Bar and click Purge All. This will purge both the cache, and any combined or minified CSS. Then hover again, and click Purge All - UCSS to have generated UCSS files purged.
Go back to your site and reload the page. This will trigger a request to generate a new UCSS file. If you have time to wait, you can skip the next step, and the UCSS will be automatically generated via the cron.
Otherwise, to jump start UCSS generation, navigate to LiteSpeed Cache > Page Optimization > CSS Settings and look for the queue displayed under the Generate UCSS setting. Run the queue manually.
Go back to the QUIC.cloud Dashboard and check the UCSS status. You should see the file has been generated again, this time without any syntax error.
Incomplete UCSS
Sometimes UCSS is generated without some necessary CSS selectors, resulting in a distorted display. This is usually because such selectors require user interaction, and are not visible to the UCSS generator.
In such cases, if you find the missing CSS selectors and add them to the UCSS Allowlist box, you can solve the problem. Execute the following steps to find the relevent CSS selectors and allowlist them.
Important First Step for Guest Mode Users
If you have not explicitly enabled UCSS, and you are only using UCSS as part of the Guest Mode + Guest Optimization feature, then you will need to temporarily force LSCWP to use Guest Mode and Guest Optimization for all visits from your IP address. To do so, navigate to LiteSpeed Cache > General > Tuning and add your local IP address to the Guest Mode IPs list.
- Navigate to LiteSpeed Cache > Page Optimization > Tuning - CSS where the UCSS Allowlist field can be found. Leave the page open there.
- Visit your website in a separate window, and have the developer tools visible. The problems in your website's display should be visible in this window. We'll call this Window A.
- Open another window with developer tools visible. This time visit your site, but append the
/?LSCWP_CTRL=before_optmstring to the end. For example,https://www.yoursite.com/?LSCWP_CTRL=before_optm. This will display your site without any of the optimizations, and it should look correct to you. We'll call this Window B. - In Window A, right click your mouse over the problematic area of the page and select Inspect from the menu.
- Do the same in Window B.
- Compare the contents of the two Inspect windows, line by line. Look for any selector that appears in Window B's Inspect detail but does not appear in Window A's Inspect detail.
- Copy the missing selector and paste it into the UCSS Allowlist box.
- Repeat the previous two steps until you have found every missing selector from the problematic area(s) of the website.
- When you've finished adding selectors to the UCSS Allowlist, press the Save Changes button.
- From the WP-Admin Admin Bar at the top of the screen, hover over the LiteSpeed Cache symbol, and then click Purge All. Hover over the symbol again and click Purge All - UCSS.
- Return to your website in Window A, and reload the page. This will trigger a request to generate a new UCSS file.
- If you have time to wait, you can skip the next two steps, and the UCSS will be automatically generated via the cron.
- To jump start UCSS generation, navigate to LiteSpeed Cache > Page Optimization > CSS Settings and look for the queue displayed under the Generate UCSS setting. Run the queue manually.
- Navigate to the LiteSpeed Cache Dashboard, find the queue displayed with Unique CSS and click Force cron. Wait a few minutes for UCSS to generate.
- Return to your website in Window A, and reload the page again. This time, the new UCSS file should be in use, and you should see an improvement in the display.
- If you see some improvement but there are still areas that are problematic, repeat the process: compare the two Inspect displays for Window A and Window B, and allowlist all of the problematic CSS selectors.
Don't Forget
If you added your local IP address to the Guest Mode IPs list previously, remove it now and press the Save Changes button.
Bypass Optimization in AJAX
If you have a conflict, and you need to bypass optimization functions in AJAX, you can either add some code to your theme's functions.php, or you can call the appropriate filter when using AJAX.
In the Theme's Functions
Add the following to your theme's functions.php file: defined( 'DOING_AJAX' ) && add_filter( 'litespeed_can_optm', '__return_false' );
Call the Filter
When using AJAX, you can call the above filter, and return false.
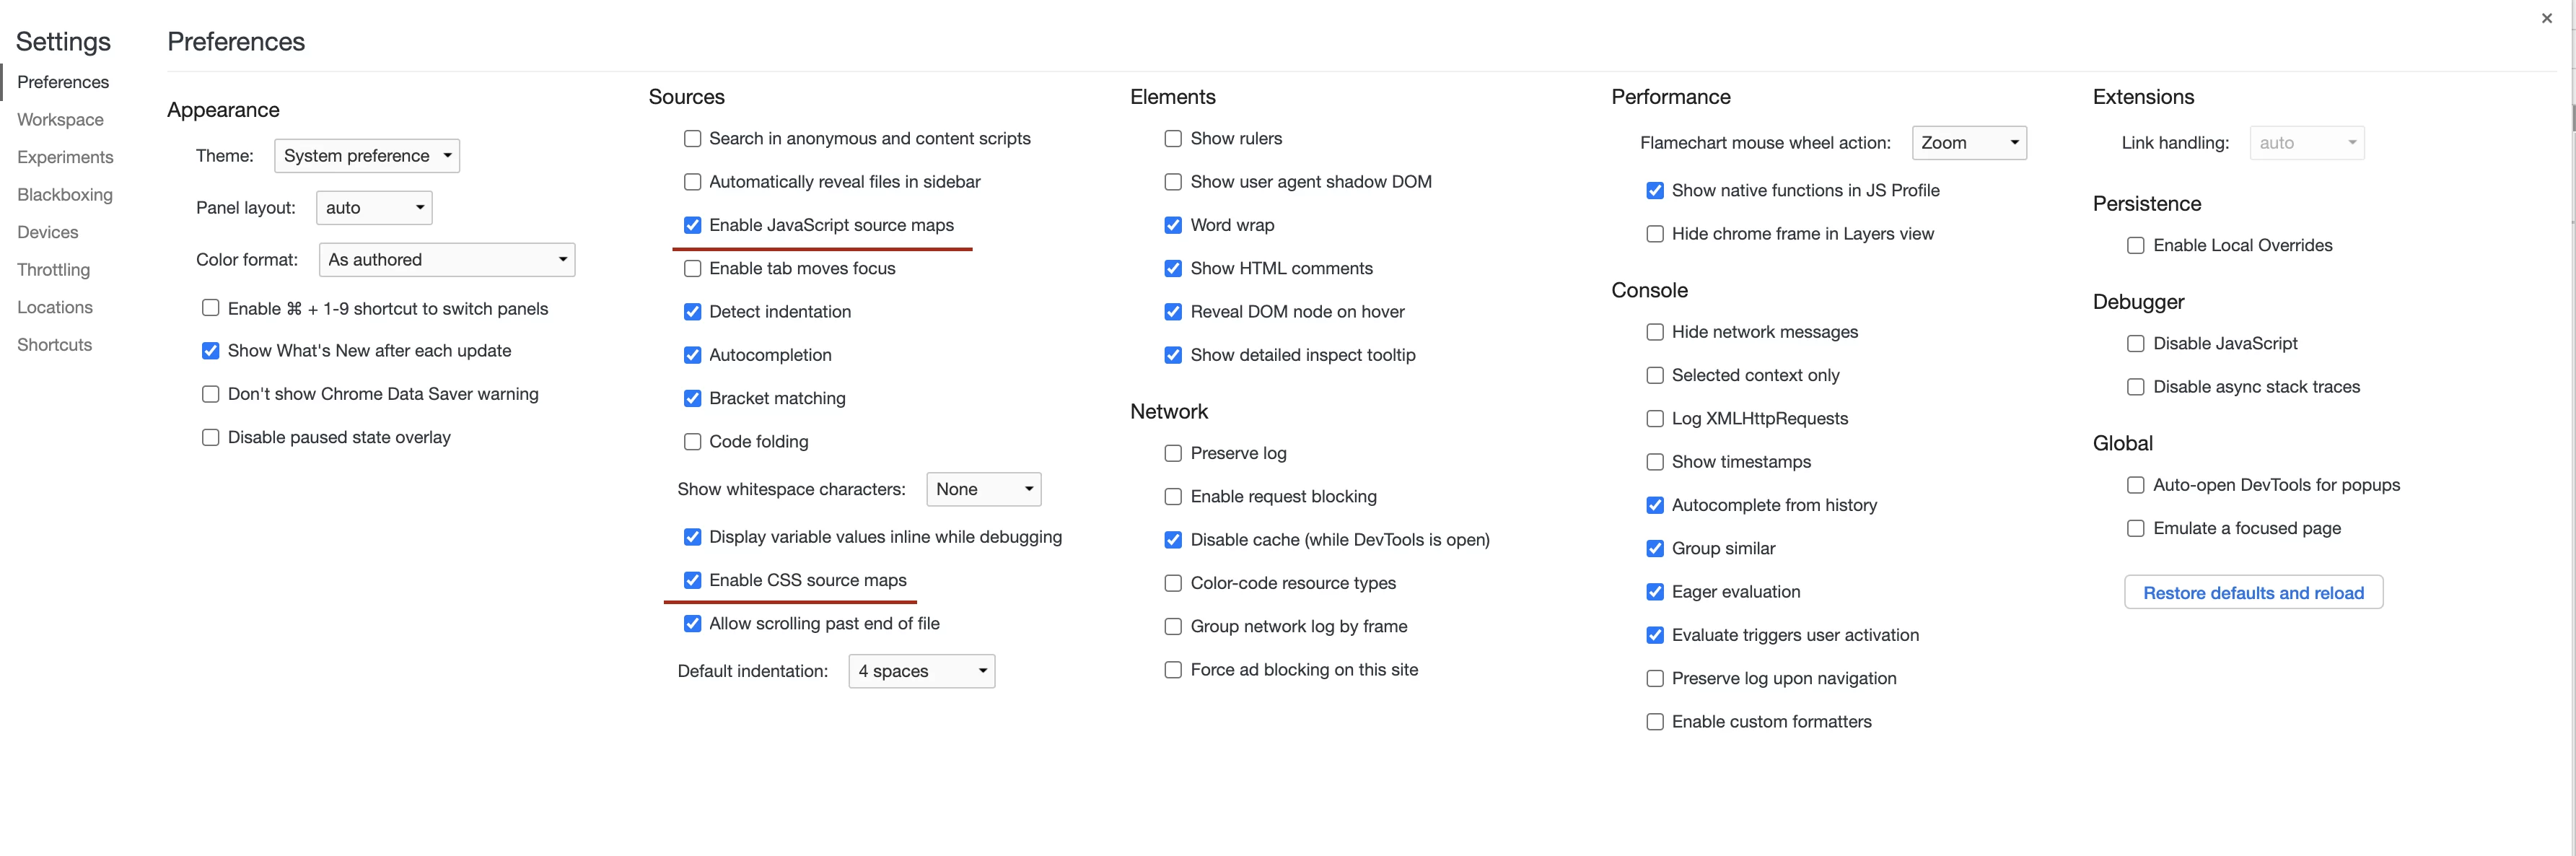
DevTools Failed to Load SourceMap
Chrome may show a message like the following in it's developer tools:
DevTools failed to load SourceMap: Could not load content for https://example.com/wp-content/litespeed/cssjs/xxxx.js.map: HTTP error: status code 404 , net :: ERR_HTTP_RESPONSE_CODE_FAILURE
Do not worry, this is absolutely normal. The tool is trying to load the resources map for a minified JS or CSS file, so that it may be unminified. Of course, this file doesn't exist, so it returns a 404 error.
You may ignore this error. It will NOT affect your site in any way.