Quick Start Guide
This guide will teach you how to replace Apache, and convert a cPanel shared-hosting server to an optimized high-performance cPanel + LiteSpeed server.
Video
Watch the How to Install LiteSpeed Web Server on a cPanel Server video.
Prepare for installation
Obtain a license
Visit the LiteSpeed store to obtain a license.
You can get a Free Starter License if you are planning to host only a single domain and have a physical server with less than 2GB RAM. Other licenses may also be purchased from the same link. If you are looking for a trial license and have a server with more than 2GB RAM and multiple domains, you can learn more about trial licenses.
If you need help with choosing a license, please see our licensing documentation.
Verify root access
LiteSpeed Web Server requires you to have full root access to the server for the installation. Verify that you have permission to use SSH and sudo before proceeding.
Disable Apache mod_ruid2
The mod_ruid2 Apache module changes the permissions of the HTTP requests for a domain to the permissions of the owner of that domain, and is not compatible with LiteSpeed Web Server. LSWS does not allow the process user to change mid-process. Before switching to LiteSpeed, make sure that mod_ruid2 is disabled in your WHM settings.
LSWS is compatible with Apache prefork and the event Multi-Processing Module, but if mod_ruid2 is enabled, functionality may be disrupted as WHM creates files that the web server user cannot access.
Remove replacements or proxies
Before installing LiteSpeed Web Server, you will need to remove any previous Apache replacements like nginx, or reverse proxies like nginx over Apache or nginx/Varnish.
Ensure existing sites are working
Before installing LiteSpeed, you should make sure that the sites on your cPanel/WHM installation are working fine under Apache. If this is a brand new server, you can add a test domain and remove it later.
Open firewall ports
In addition to TCP 80 and TCP 443, LiteSpeed uses UDP 443 for QUIC, which is one of LiteSpeed's most popular features. Make sure that TCP 80, 443 and UDP 443 are open in Firewall Configuration. TCP 7080 is also used by LiteSpeed for its WebAdmin Console, and it requires a username and password to log in (you will set these during installation). You should keep this port open to Administrative IPs only.
Installation
There are two ways to install LiteSpeed Web Server on your system: Detailed installation, and quick/automated installation.
Detailed installation is recommended if you are installing LiteSpeed for the first time, as each option that is presented will be discussed in detail. If you are experienced with LiteSpeed, the automated installation will give you a quick and simple setup experience.
Detailed installation
Log into your SSH server and run the following command, replacing your_serial_no with your License key:
bash <( curl https://get.litespeed.sh ) your_serial_no
This script detects your environment and downloads only the required dependencies and installation data from our servers. Depending on the environment, the script asks you for input to various questions. Finally, it installs LiteSpeed Web Server.
Tip
To use this script with a trial license, just replace your_serial_no with the word TRIAL (in all capitals), like so:
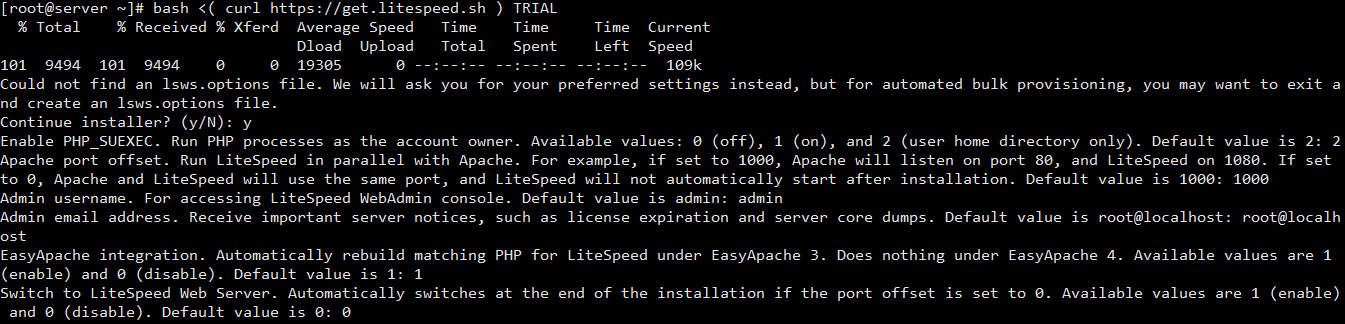
bash <( curl https://get.litespeed.sh ) TRIAL
This will automatically request a trial license for your server and install LiteSpeed Web Server on it. If you see an error while using the trial license, please refer to the FAQ.
Once you've started the script, it will detect that your installation is using cPanel/WHM and will ask your input with the following prompts:
Could not find an lsws.options file
Could not find an lsws.options file. We will ask you for your preferred settings instead, but for automated bulk provisioning, you may want to exit and create an lsws.options file. Continue Installer(Y/N) ?
This is expected since this is the detailed installation process. lsws.options is for quick/automatic installation.
Press Y and Enter to proceed.
Enable PHP_SUEXEC
Enable PHP_SUEXEC. Run PHP processes as the account owner. Available values: 0 (off), 1 (on), and 2 (user home directory only).
This option defines how a PHP process will run in your server. For shared hosting servers, a value of 2 is recommended, and is the default.
Apache port offset
Apache port offset. Run LiteSpeed in parallel with Apache. For example, if set to 1000, Apache will listen on port 80, and LiteSpeed on 1080. If set to 0, Apache and LiteSpeed will use the same port, and LiteSpeed will not automatically start after installation.
This option defines the port to which LiteSpeed Web Server should bind once installed. It is recommended that you first set the port offset to something other than 0 (like the default value of 1000). This will allow LiteSpeed and Apache to run concurrently while you test if LiteSpeed works correctly on your server.
You can change the port offset to 0, after the installation is completed and you are confident that your websites are working properly with LiteSpeed.
If you choose to set port offset to 0 now, LiteSpeed will start after installation, and Apache will be stopped. This also requires that you enable the Switch to LiteSpeed Automatically option, which we will discuss below.
Admin username
Admin username. For accessing LiteSpeed WebAdmin console.
This option defines the username you will use to access the LiteSpeed WebAdmin Console, which is helpful for accessing LiteSpeed Stats or controlling LiteSpeed behavior after installation. It is recommended that you set this to something secure.
Default value is admin.
Admin email address
Admin email address. Receive important server notices, such as license expiration and server core dumps.
This option sets the email address at which you will receive notices, warnings, and errors from LiteSpeed Web Server. It is recommended to set this to an email you regularly monitor.
Default value is root@localhost.
EasyApache integration
EasyApache integration. Automatically rebuild matching PHP for LiteSpeed under EasyApache 3. Does nothing under EasyApache 4. Available values are 1 (enable) and 0 (disable).
This option tells the installer to build a matching PHP for LiteSpeed. It is only useful if you're still using EasyApache 3. EA3 has reached end of life, and this value has no effect on EasyApache 4.
Default value is 1.
Switch to LiteSpeed Web Server
Automatically switch to LiteSpeed at the end of installation. This setting will only take effect if port_offset is set to `0`. Most users will need to test and verify before they switch, so the default is to not automatically switch. Available values are `1` (enable) and `0` (disable).
This option defines if the installer should automatically shut down Apache and shift to LiteSpeed Web Server after installation. If you've set Apache Port Offset to 0 earlier, then you should set this to 1.
Default value is 0.
Deploy LSCWP automatically
Automatically scan for any WordPress installations and install + enable the LSCache plugin for WordPress on all found installations. If not already set, the server and virtual host cache root will also be set automatically. This option is disabled by default. Available values are 1 (enable) and 0 (disable).
This value controls the automatic deployment of LiteSpeed Cache on the server and on all of the WordPress websites on the server. If enabled, it will automatically set up default cache roots at the server level as well as at the virtual host level. Once installed, it will also scan for all WordPress websites on the server and will install LiteSpeed Cache Plugin on them.
Note
LiteSpeed will not install its Cache Plugin on websites which are already using a full page caching plugin. Those sites will be skipped.
Install user-end cPanel plugin automatically
Automatically install the LiteSpeed Web Cache Manager user-end plugin for all cPanel users. This plugin will appear as "LiteSpeed Web Cache Manager" under the 'Advanced' section of a user's cPanel dashboard. This option is enabled by default. Available values are `1` (enable) and `0` (disable).
This value controls automatic installation of the user-end cPanel plugin for this server. If enabled, the LiteSpeed user-end cPanel plugin and its contained features will be accessible through the cPanel user's dashboard.
After all of the values have been entered, the script will install LiteSpeed Web Server on your cPanel/WHM server.
Once the installation is complete, you should see the following success message with a randomly generated password. You should save this password in a safe place. You can also change it later.

If you encounter any problems during the installation, create a ticket with us, and we will be happy to help.
Quick/automated installation
This method uses shortcuts to automate the installation and deployment of LiteSpeed in the fastest possible way on cPanel/WHM servers.
In most situations, running the installer script manually is sufficient. However, it is possible to automate the process for bulk provisioning. To do this you can create a lsws.options file and upload it to your organization's internal repo. This will allow the installer to pick up installation options directly from the file and will not ask for input from the user.
A default lsws.options file will look like this:
php_suexec="2"
port_offset="1000"
admin_user="admin"
admin_pass="a1234567"
admin_email="root@localhost"
easyapache_integration="1"
auto_switch_to_lsws="0"
deploy_lscwp="0"
cpanel_plugin_autoinstall="1"
admin_pass is the password which will be used to access your LiteSpeed WebAdmin Console. Set it to something secure for your internal usage only.
If you do not understand what the other options mean, please go through the detailed installation process once before attempting an automated installation.
You can create lsws.options and keep it on your local network for bulk provisioning, at a URL like example.com/yourinternalrepo/lsws.options and then run the following command:
curl -o lsws.options example.com/yourinternalrepo/lsws.options && bash <( curl https://get.litespeed.sh ) your_serial_no
Note
example.com/yourinternalrepo/lsws.options is the link to your personalized lsws.options file which should be accessible to your servers.
lsws.options is the location of the lsws.options file. If you're running the installer from the same directory as your lsws.options file, it's fine to leave it exactly like that.
your_serial_no is the license key for LiteSpeed Web Server. You can also use TRIAL if you want to request a trial license. If you see an error while using the trial license, refer to the FAQ.
After installation
Verify LiteSpeed is running
In most situations, once LSWS is installed it will be set as the default web server and started immediately. In these cases, it will not be necessary to switch to LiteSpeed Web Server, as it should already be running.
If, however, your Apache Port Offset was set to anything other than 0, or Auto Switch to LSWS was set to 0, LiteSpeed will be installed but will not be started or set as the default web server.
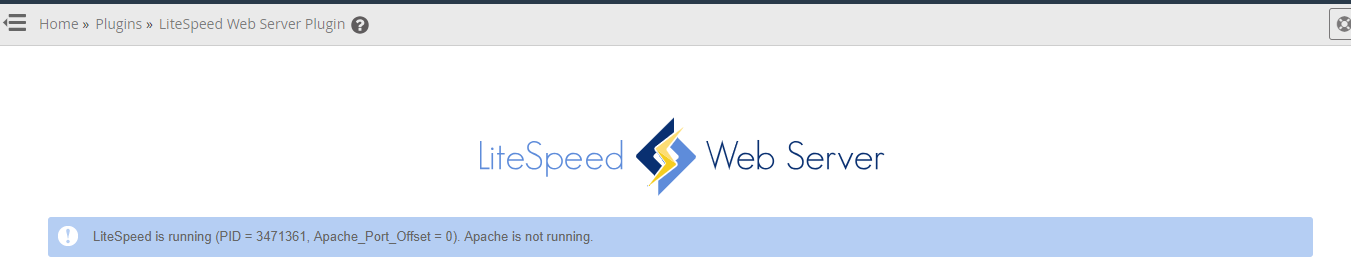
To verify LiteSpeed is running, navigate to WHM > Plugins > LiteSpeed Web Server. This page will confirm which web server is currently running.
Switch between LSWS and Apache
From within cPanel, navigate to WHM > Plugins > LiteSpeed Web Server. This page will confirm which web server is currently running. If Apache is running, you can click the Switch to LiteSpeed button. Likewise, if LSWS is running, you can click the Switch to Apache button to toggle to Apache.
Alternately, you can switch between servers at the command line by using the cp_switch_ws script.
Switch to LiteSpeed:
/usr/local/lsws/admin/misc/cp_switch_ws.sh lsws
Switch to Apache:
/usr/local/lsws/admin/misc/cp_switch_ws.sh apache
Warning
You may be tempted to switch between servers using commands like service httpd stop followed by service lsws start. We strongly do not recommend this. The switching process involves several other important steps, and must be done using the WHM Plugin or the SSH command above.
Set up cache root and enable LiteSpeed Cache
Tip
This step is only needed if Deploy LSCache was set to 0 during installation.
One of the most talked-about features of LiteSpeed is its full page cache, which is particularly popular with known CMSes such as WordPress and Magento. Though these features are included with every LiteSpeed license, you'll need to enable LiteSpeed Cache manually and set up the cache root to use these features on the server.
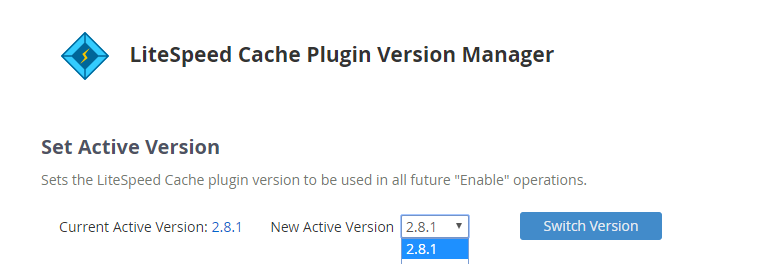
Click LSCWP Version Manager inside the LiteSpeed WHM Plugin, select the desired version (latest is recommended), and click Switch Version.
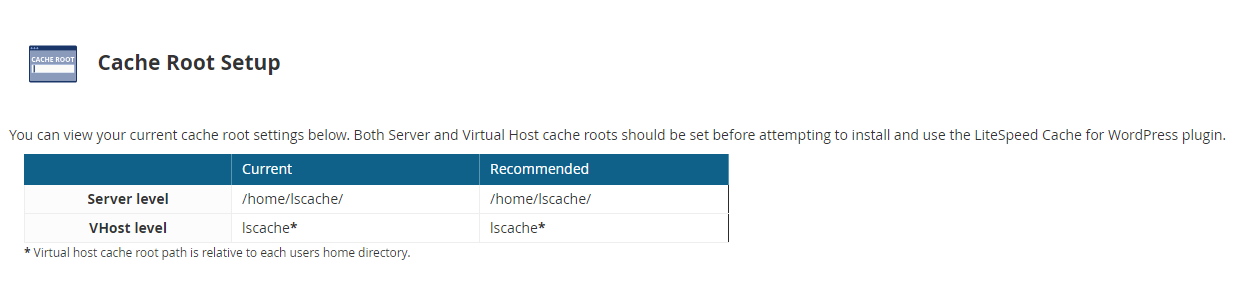
Work through the LiteSpeed Configuration options on the main plugin page. On the next page, click Cache Root Setup. Click Set Missing Cache Roots if any of the cache root folders are not set up.
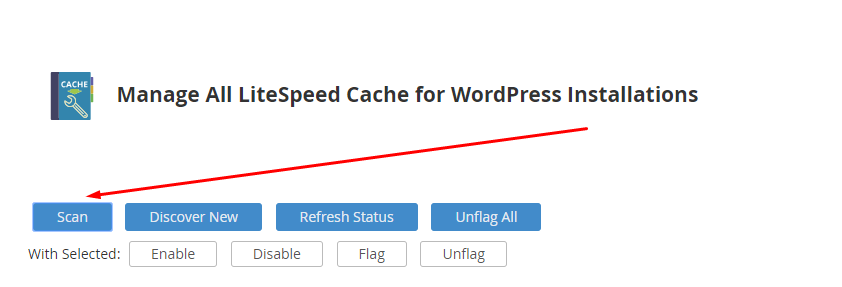
Once LiteSpeed Web Server has been installed successfully, and LiteSpeed Cache has been set up, you are free to enable the LSCache plugin on your server's WordPress sites. LiteSpeed provides a centralized dashboard to scan and manage LSCache installations for all WordPress sites on the server.
From the plugin homepage, click Manage Cache Installations. Click Scan to check your complete server for existing and valid WordPress Installations.
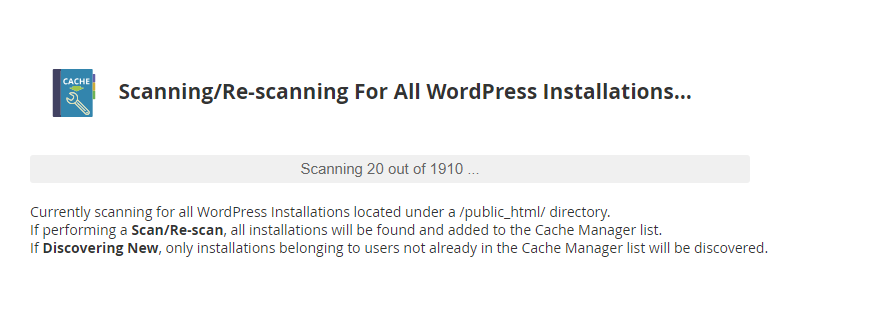
Give the scan a few minutes to complete. You might see some error messages at the bottom of the scan process, but you can safely ignore them as they are mostly about the WordPress installations which are not valid. (For example, databases that have not been configured or WordPress versions that are older than 4.0). LiteSpeed will automatically flag those installations and will not install the LSCache plugin on them.
Once the scanning is complete, click Mass Enable/Disable Cache, and click Start.
It might take a few minutes to complete, depending on the number of installations scanned in the previous step.
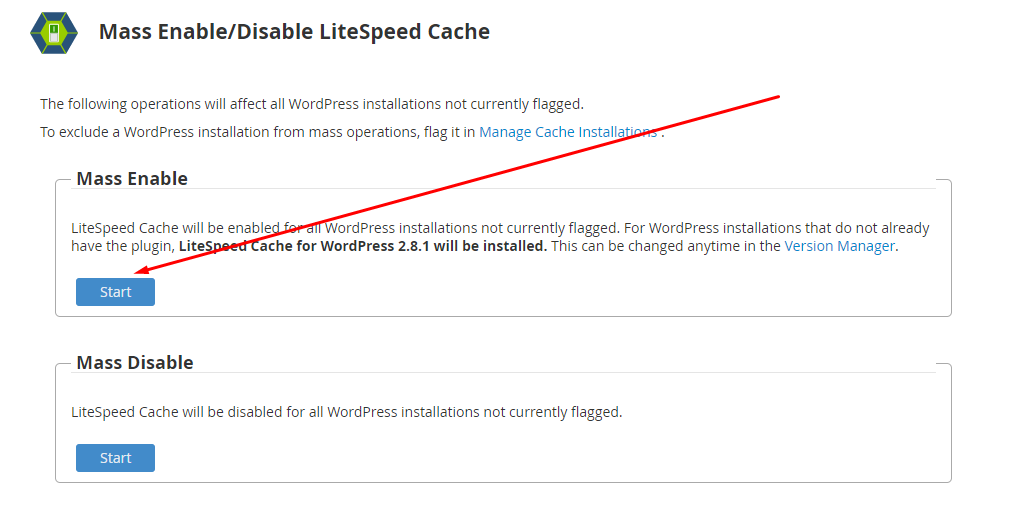
You might see some failed messages here as well for the websites that are already using other WordPress cache plugins. LSCache will not be installed for these sites, but you can manually contact your customers and let them know about the benefits of LiteSpeed Cache. For any other error messages refer to the lsws/log/webcachemgr.log file.
Verify LiteSpeed Web Server and LSCache are working
Now that installation and enablement process for your server has been completed, it's time to verify that your websites are running on LiteSpeed and that LSCache is working correctly on your WordPress websites.
Click List Accounts, open any customer's website, and check its headers, like so:
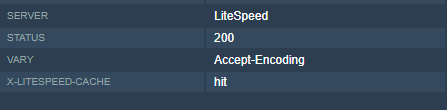
The headers should show Server as LiteSpeed and X-LiteSpeed-Cache as hit or miss.
The X-LiteSpeed Cache header will only be shown on websites which have LiteSpeed Cache enabled at that moment. Other websites will show Server as LiteSpeed only, and will continue to see the benefits of LiteSpeed Web Server, but it will be without caching.
Headers can be checked by using browser extensions or by using the Check LSCache tool.
Install cPanel user-end plugin (optional)
LiteSpeed also has a front-end cache management plugin for cPanel users. This allows hosting companies to provide a convenient cache management tool to their clients, and allows customers to manage all aspects of their website caching.
Click Install. Once complete, it will show you a success message.
You can make changes to your cPanel plugin's settings after installation using the Settings button on the plugin homepage. This will only show up after the cPanel plugin is installed successfully.
Set up WordPress discovery and cache installation (optional)
Once you're done with the installation phase, you can utilize our LiteSpeed Cache Manager tool. This allows you to automate the process of scanning for new WP installations, and enabling LSCache on those installations. The tool is located at /usr/local/lsws/admin/misc/lscmctl.
You can run it through cron, if you'd like to automate the process. Try one of the following commands:
- (Recommended) Scan for new installations and enable only for those newly discovered installations:
./lscmctl scannew -en - Scan for new installations and enable for all known installations (not just new ones):
./lscmctl scan -n -e
This tool will create an lscm.data file under the lsws/admin/lscdata directory.
Frequently asked questions
What if I see a failure message when I request a trial license during installation?
We track all licenses by Server IP. If your server has been given a trial license before, it won't be able to request another automatically. We will, however, reset it by request for eligible servers. To request another trial, please contact us.
What should I do if I see a timezoneDB error in my WHM Plugin?
The timezoneDB extension will improve your website's speed with LiteSpeed. You may see the following error in your WHM LiteSpeed Plugin:
Some pre-built EasyApache PHP installations may be missing the timezoneDB extension."
Click Resolve Now to install those extensions to matching PHPs.
If there is a timezoneDB extension update in the future, it may prompt you to update. Some users may prefer to set up a daily cron job to handle any timezoneDB extension updates, instead of using the web GUI. If that appeals to you, the following command may be used in the cron job:
0 0 * * * cd /usr/local/cpanel/whostmgr/docroot/cgi/lsws/ && ./buildtimezone.sh
Note
If using a LiteSpeed Plugin for WHM version below v4.1.11, replace ./buildtimezone.sh in the command above with ./buildtimezone_ea4.sh y. Please note that this older version of our script contains bugs that have since been corrected in ./buildtimezone.sh. If possible, we recommend updating your LiteSpeed plugin for WHM installation to at least v4.1.11 and using this newer script instead.
What should I do if I see "lvectl command not found" during installation?
There is nothing to worry about if you see this message during your installation process. It simply means that your cPanel/WHM installation is not on a CloudLinux-based server. However, if yours is a CloudLinux server and you still see this error, please create a ticket with us so that we can take a look.
Will LiteSpeed automatically sync all of my current and new domains?
LiteSpeed is a full-service drop-in replacement for Apache on cPanel servers. As a result, it will automatically pick up all of the domains hosted on your server. It will also work with any new domains without error.
Will LiteSpeed match all of my PHP installations?
Yes. LiteSpeed will build matching PHPs for all of the versions you have installed currently, and for any new versions you add with the same PHP extensions. In short, your Multi PHP Manager or PHP Selectors will work just fine with LiteSpeed.
Please note that as of LSWS 5.3.0, PHP auto-detection has been introduced, and detected PHP will not show up in the WebAdmin Console external app or script handler page. Learn more.
How do I troubleshoot errors with LiteSpeed Web Server?
If you see an error on your websites while using LiteSpeed, please refer to the Troubleshooting section.
How do I change my WebAdmin port?
Some services like Bitninja also use TCP 7080, which is LiteSpeed WebAdmin Console's default port. Without it, LiteSpeed will not start. If 7080 is assigned to another service, you can change WebAdmin's port like so: Open /usr/local/lsws/admin/conf/admin_config.xml using your preferred editor. Change the value of Listener from 7080 to your desired available port.
Which workers should I install on EasyApache for LiteSpeed?
LiteSpeed Web Server supports mpm_worker or mpm_event. Any other MPMs are not recommended.
Do I need the PHP-FPM setting in WHM?
LiteSpeed only uses LSPHP + LSAPI to run PHP on cPanel/WHM, which is much faster than any other methods of executing PHP. It is not possible to change the PHP handler setting while using LiteSpeed Web Server on cPanel/WHM. This value is ignored when running LiteSpeed.
How do I change the LiteSpeed WebAdmin Console password?
Run the following commands to change LiteSpeed WebAdmin Console password:
cd /usr/local/lsws/admin/misc
./admpass.sh
How do I add the LSCache plugin to WordPress websites that were left out during installation?
You can re-run the step, if you wish to mass-enable the plugin on the WordPress installations which were left out. Or you may install the plugin in the site's WordPress Dashboard directly from the WordPress Plugin Directory.
How do I install LiteSpeed Cache extensions on other CMSes?
LiteSpeed Cache supports various other CMSes, like Joomla and Drupal. Please visit our LSCache documentation for more information on the CMSes supported by LiteSpeed, and for instructions for downloading and installing each.
How do I utilize LiteSpeed Cache on CMSes where no plugin exists?
Please check out our documentation for using LSCache without a plugin.
What happens if my LiteSpeed license Domain/RAM limit is crossed, or if my license expires?
In a case where your LiteSpeed license is deemed invalid (due to exceeding limits or reaching the expiration date), your system will automatically switch to Apache. (This is true as of LSWS v5.3.5)
Which license should I choose?
See our licensing documentation for a complete guide to choosing a license. You can upgrade or downgrade your license at any time.