PHP Extensions
Warning
If you are using a control panel, then the following document will not be helpful. We honor how control panels handle PHP extensions.
- cPanel: EasyApache 4
- Plesk: PHP Settings
- CloudLinux: PHP Selector
- DirectAdmin: CustomBuild 2.0
PECL
Overview
PECL is a repository for PHP extensions, providing a directory of all known extensions and hosting facilities for downloading and developing PHP extensions. You may need a certain PHP PECL extension to get the application working. This guide explains how to install PECL extensions for native LSWS installs. For cPanel installs, please refer to this ‘PHP PECL’ article.
There are several ways to get a PHP PECL extension installed:
- LiteSpeed repository
- The PEAR package manager
- Source code
Note
If you have not already set up our repository on your system, you can learn how to do that in our ‘Getting Started | PHP’ article. Please be sure to do this before proceeding. Also, be mindful that there are some differences in CentOS and Debian/Ubuntu’s package names so that they are more in line with their individual distributions’ packages.
Install
LiteSpeed repository
We offer some of the more popular PECL extensions right in our own CentOS or Debian/Ubuntu repositories.
The extensions we currently offer are:
- APCu
- Igbinary
- Imagick
- Memcached
- Msgpack
- Redis
If the extension is not in our repository, you can send a request to support@litespeedtech.com requesting its inclusion, and we will evaluate the possibility of adding it.
To install a PECL extension via a repository, type one of the following commands into a terminal, depending on your distribution:
sudo dnf install lsphpXX-pecl-PECL_NAME
sudo apt install lsphpXX-PECL_NAME
Info
Be sure to replace XX with the specific PHP version and PECL_NAME with the PECL extension you wish to install.
Once completed, please skip ahead to the Finish section.
The PEAR package manager
Another way to install a PECL extension is by using PECL, which is supplied by PEAR.
Install PEAR/PECL by running one of the following inside a terminal:
sudo dnf install lsphpXX-pear
sudo apt install lsphpXX-pear
sudo cd /usr/local/lsws/lsphpXX/bin
wget http://pear.php.net/go-pear.phar
sudo ./php go-pear.phar
sed -i -e 's/-C -n/-C/g' ./pecl
Install the necessary PECL extension by running the following command inside a terminal:
sudo /usr/local/lsws/lsphpXX/bin/pecl install PECL_NAME
Once completed, please skip ahead to the Configure section.
Source code
The PECL extensions can also be compiled and installed from source code.
In the following examples, we will install the PECL extension, Imagick, for LSPHPXX. We will install the necessary packages first, and then do the compilation.
Type the following code blocks for your specific distribution into the terminal in order to install the necessary build packages:
sudo dnf install epel-release # Installs the Extra Packages for Enterprise Linux Repo
sudo dnf install gcc gcc-c++ make autoconf glibc rcs # Installs needed compilation packages
sudo dnf install lsphpXX-devel # Installs the LSPHP devel package
sudo dnf install ImageMagick-devel # Installs the ImageMagick-devel package
sudo apt-get install libmagickwand-dev pkg-config build-essential # Installs needed compilation packages
sudo apt-get install lsphpXX-dev # Installs the LSPHP dev package
After the build packages are installed, the next step is to compile Imagick. Run the following in a terminal:
wget https://pecl.php.net/get/imagick-3.7.0.tgz
tar -zxvf imagick-3.7.0.tgz
cd imagick-3.7.0
sudo /usr/local/lsws/lsphpXX/bin/phpize
./configure --with-imagick=/usr/local/lsws/lsphpXX --with-php-config=/usr/local/lsws/lsphpXX/bin/php-config
make
sudo make install
Once completed, please skip ahead to the Configure section.
Configure
The Imagick extension is now installed to the following directories:
Installing shared extensions:     /usr/local/lsws/lsphpXX/lib64/php/modules/
Installing header files:          /usr/local/lsws/lsphpXX/include/php/
Installing shared extensions:     /usr/local/lsws/lsphpXX/lib/php/XXXXXXXX/
Installing header files:          /usr/local/lsws/lsphpXX/include/php/
Next, load the PECL extension via an .ini file.
sudo echo "extension=imagick.so" >> /usr/local/lsws/lsphpXX/etc/php.d/40-imagick.ini
sudo echo "extension=imagick.so" >> /usr/local/lsws/lsphpXX/etc/php/X.X/mods-available/40-imagick.ini
Finish
Once everything is installed and loaded, restart PHP and the web server.
sudo touch /usr/local/lsws/admin/tmp/.lsphp_restart.txt
sudo systemctl restart lsws
When checking a phpinfo.php page, it should now show the PECL extension, Imagick, as enabled.
Info
You can follow a similar procedure with other LSPHP versions and PECL extensions.
cURL
Sometimes the lsphp-curl package does not contain the latest cURL. If this is the case, you can manually compile the cURL extension with the latest version.
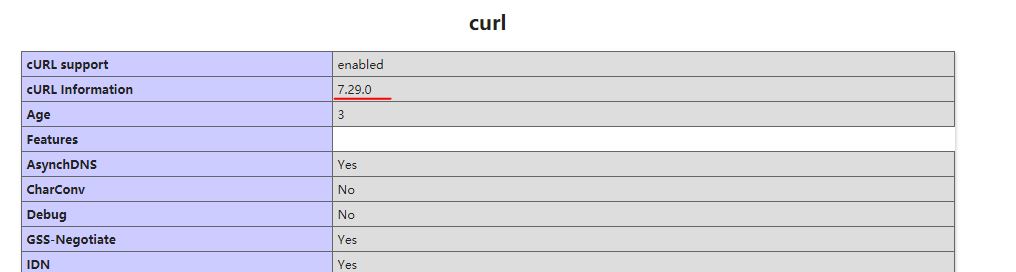
The PHPinfo page in the screenshot above reveals the currently installed cURL version is 7.29.0, but certain applications may require a higher version in order to work properly.
Install the latest cURL
Run the following commands:
rpm -ivh http://www.city-fan.org/ftp/contrib/yum-repo/city-fan.org-release-3-6.rhel7.noarch.rpm
yum-config-manager --enable city-fan.org
yum clean all
yum update
Check the cURL version
Run the following command:
curl -V
You should see output similar to this:
curl 7.69.1 (x86_64-redhat-linux-gnu) libcurl/7.69.1 NSS/3.44 zlib/1.2.7 libpsl/0.7.0 (+libicu/50.1.2) libssh2/1.9.0 nghttp2/1.31.1
Release-Date: 2020-03-11
Protocols: dict file ftp ftps gopher http https imap imaps ldap ldaps pop3 pop3s rtsp scp sftp smb smbs smtp smtps telnet tftp
Features: AsynchDNS GSS-API HTTP2 HTTPS-proxy IPv6 Kerberos Largefile libz Metalink NTLM NTLM_WB PSL SPNEGO SSL UnixSockets
Download the PHP source code
In this example, we use PHP 7.4 and compile the extension from source:
wget https://www.php.net/distributions/php-7.4.33.tar.gz
tar xzvf php-7.4.33.tar.gz
cd php-7.4.33/ext/curl
/usr/local/lsws/lsphp74/bin/phpize
./configure --with-php-config=/usr/local/lsws/lsphp74/bin/php-config --with-curl=/usr/bin
make
make install
Restart and verify
Restart LSPHP with the pkill lsphp command, if necessary, and check the PHPinfo page again.
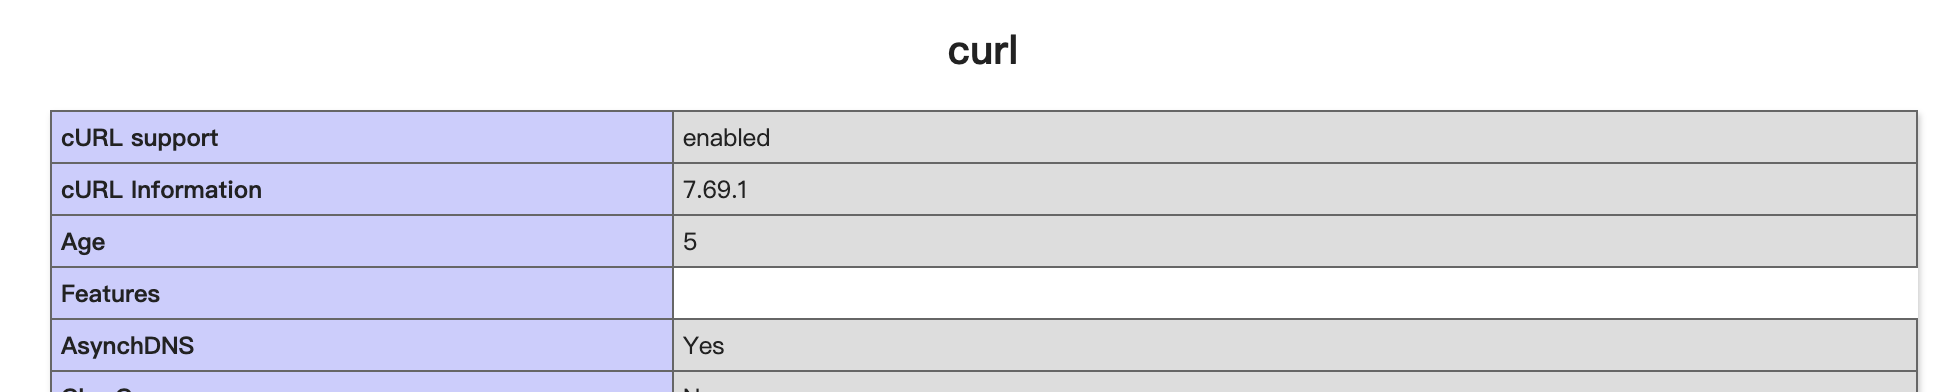
In this example, the screenshot shows cURL version 7.69.1 is installed.
Imagick
Sometimes the lsphp-imagick package does not contain the latest features. If this is the case, you can manually compile the extension to the latest version.
Compile libwebp
Run the following commands:
dnf install libjpeg-devel libpng-devel libtiff-devel giflib-devel -y
wget https://github.com/webmproject/libwebp/archive/refs/tags/v1.6.0.tar.gz
tar xzvf v1.6.0.tar.gz
cd libwebp-1.6.0
./configure
make
make install
Compile Imagick with WebP support
Run the following commands:
wget https://imagemagick.org/download/ImageMagick.tar.gz
tar xzvf ImageMagick.tar.gz
cd ImageMagick*
./configure --with-webp=yes
make
make install
Compile PHP extension
As Imagick requires a lot of dependencies, use the following commands to install it, and then upgrade it:
wget http://pecl.php.net/get/imagick
tar xzvf imagick
cd imagick-*
/usr/local/lsws/lsphp85/bin/phpize
./configure --with-php-config=/usr/local/lsws/lsphp85/bin/php-config
make
make install
Restart the LSPHP process if necessary.
ionCube
ionCube Loader is sometimes needed when using encoded and secure PHP files. This section will show you how to enable it for LSPHP.
Repository
Note
If you have not already set up our repository on your system, you can find out how to do that in our ‘Getting Started | PHP’ article. Please be sure to do this before proceeding. Also, be mindful that there are some differences in CentOS and Debian/Ubuntu’s package names so that they are more in line with their individual distributions’ packages.
To install ionCube via the repository, run the following in a command prompt:
sudo dnf install lsphpXX-ioncube
sudo apt install lsphpXX-ioncube
Manual
-
Download ionCube by running:
wget https://downloads.ioncube.com/loader_downloads/ioncube_loaders_lin_x86-64.tar.gz -
Extract the package by running:
tar -xf ioncube_loaders_lin_x86-64.tar.gz -
Move the needed
.sofile by running:sudo cp ioncube/ioncube_loader_lin_X.X.so /usr/local/lsws/lsphpXX/lib64/php/modules/ioncube.sosudo cp ioncube/ioncube_loader_lin_X.X.so /usr/local/lsws/lsphpXX/lib/php/XXXXXXXX/ioncube.so -
Now, enable the extension by running:
sudo echo "extension=ioncube.so" >> /usr/local/lsws/lsphpXX/etc/php.d/01-imagick.inisudo echo "extension=ioncube.so" >> /usr/local/lsws/lsphpXX/etc/php/X.X/mods-available/01-imagick.ini -
Restart PHP in order for the changes to take effect.
sudo touch /usr/local/lsws/admin/tmp/.lsphp_restart.txt
sudo systemctl restart lsws
Note
Be sure to replace XX and X.X with the PHP version for which you want to install ionCube.